Help Center
Everything you need to know about managing your courses, registrations, and payments with ClassManager.pro.
Dashboard
The Dashboard is the first page you see when you log in. It gives you a quick overview of how your courses are performing with key metrics at a glance.
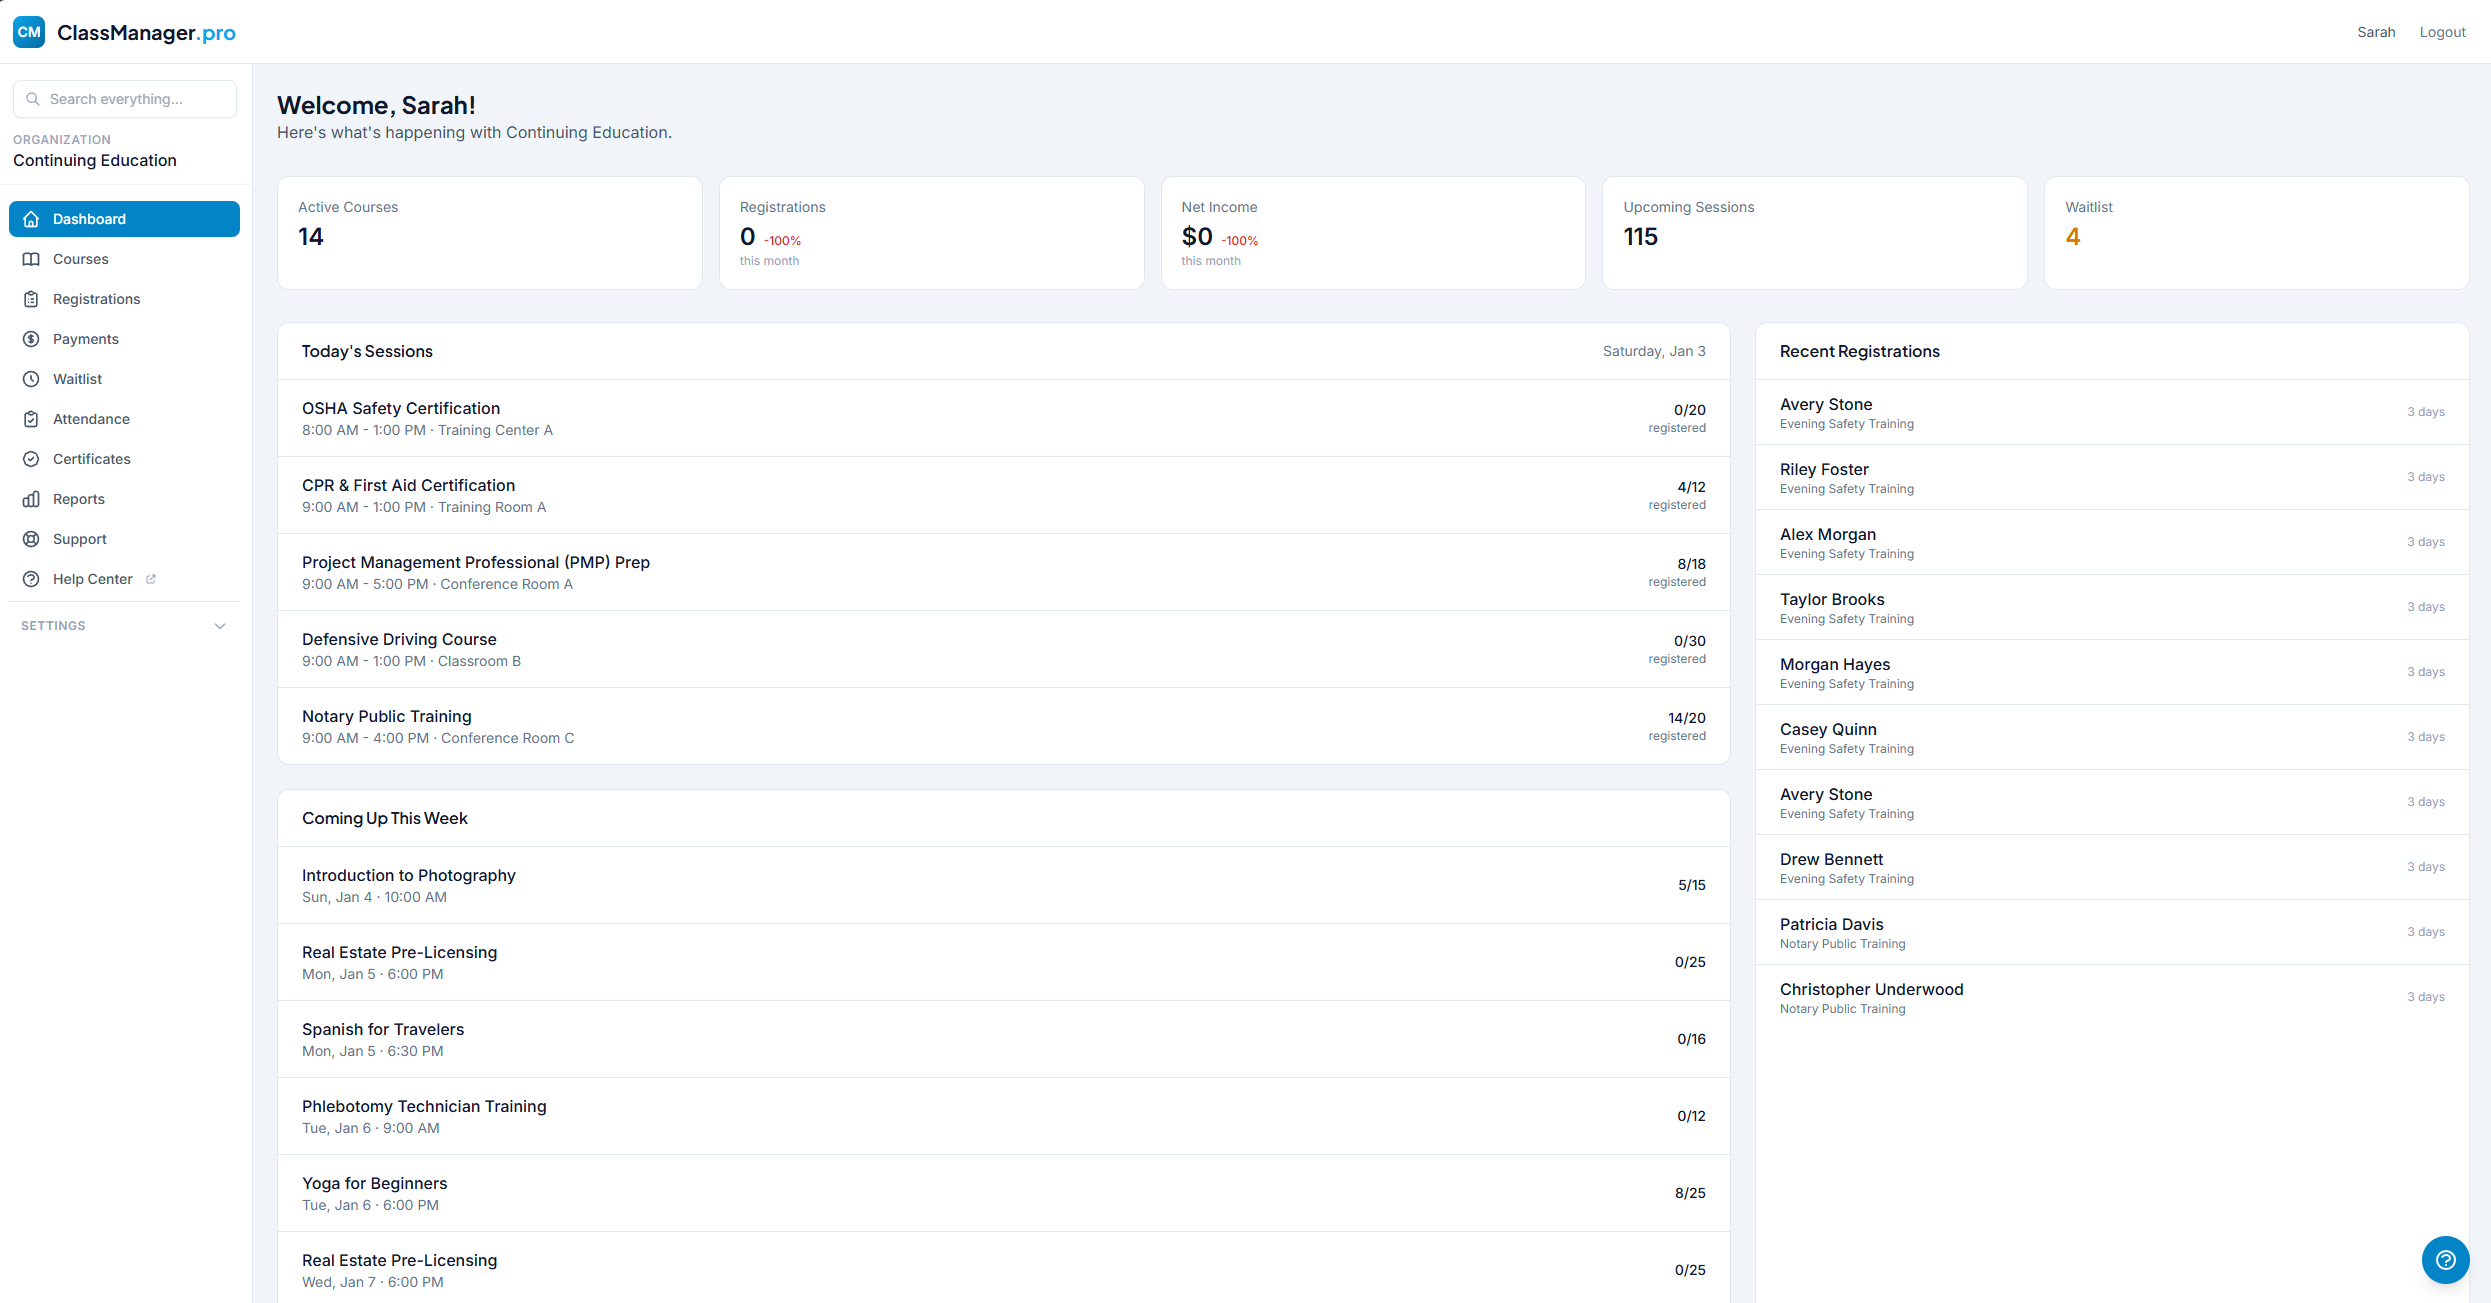

Quick Stats Cards
The top row shows clickable stat cards that link to their respective sections:
- Active Courses — Published courses with upcoming sessions
- Registrations This Month — Pre-filtered view (click to view list)
- Net Income This Month — Pre-filtered view (click to see transactions)
- Waitlist Count — People waiting for spots to open
Analytics Cards
- Net Income This Month — Revenue with month-over-month change and a 30-day trend chart. Visible to Owners and Managers only.
- Registration Trend — Registration count with 8-week bar chart showing trends.
Quick Actions
The sidebar shows common actions based on your role:
- New Course — Create a new course or class series
- Manage Waitlist — See students waiting for a spot
- Run Reports — Generate, filter, view, and export data
- Embed Code — Change branding and get calendar code for your website
- Stripe Dashboard — View payments in Stripe (Owners only)
Setup Checklist
If your setup isn't complete, you'll see a checklist at the top prompting you to connect Stripe, create your first course, or embed your calendar.
Courses
The Courses page is your control center for all classes. View, create, edit, and manage every course you offer.
Course List
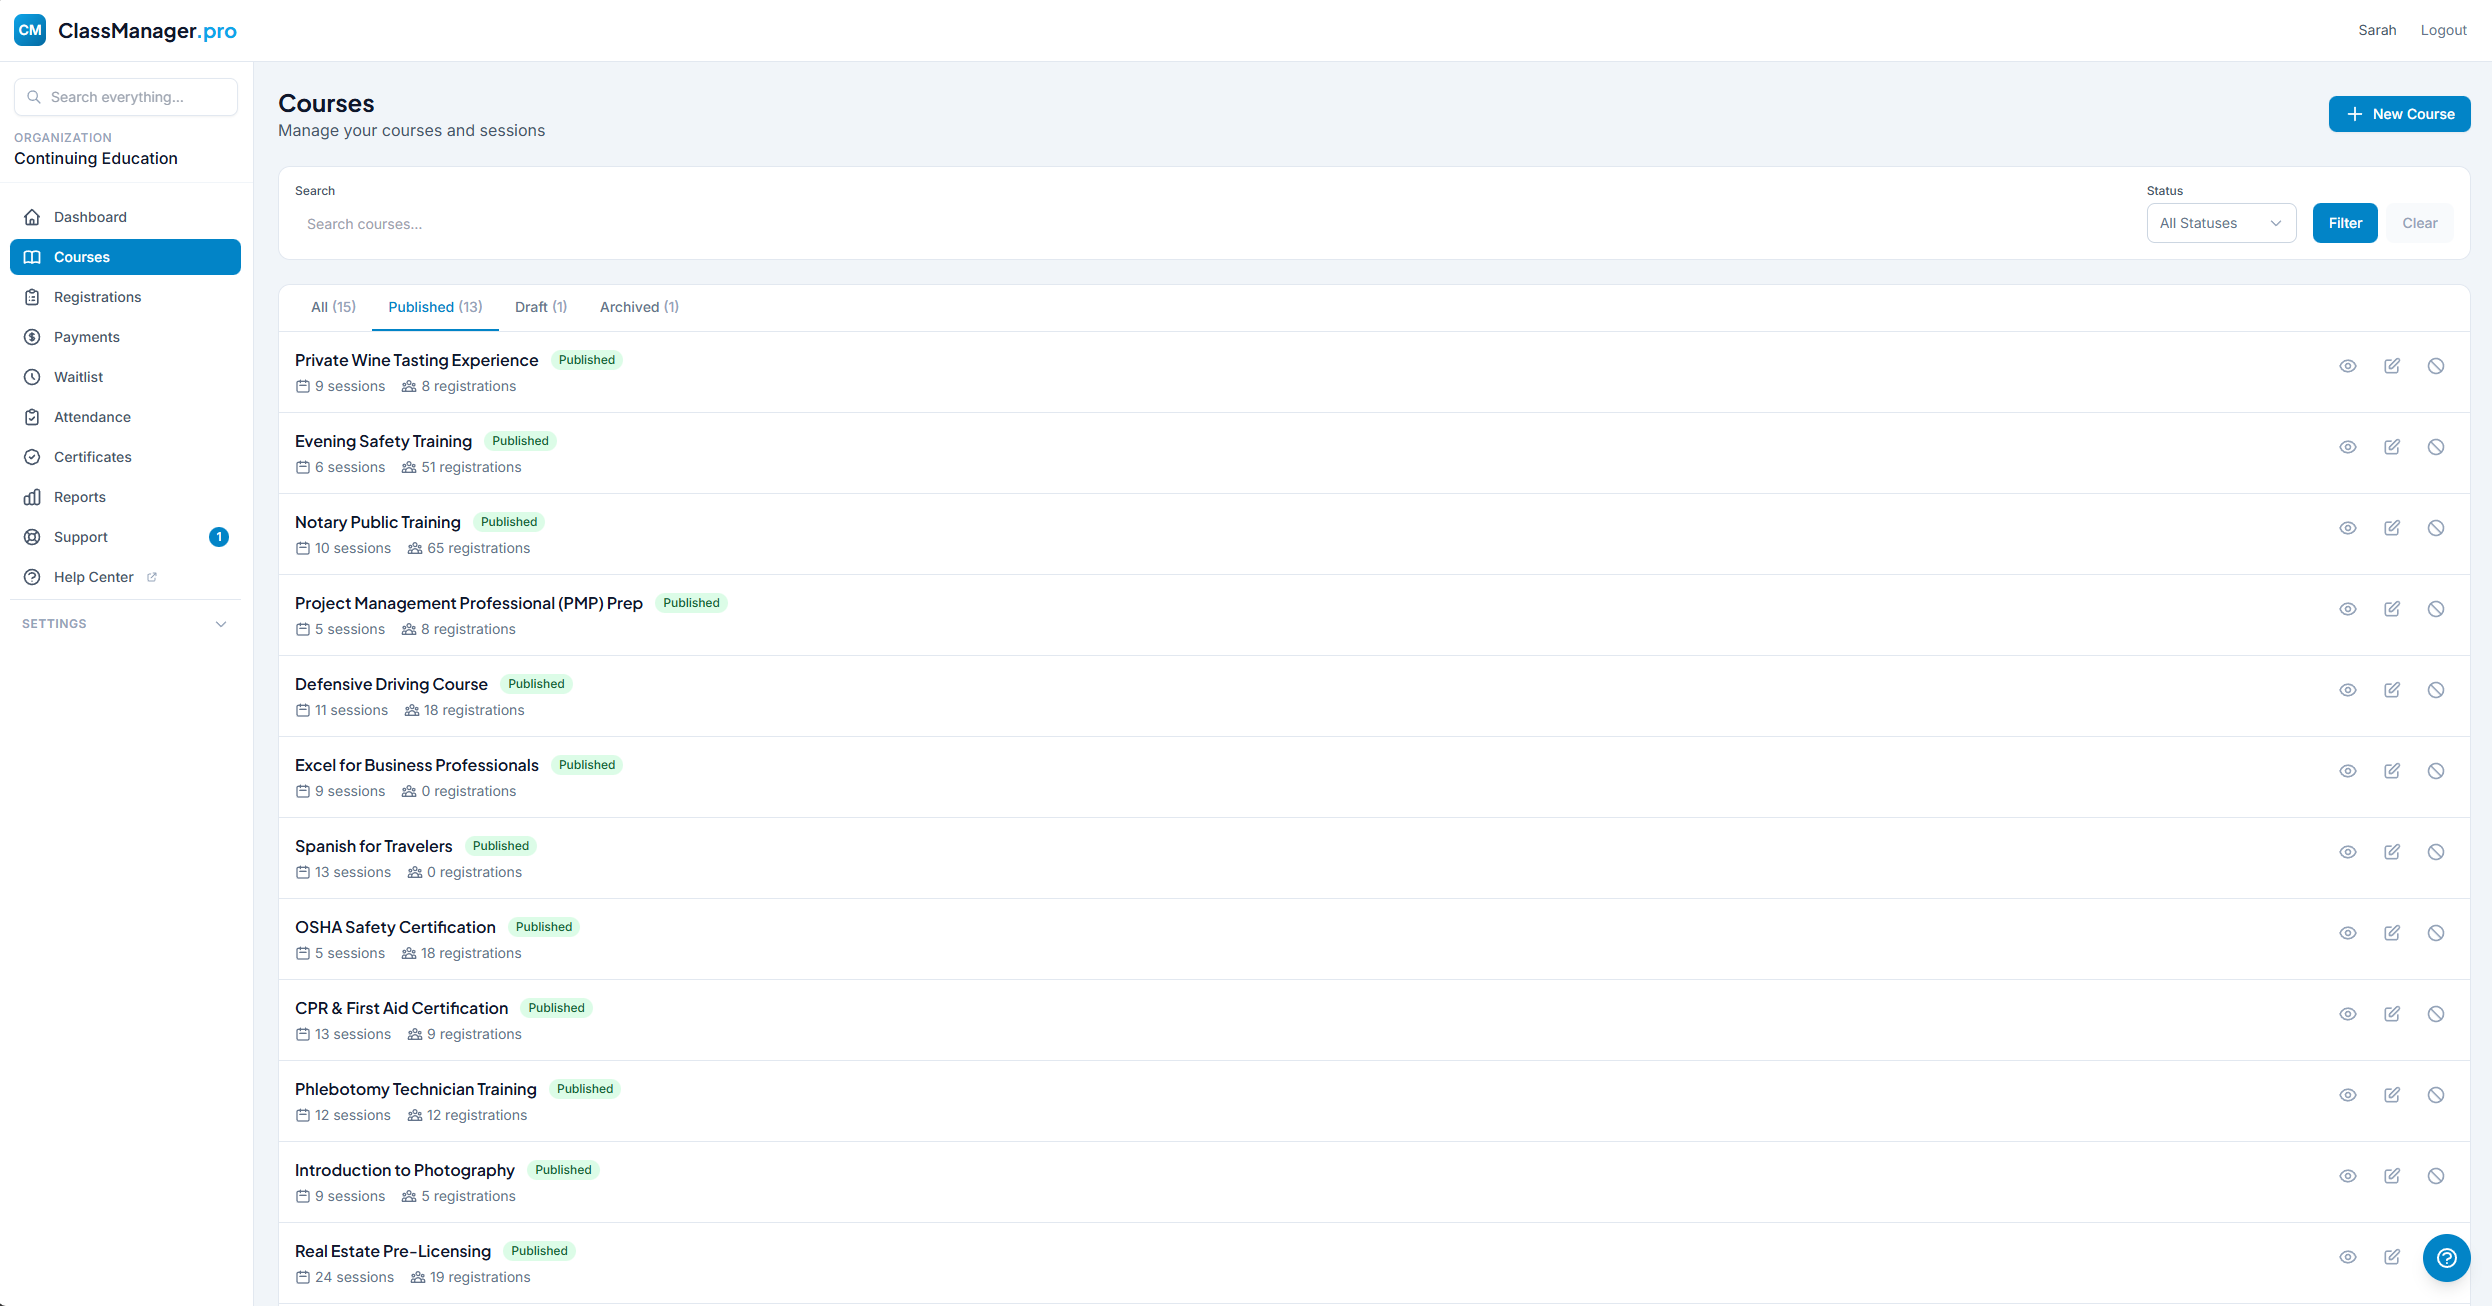
Filter & Search: Use the filter bar to quickly find courses by title, instructor, location, or status (All, Published, Draft, or Archived).
Status Badges:
The blue "Tracking" badge appears when attendance tracking is enabled for a course.
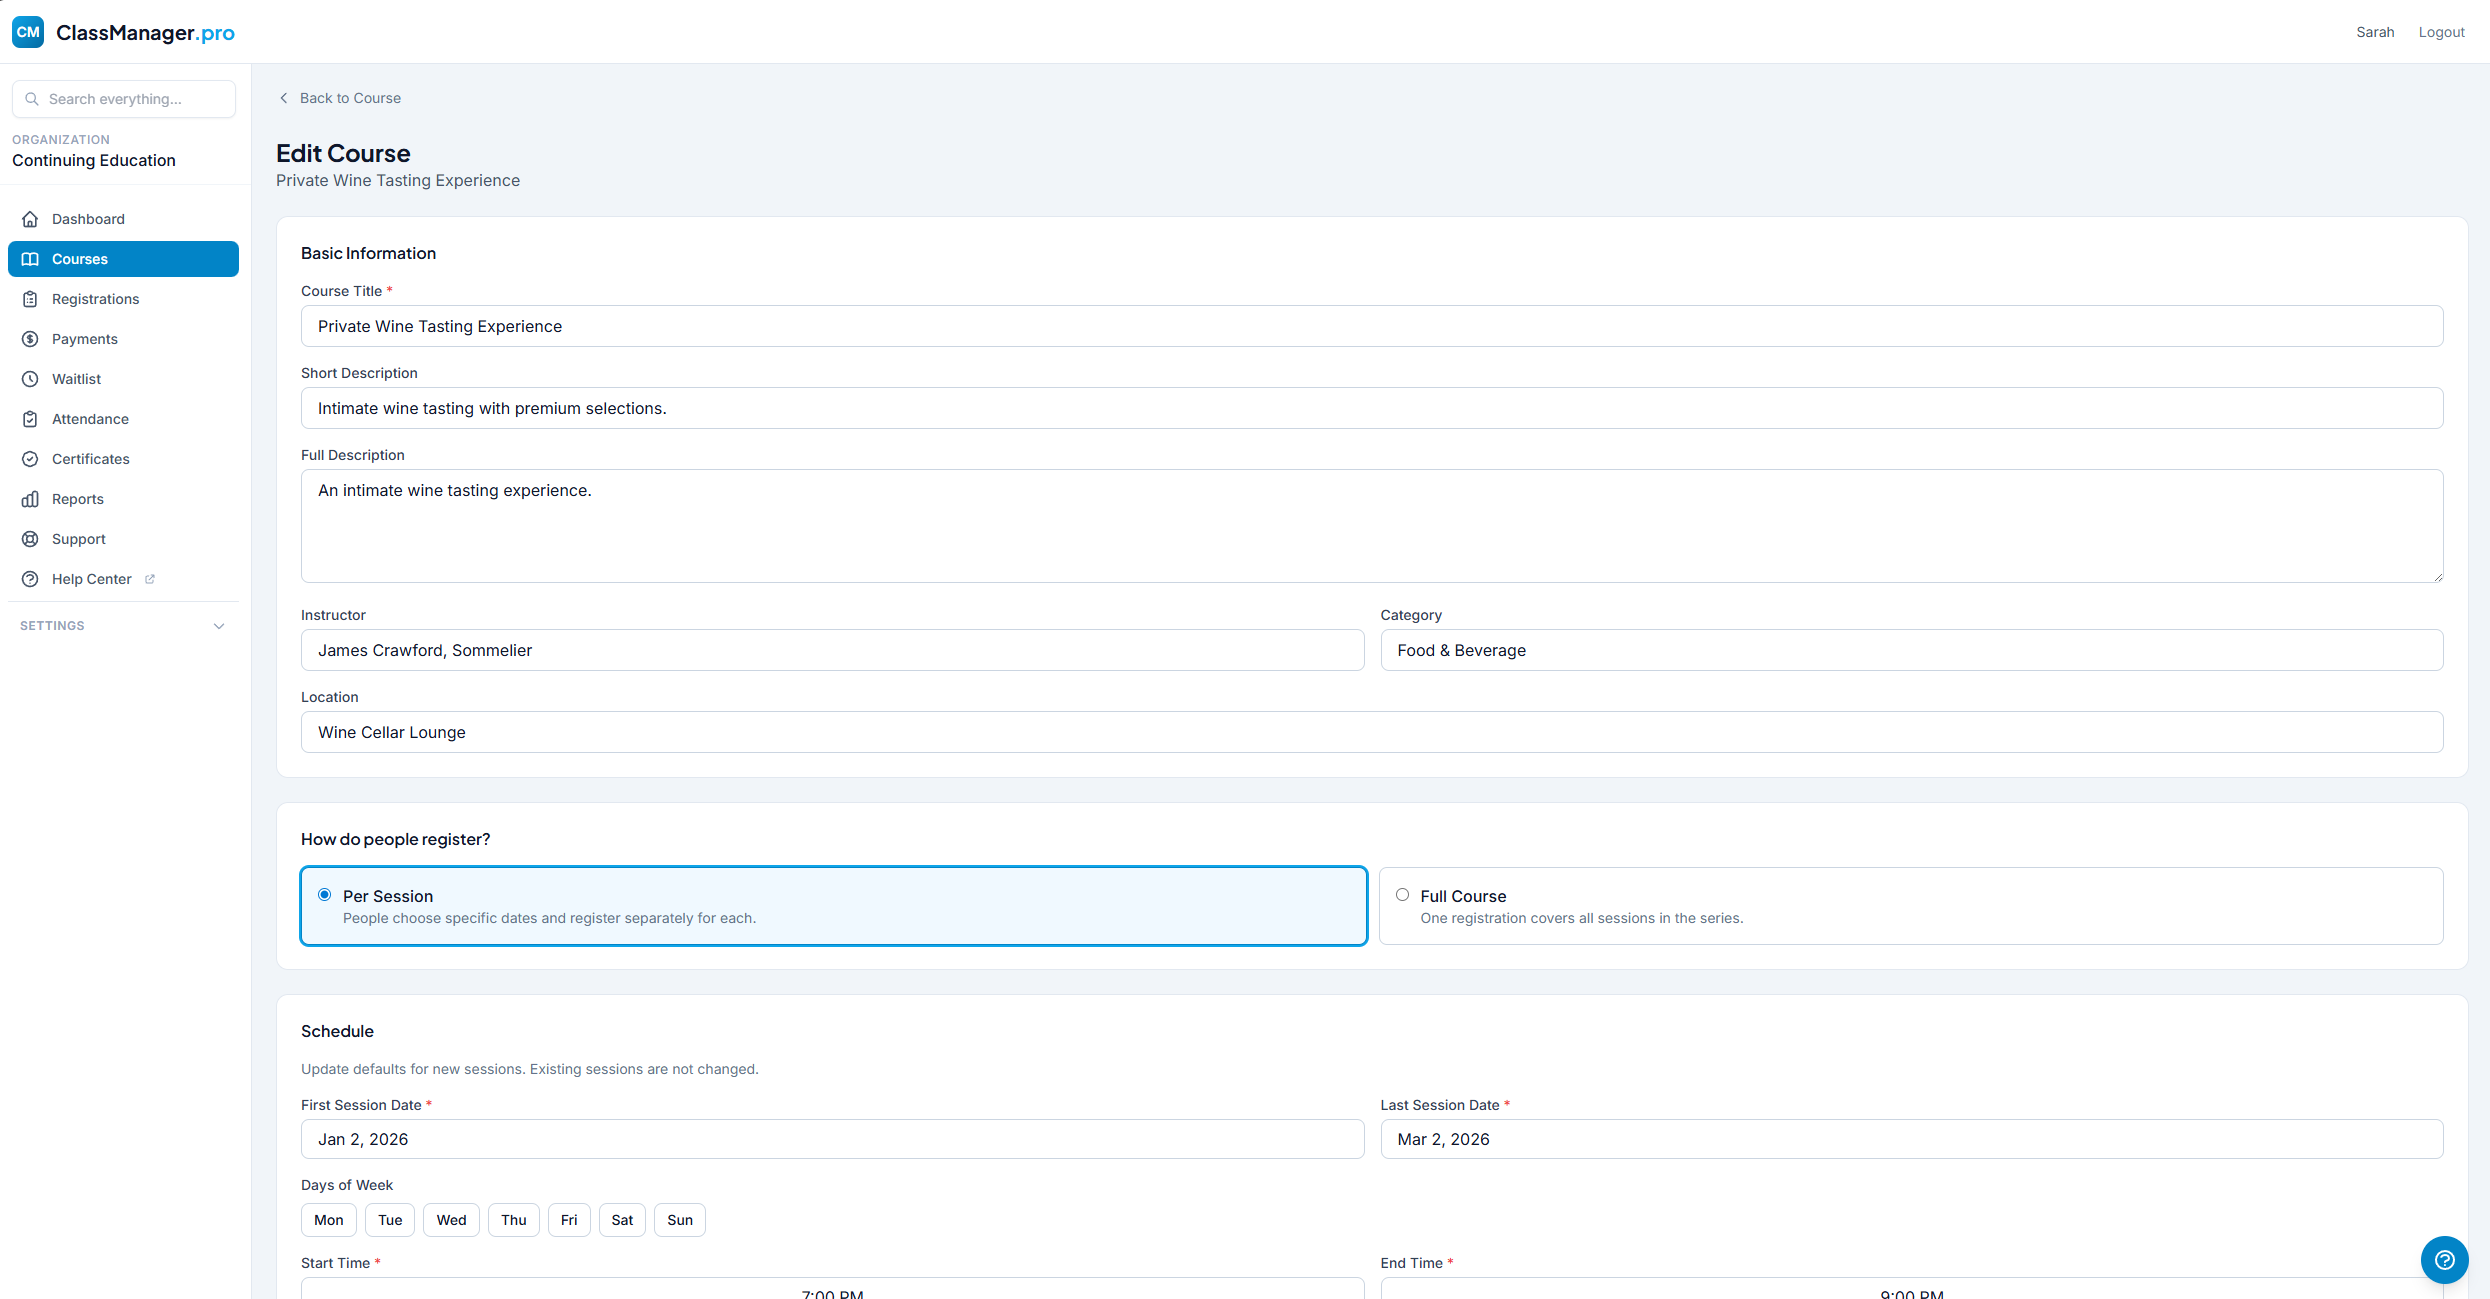
Creating a Course
Click the + New Course button to start. You'll configure several sections:
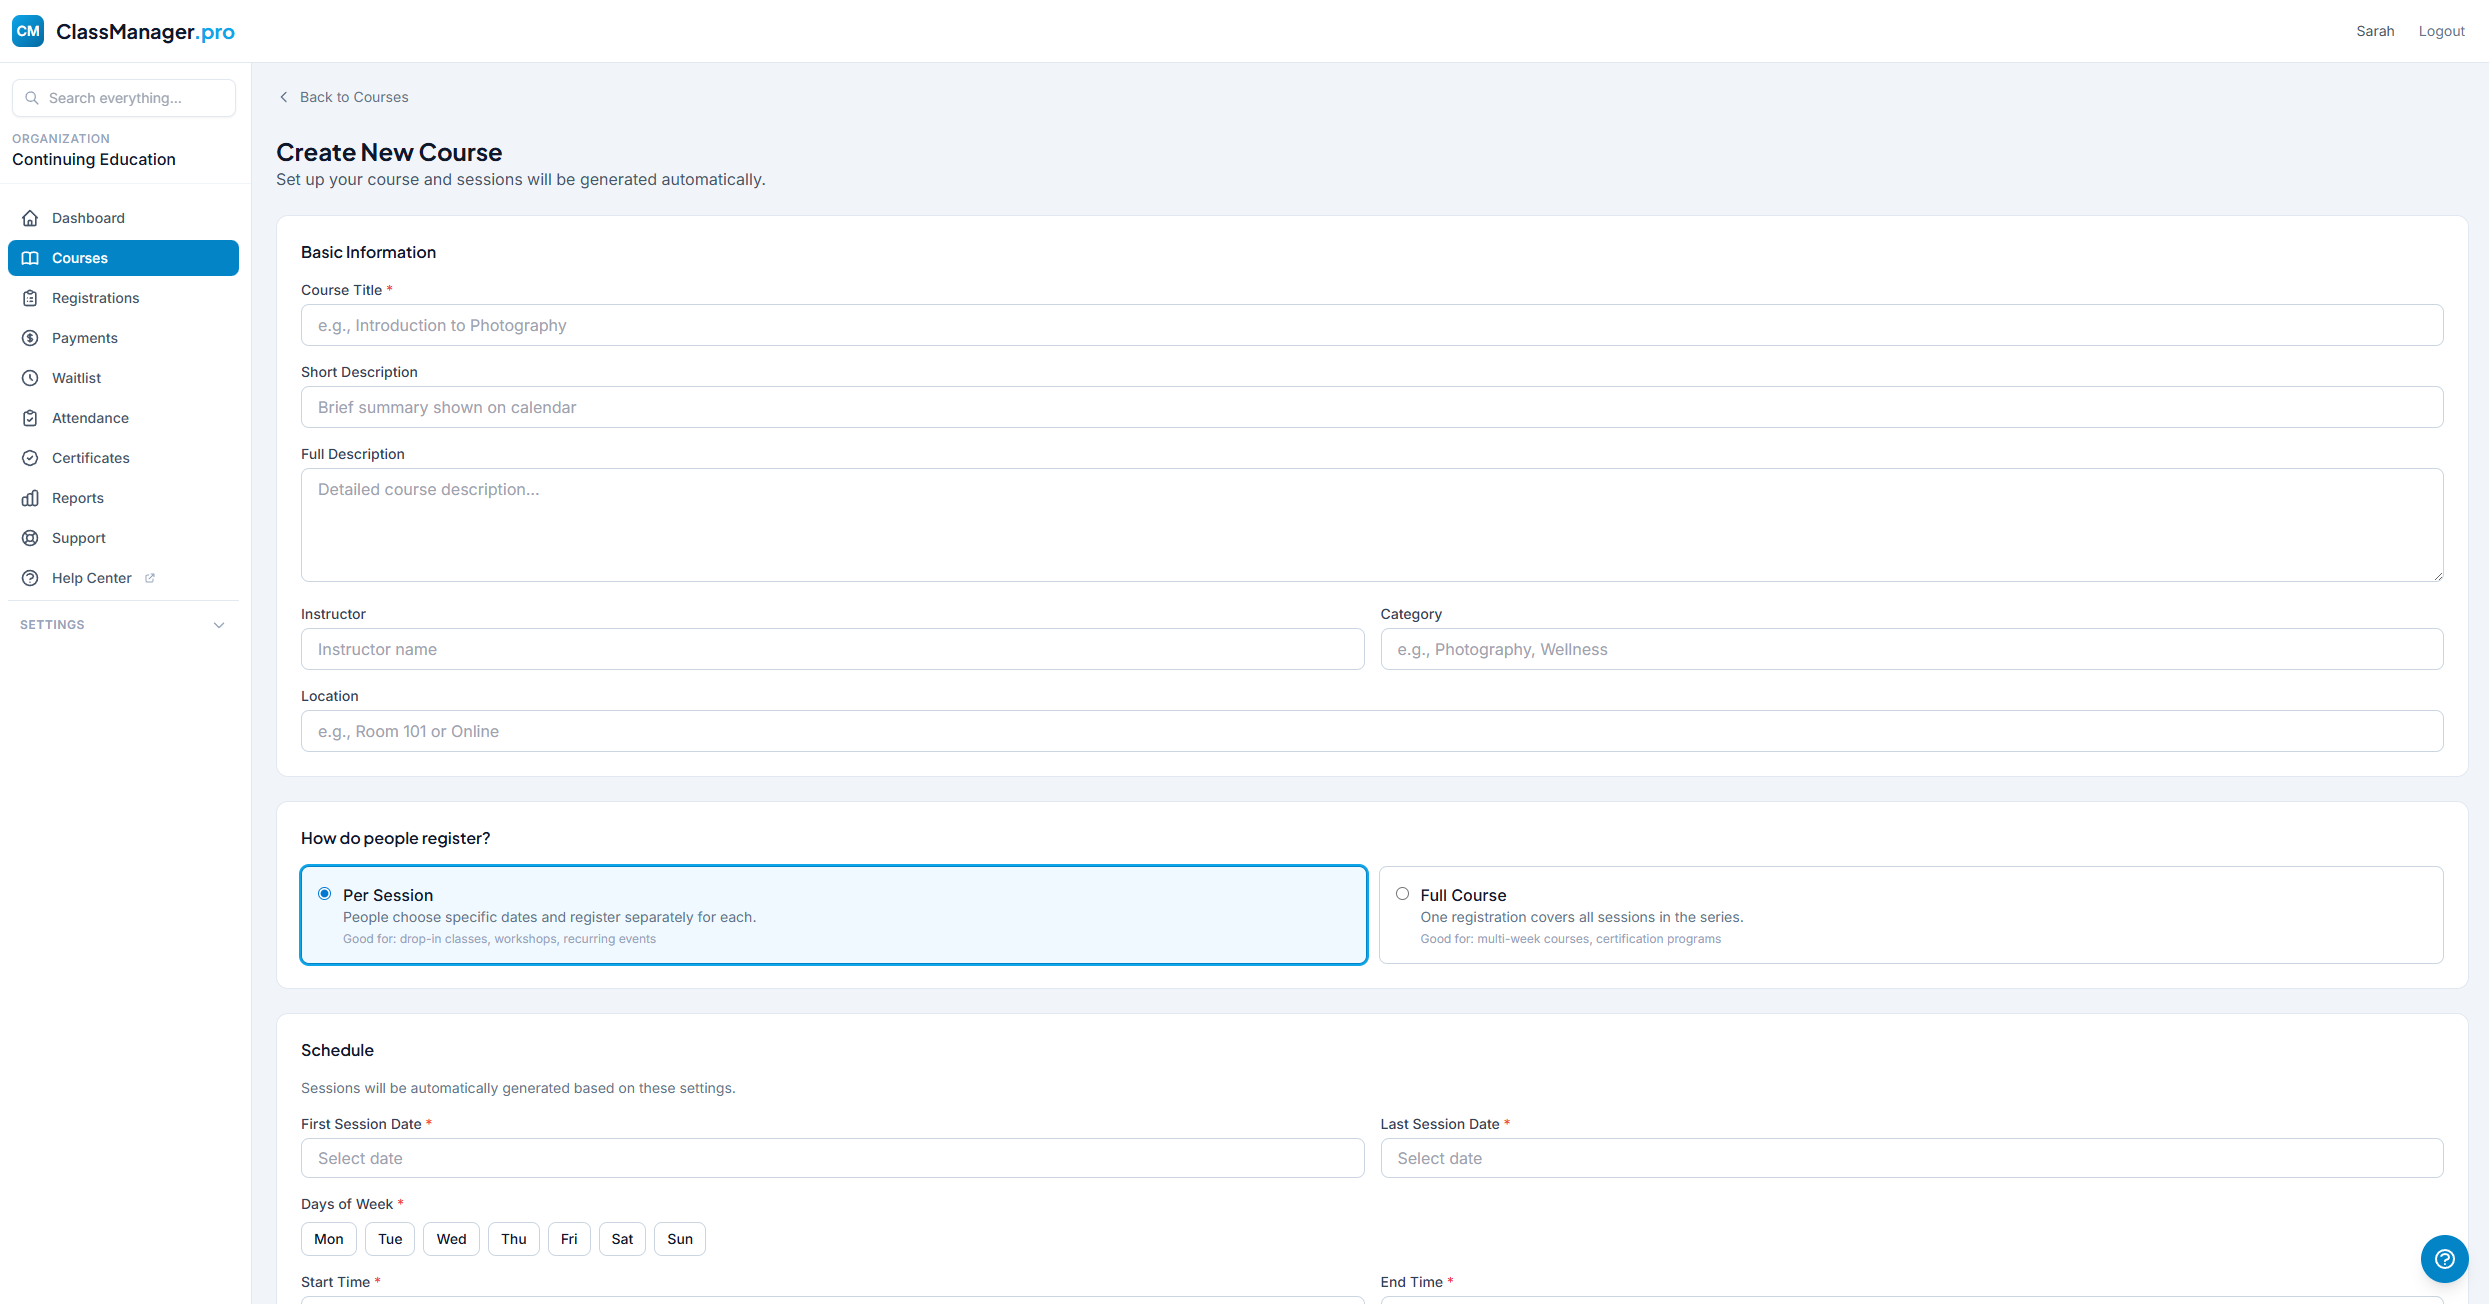
Course Setup Sections
- Basic Information
- Title (required), short description (shown on calendar), full description, instructor, category, and location.
- Registration Type
- Per Session: Students choose specific dates. Full Course: One registration covers all sessions.
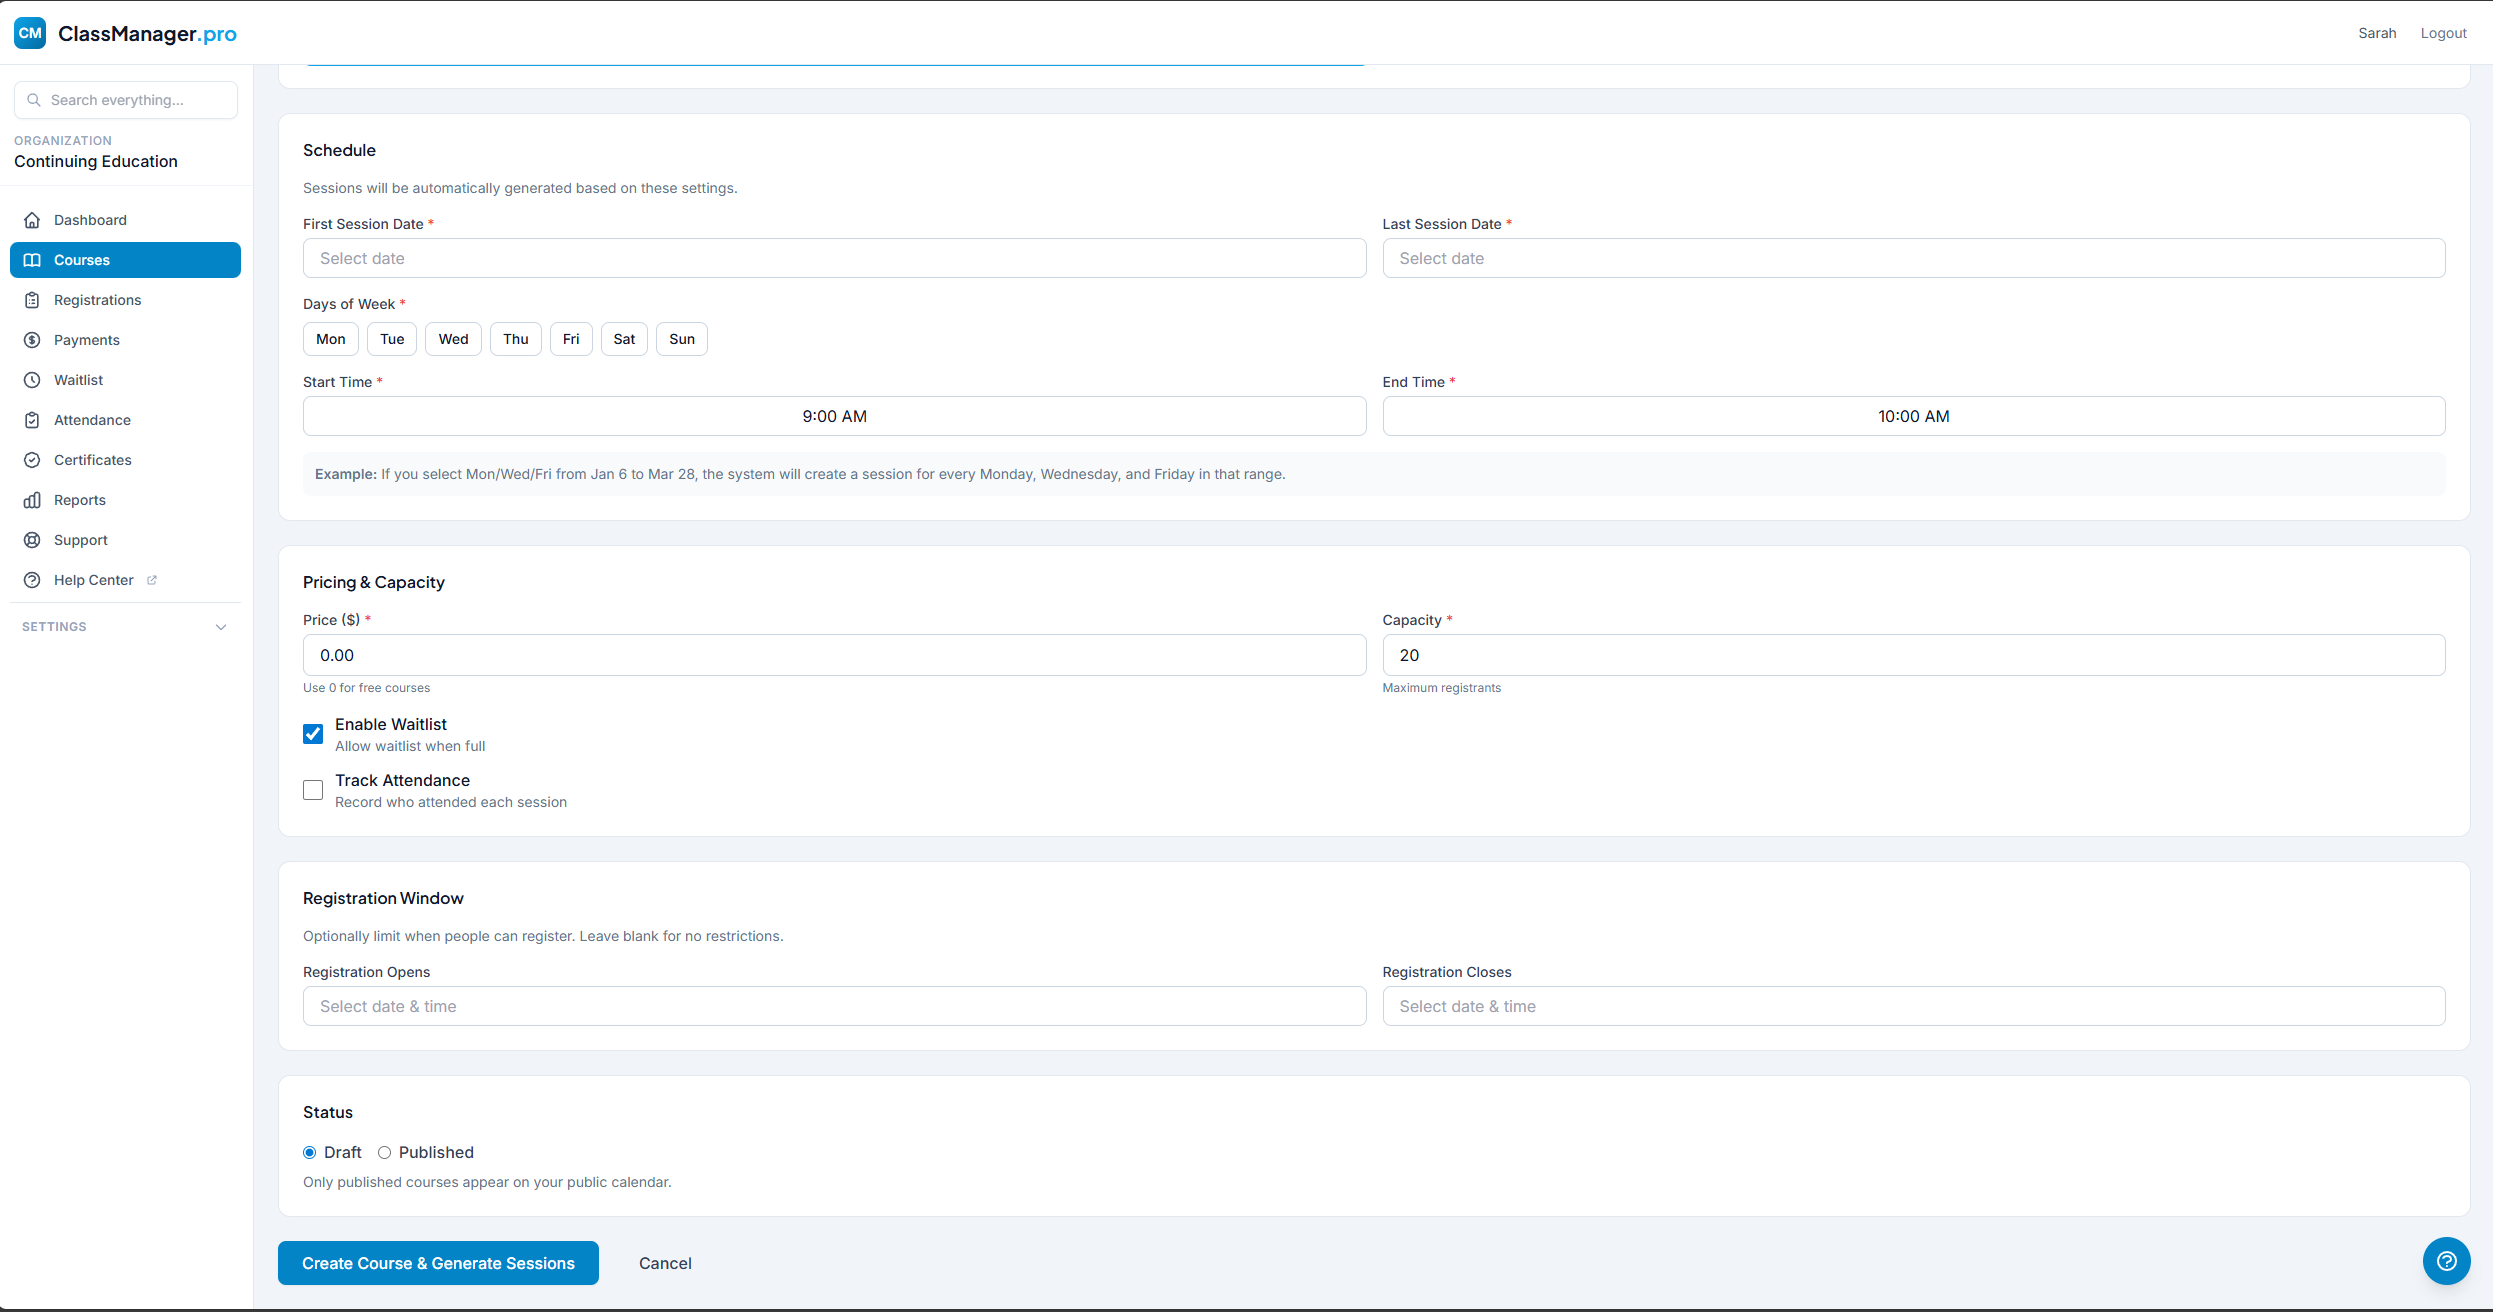
- Schedule
- First/Last session dates, days of the week, default times. Sessions are generated automatically.
- Pricing & Capacity
- Set price and max students per session. Toggle waitlist and attendance tracking.
- Registration Window
- Optional open/close dates to control when students can register.
- Status
- Draft: Only visible to admins. Published: Visible on public calendar.
Course Details View
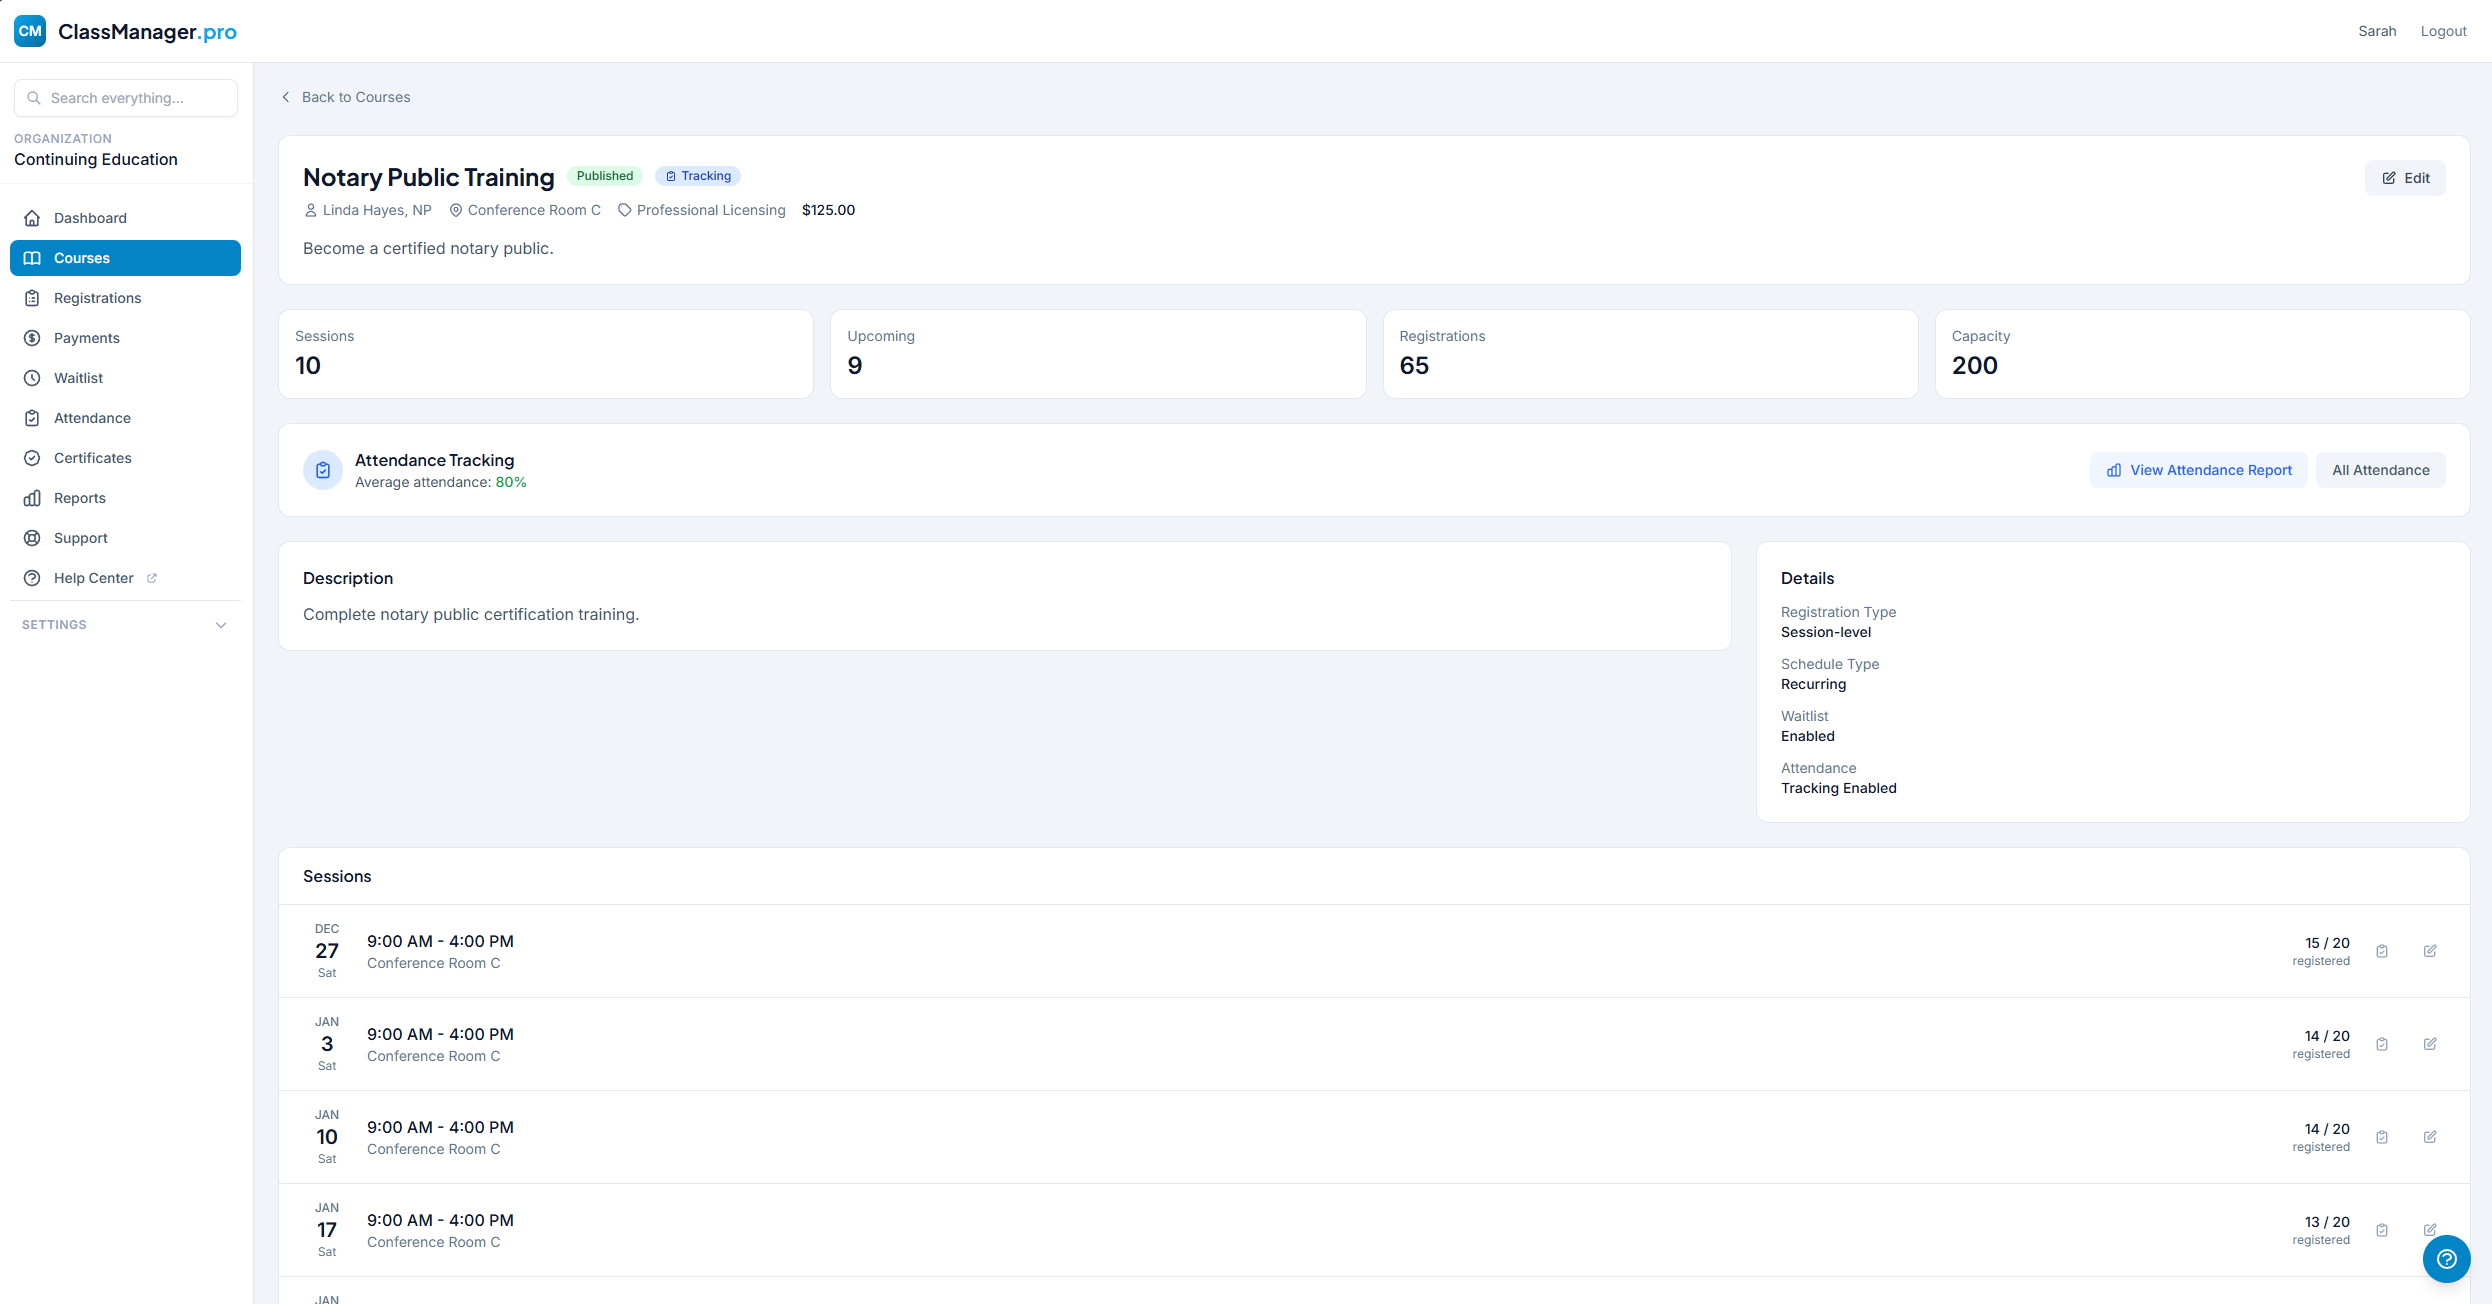
The course details page shows:
- Stats Cards — Sessions count, upcoming sessions, total registrations, and capacity. Clickable.
- Attendance Card — If tracking is enabled, shows average attendance with color-coded indicator.
- Sessions List — All sessions with date, time, location, registration count, and actions.
Editing & Cancelling
| Action | Description |
|---|---|
| Edit Course | Update title, description, pricing, etc. Changes apply to future behavior only. |
| Regenerate Sessions | Only available if no registrations exist. Deletes existing sessions and creates new ones. |
| Cancel Series | Cancels all sessions, notifies registrants, archives the course. Type "CANCEL" to confirm. |
| Delete Course | Permanently removes the course. Only available if there are no registrations. |
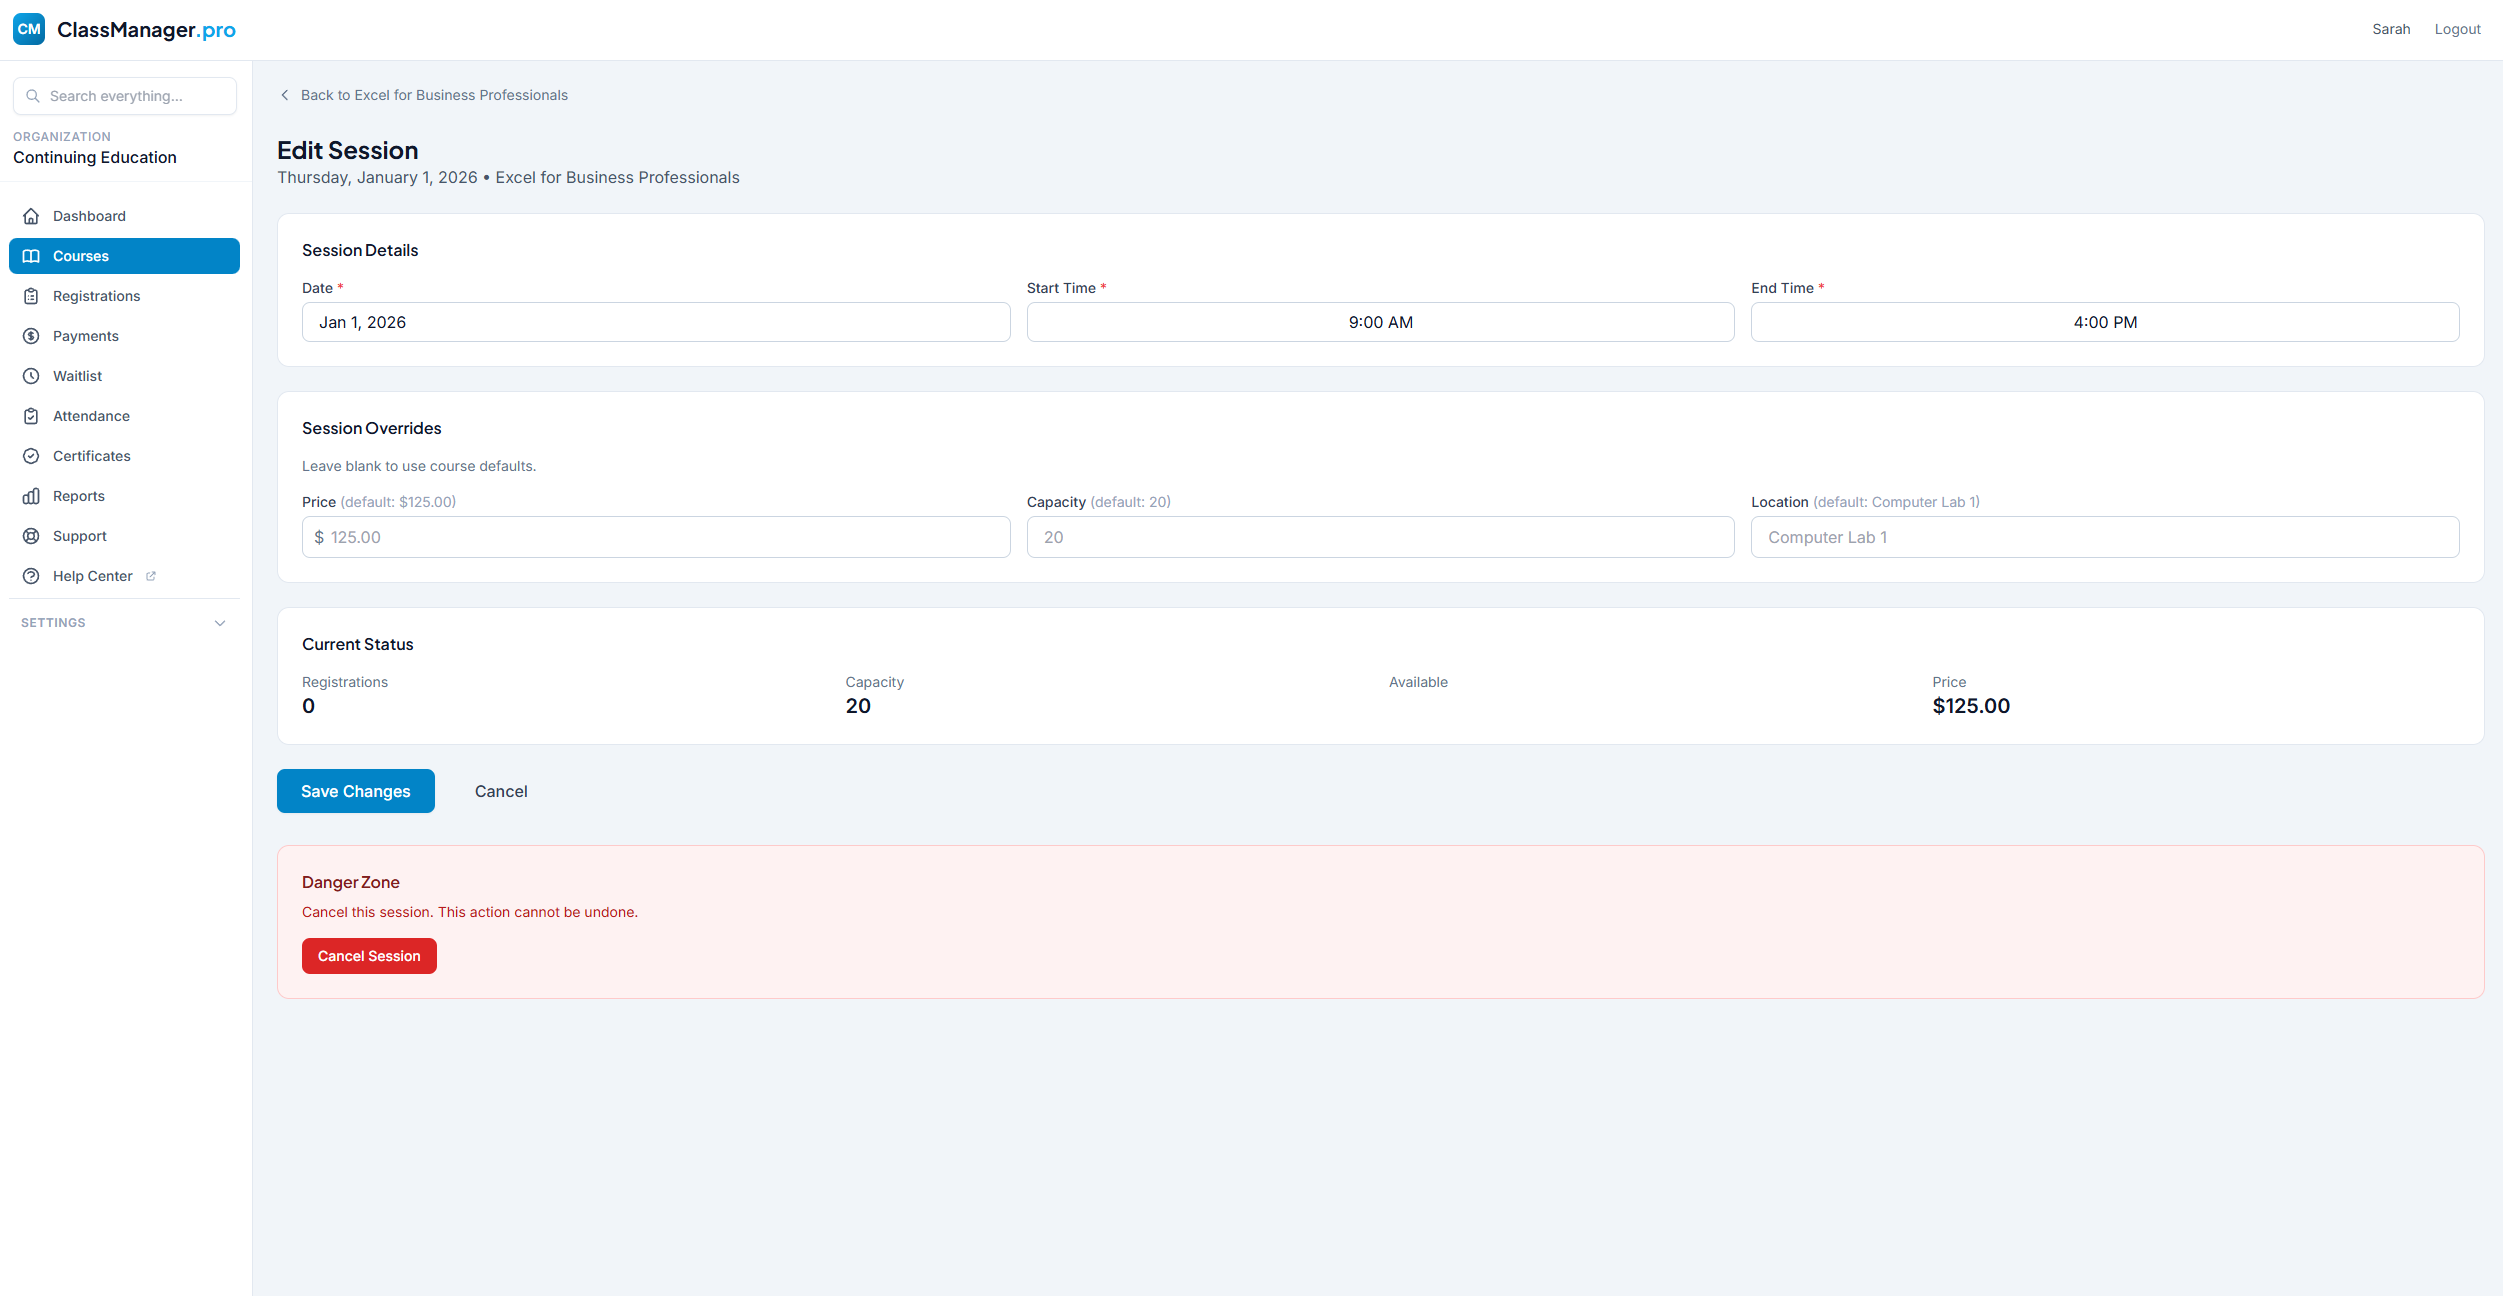
Cancelling is Permanent
When you cancel a course series, all registrants will be notified via email with your cancellation reason. This action cannot be undone.
Registrations
View and manage all student registrations. Track payment status, issue refunds, and generate certificates.
Registration List
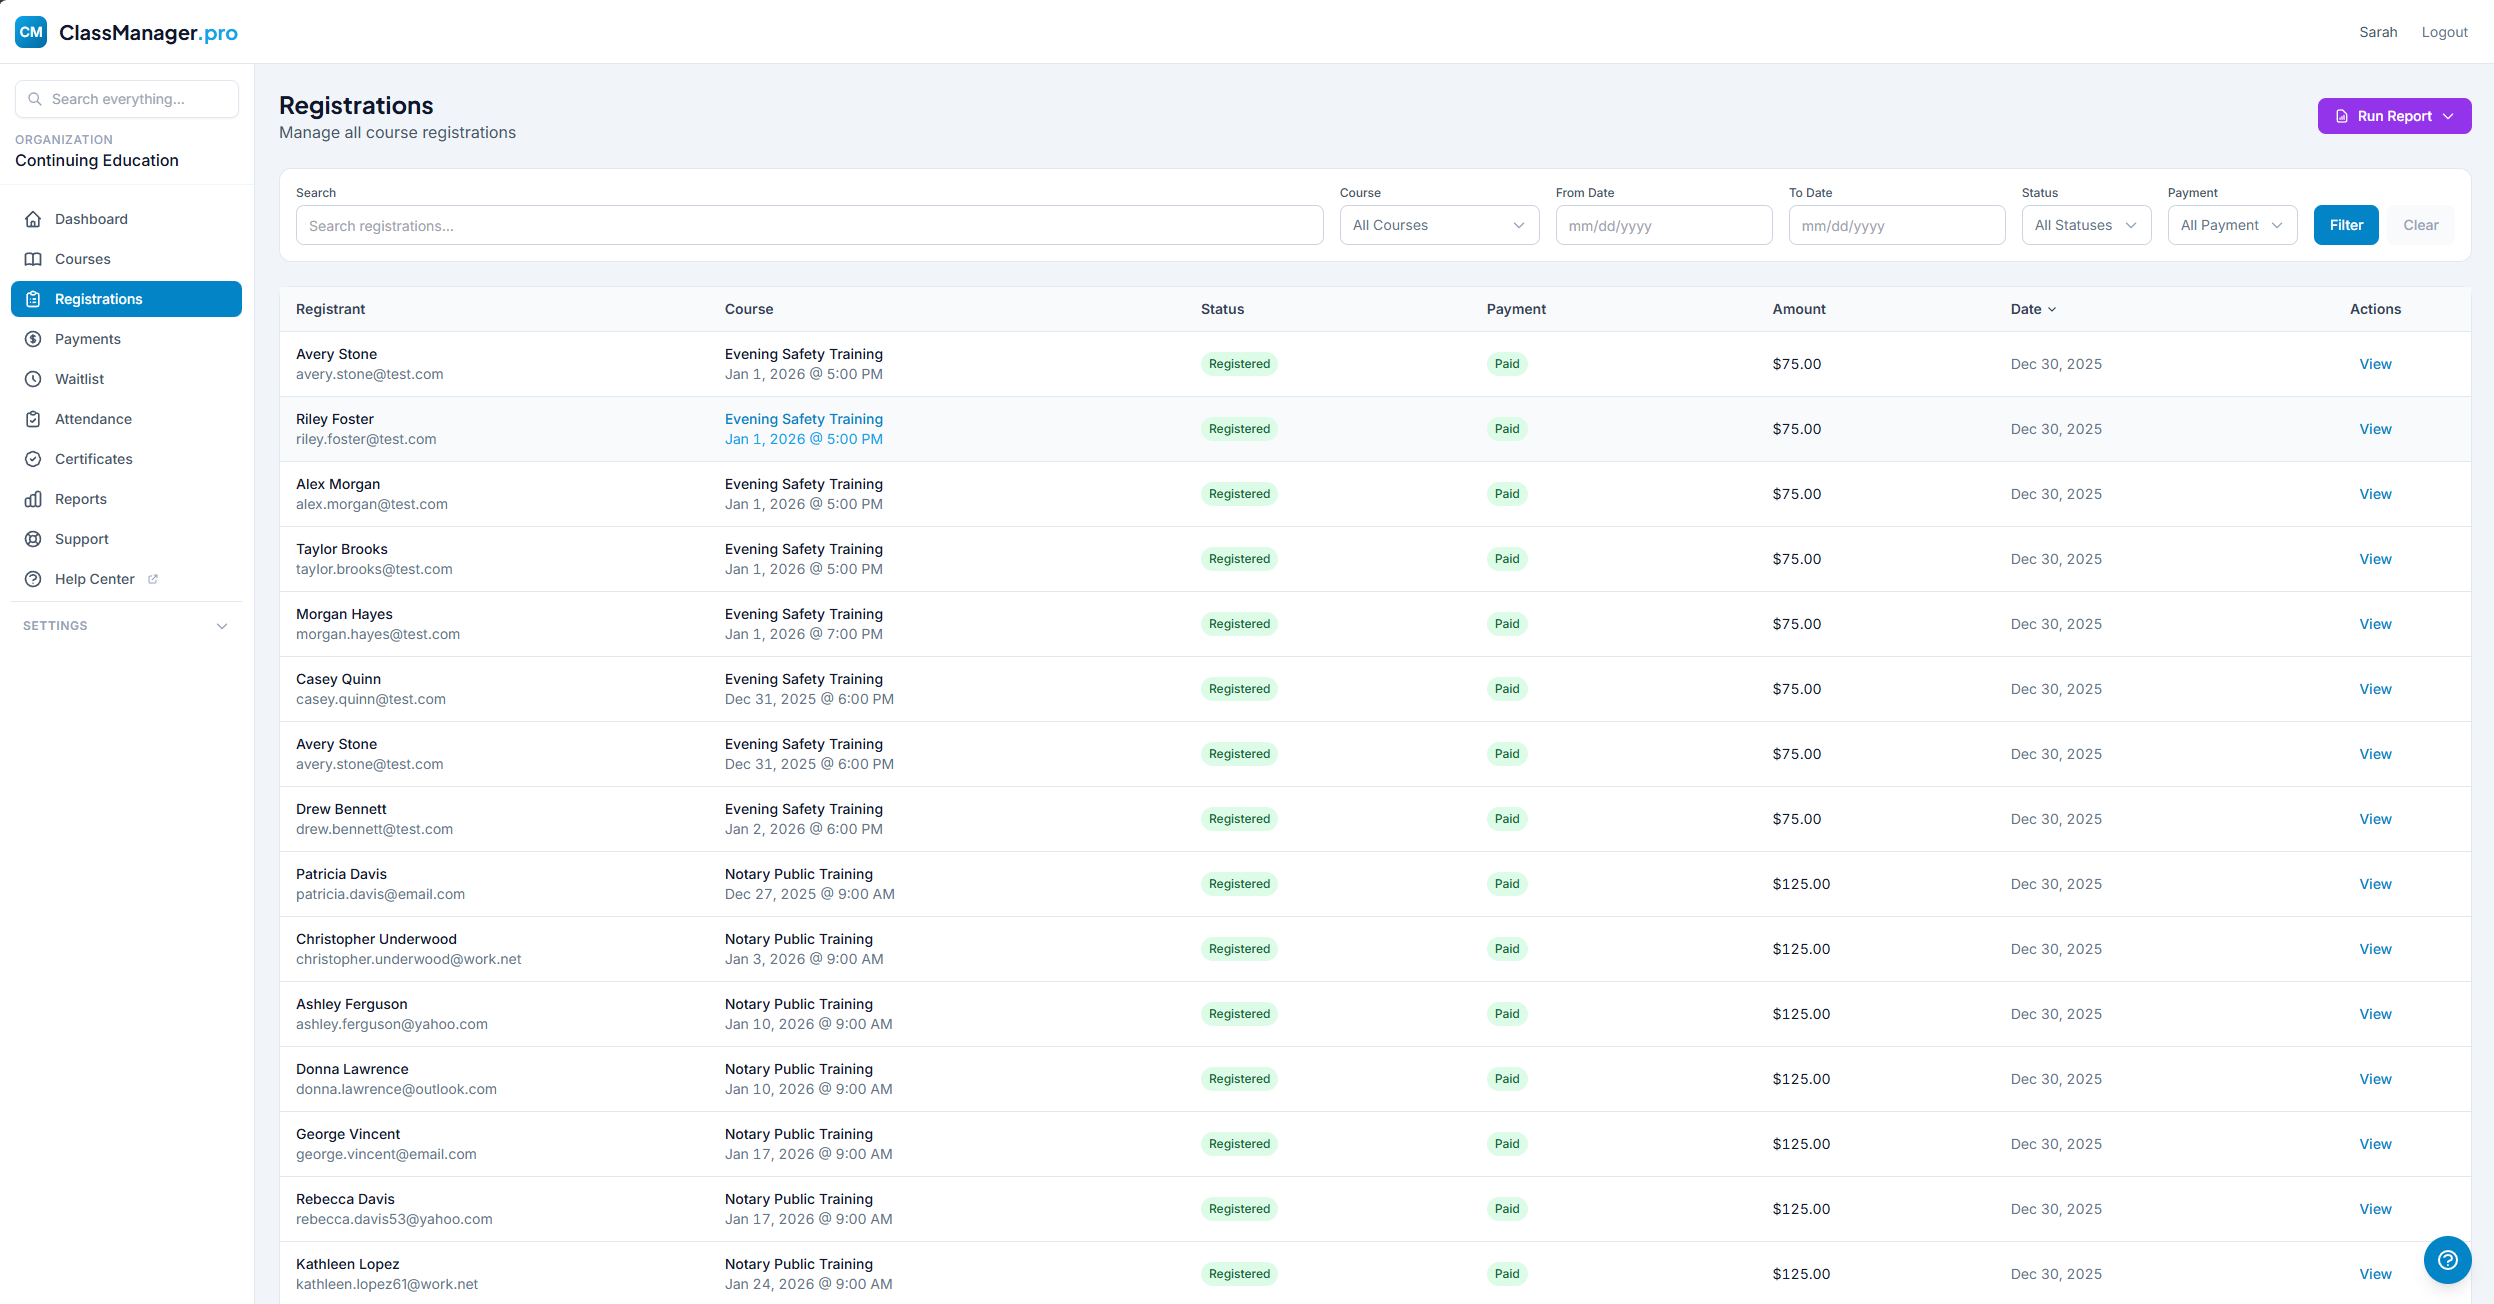
Filter Options: Search by any data point, filter by course, date range, registration status, or payment status.
Registration Status:
Payment Status:
Registration Details
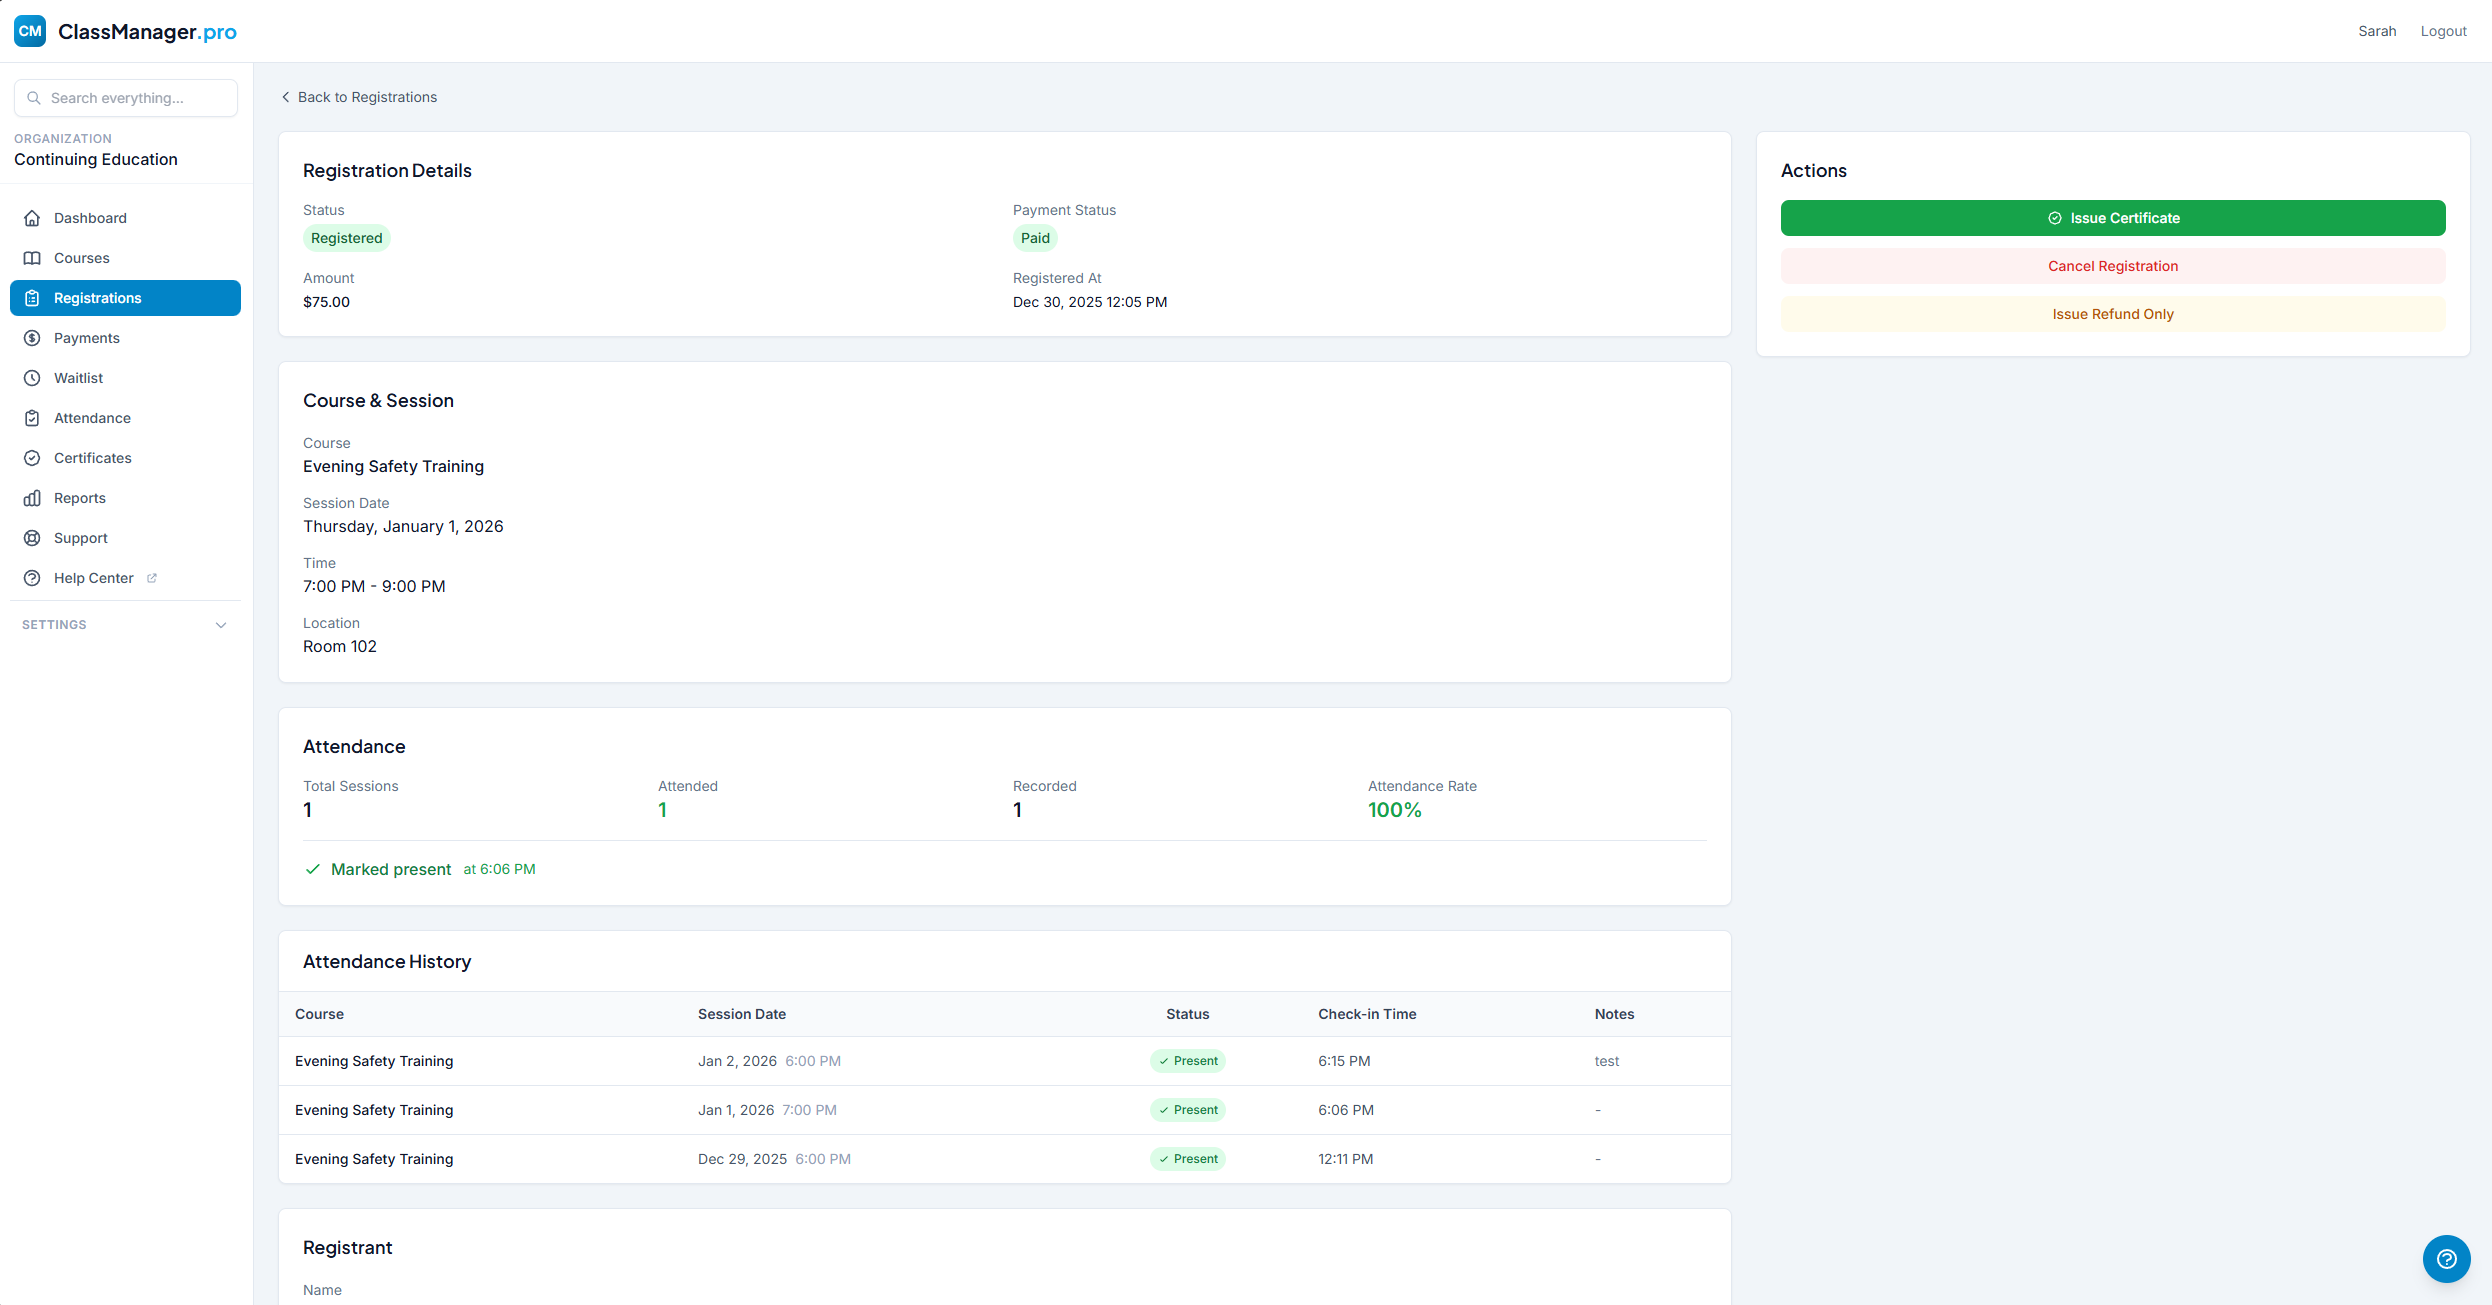
The details page shows registrant name, email, phone, registration date, status, payment status, course/session info, and attendance records.
Cancelling & Refunds
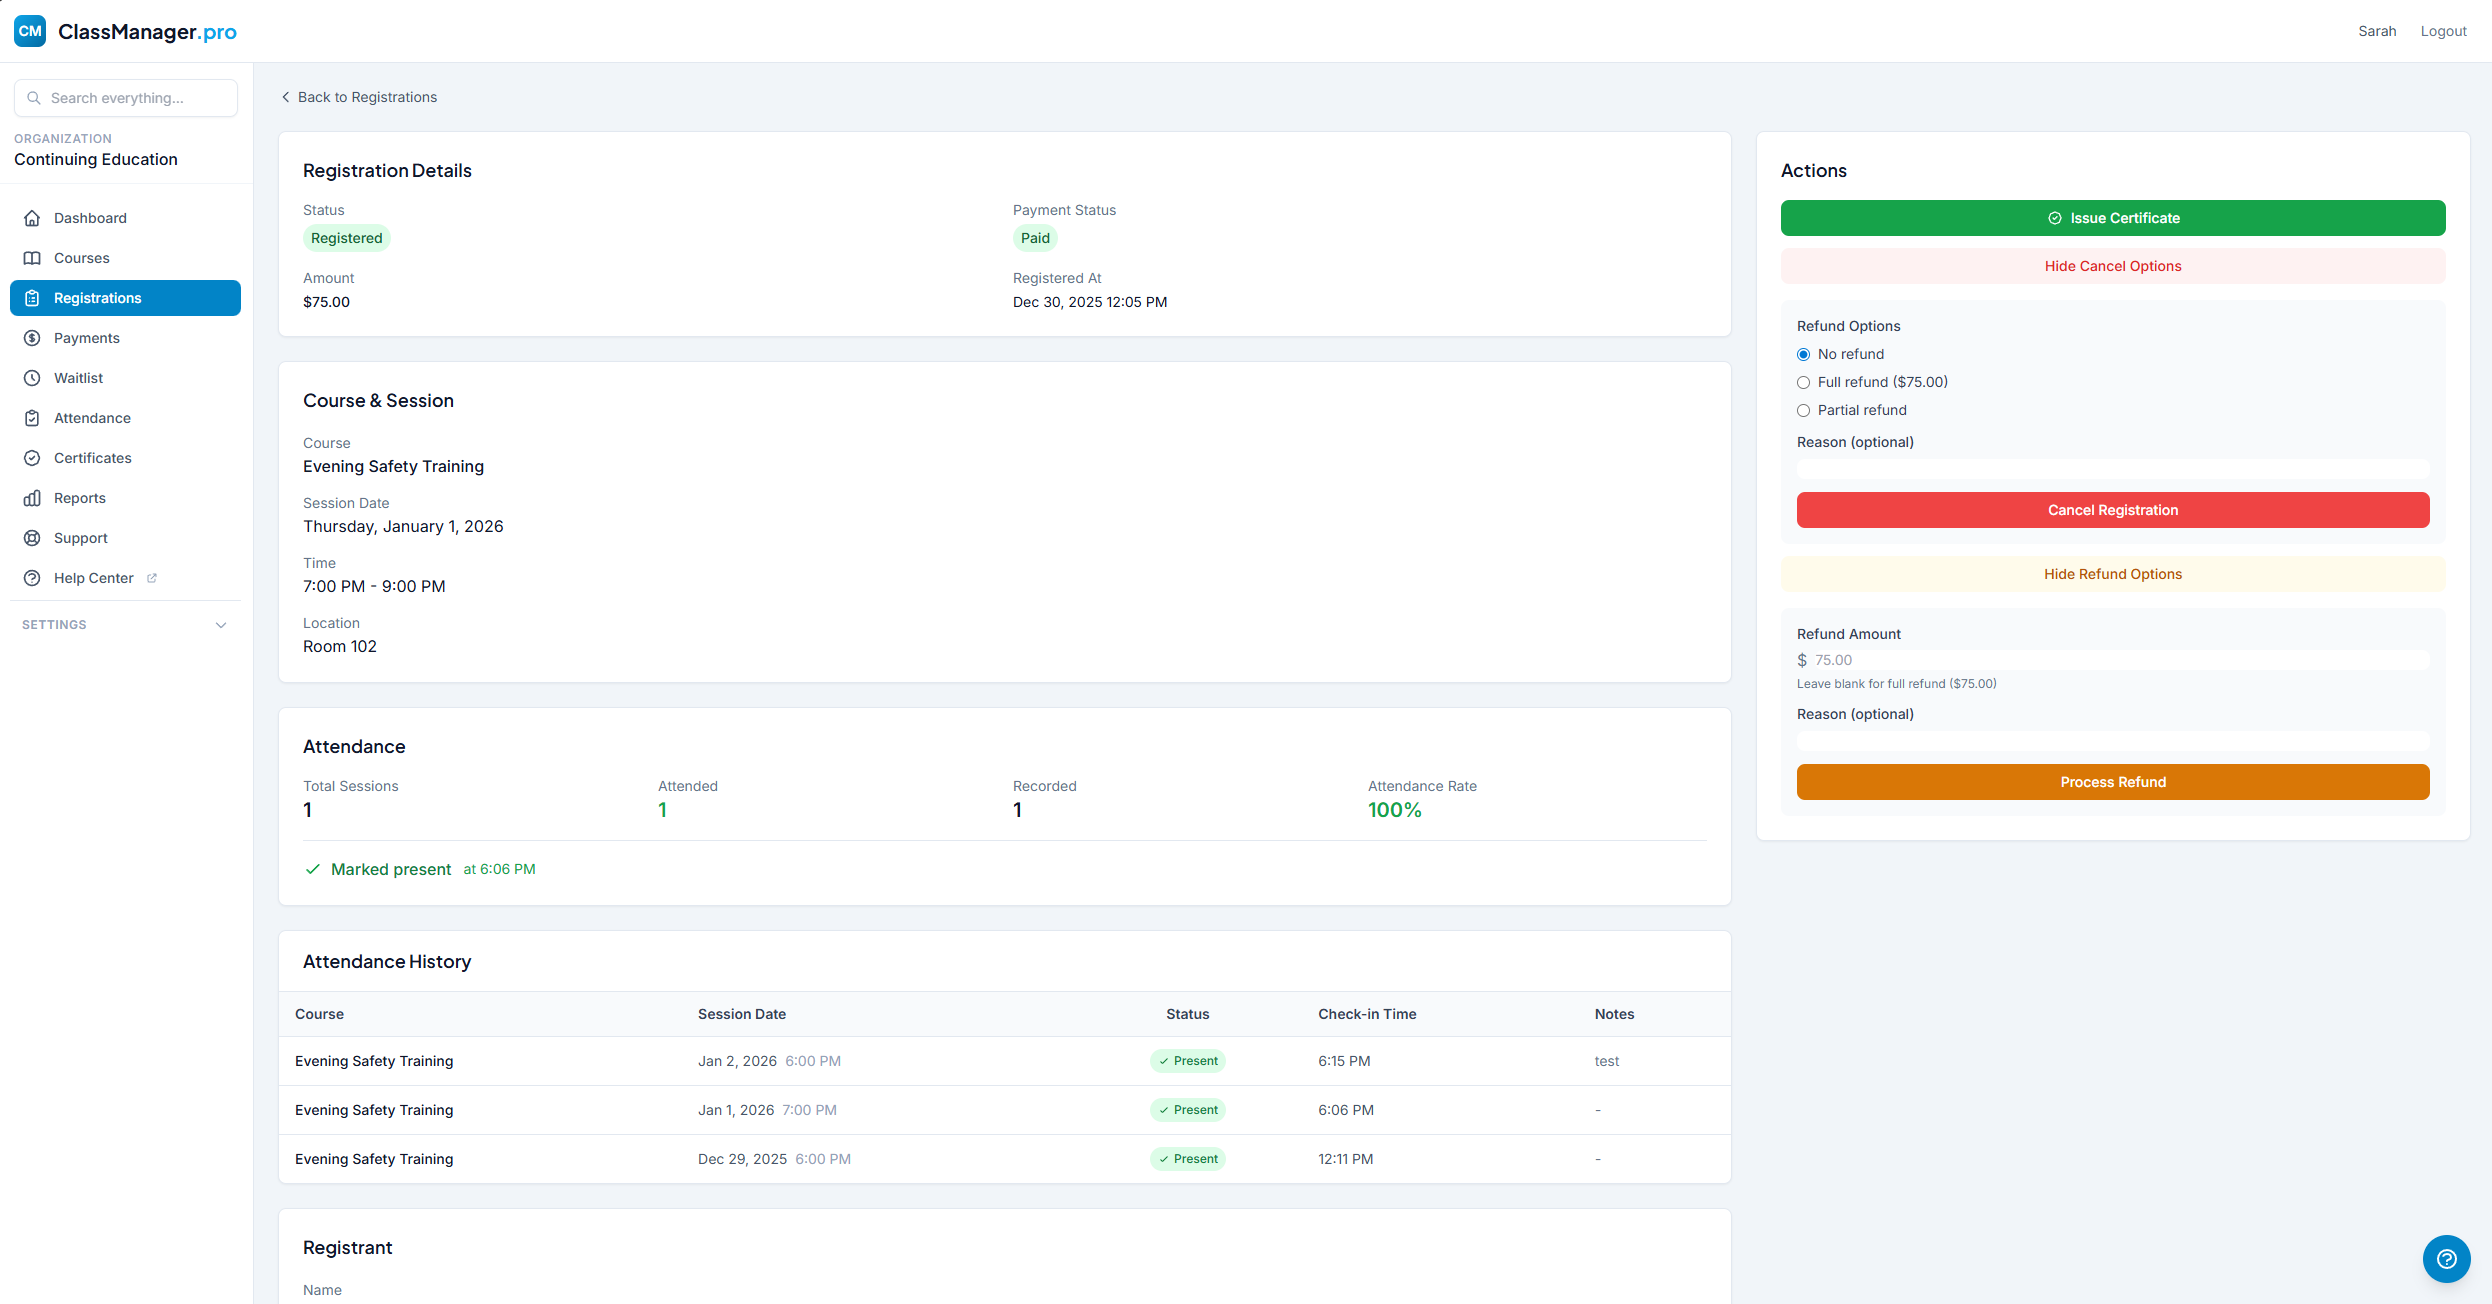
How to Cancel a Registration:
- Click "Cancel Registration" on the registration details page
- Choose refund option: Full refund, Partial refund, or No refund
- Enter cancellation reason (sent to registrant)
- Confirm to process the cancellation and refund
About Refunds
Refunds are processed through Stripe and typically appear on the customer's statement within 5-10 business days. Stripe processing fees are not refunded.
Run Report
Use the purple "Run Report" button at the top of the registrations list to view or export filtered data to Excel. Great for rosters, mailing lists, or accounting.
Payments
Track all payment activity, view revenue analytics, perform refunds, and generate financial reports. Available to Owners and Managers only.
Payment Dashboard
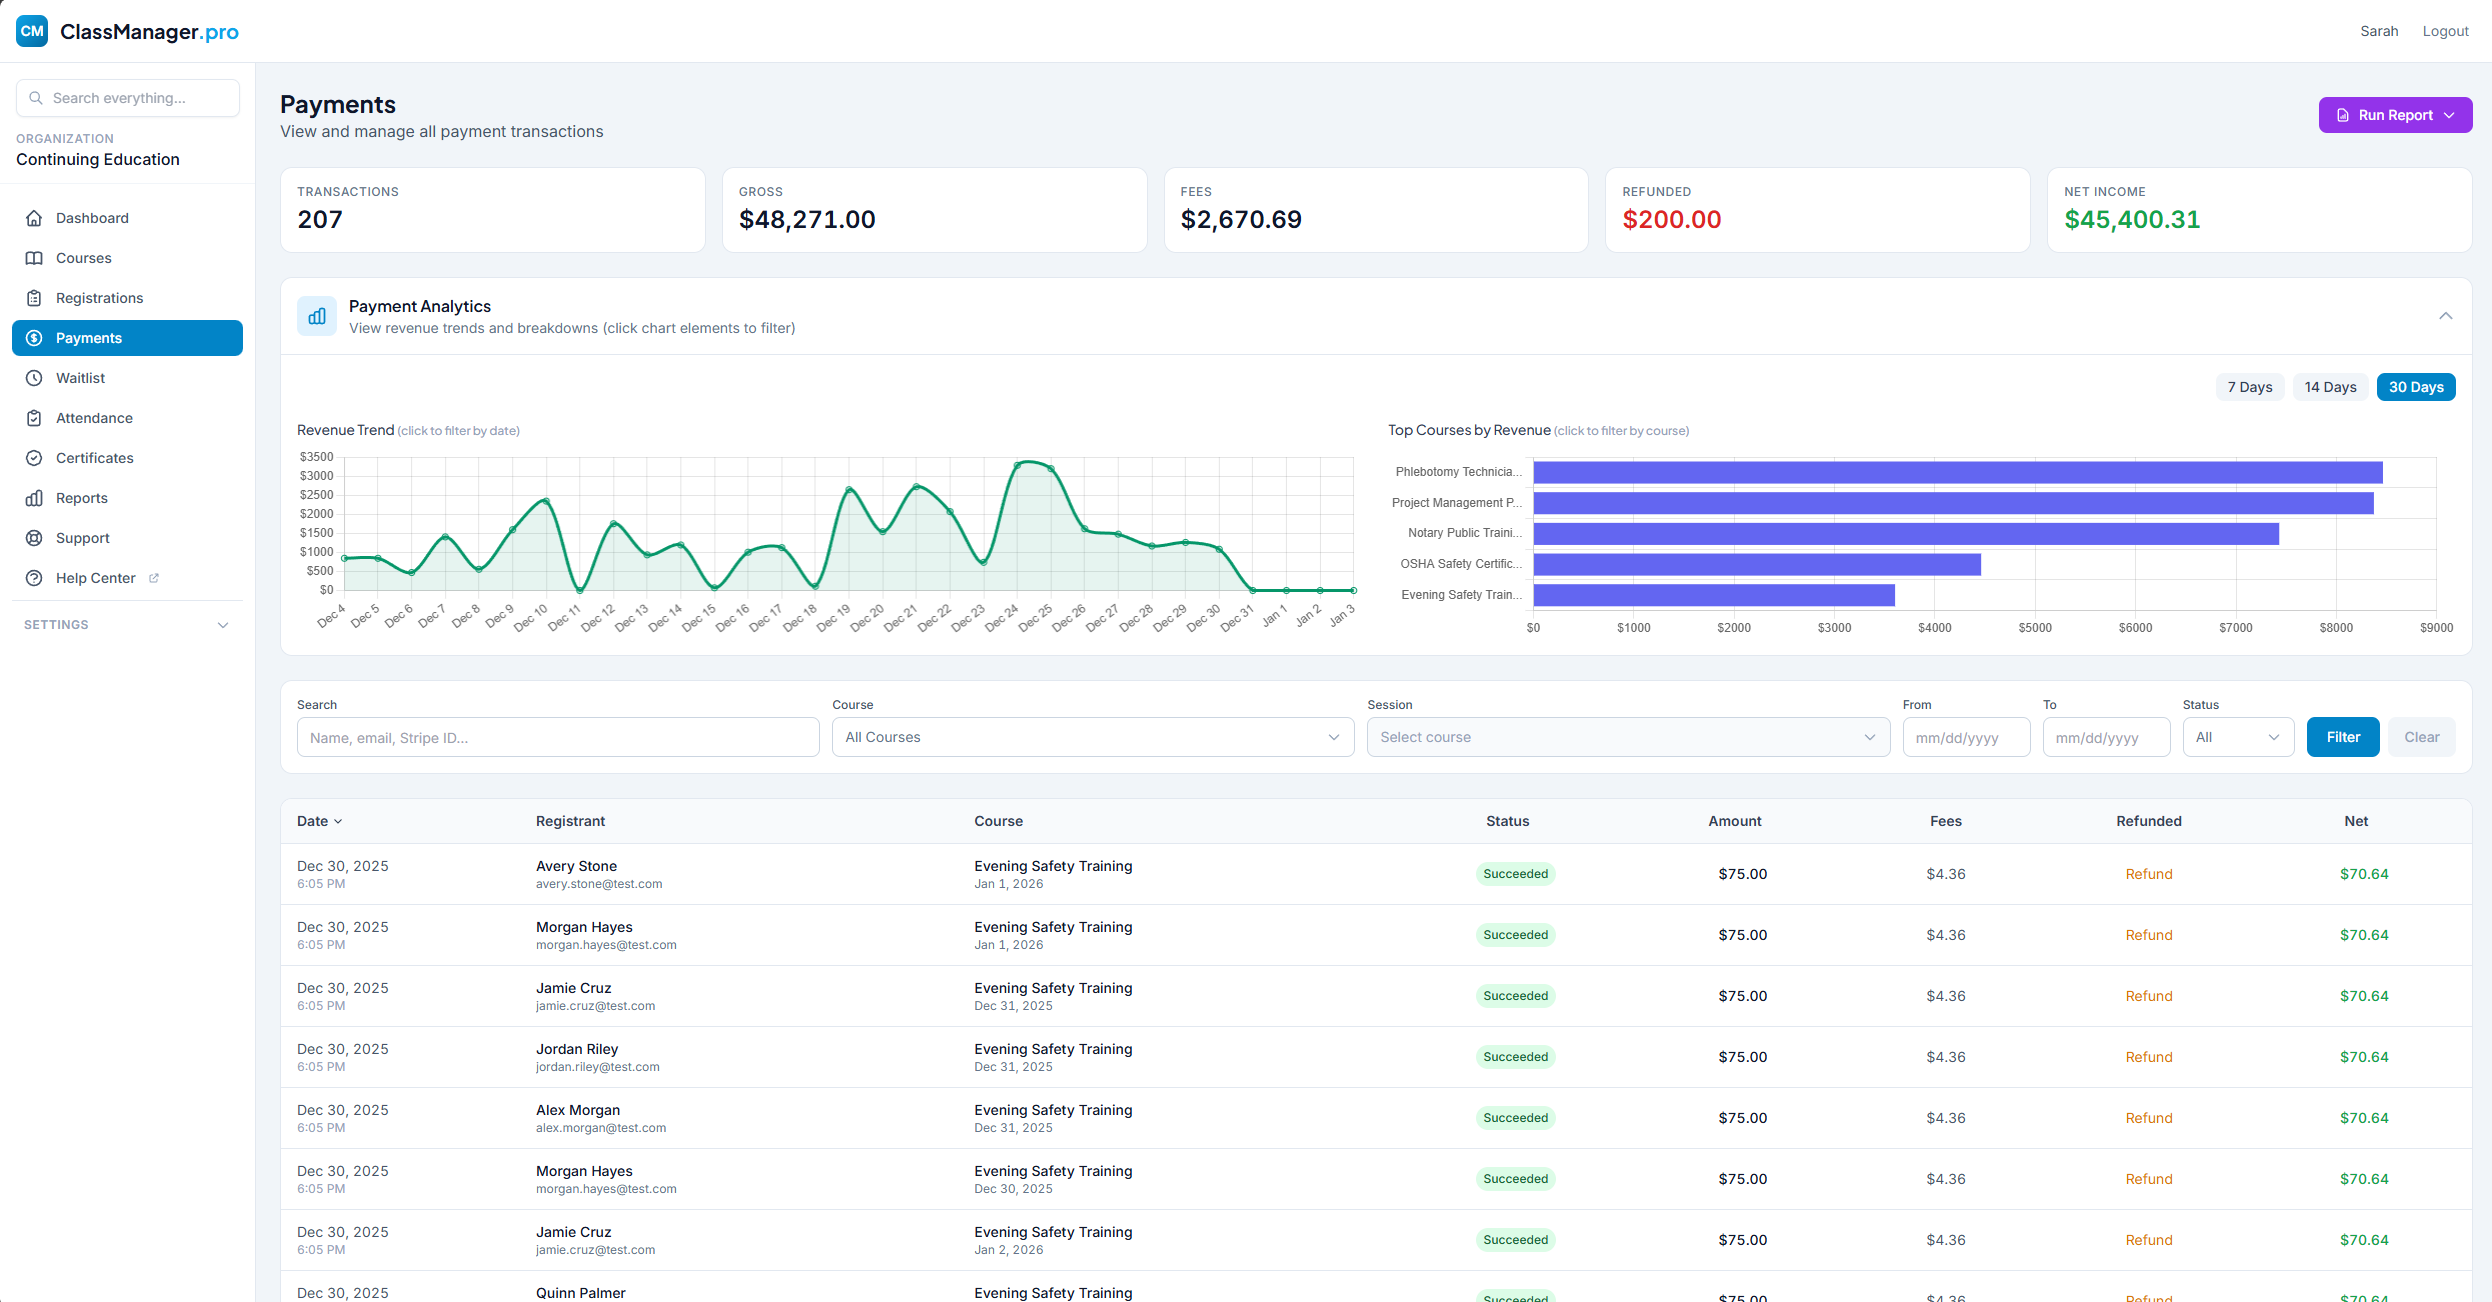
Summary Cards: The top row shows key financial metrics for your selected date range:
- Gross Revenue — Total amount collected
- Refunds — Total refunded amount
- Fees — Stripe + platform fees
- Net Income — What you actually receive
Analytics & Charts
- Revenue Over Time — Line chart showing daily/weekly/monthly revenue trends. Click any point to see details.
- Revenue by Course — Bar graph showing which courses generate the most revenue. Click segments to filter.
Filtering & Search
Filter by date range, course, payment status (Succeeded, Pending, Refunded, etc.), or search by any data point.
Payments Table
| Column | Description |
|---|---|
| Date | When the payment was processed |
| Registrant | Name and email (links to registration) |
| Course | Course name and session date |
| Status | Succeeded, refunded, etc. |
| Amount | Gross amount charged |
| Fees | Stripe + platform fees |
| Refunded | Perform a refund or see amount refunded |
| Net | To your bank after fees |
Running Reports
Click the purple "Run Report" button to export your filtered payment data to a .csv file for accounting or further analysis. The export includes all payments matching your current filters.
Waitlist
When a session fills up, interested students can join the waitlist. You can manually invite them when spots open, or enable auto-invite to handle it automatically.
Waitlist Management
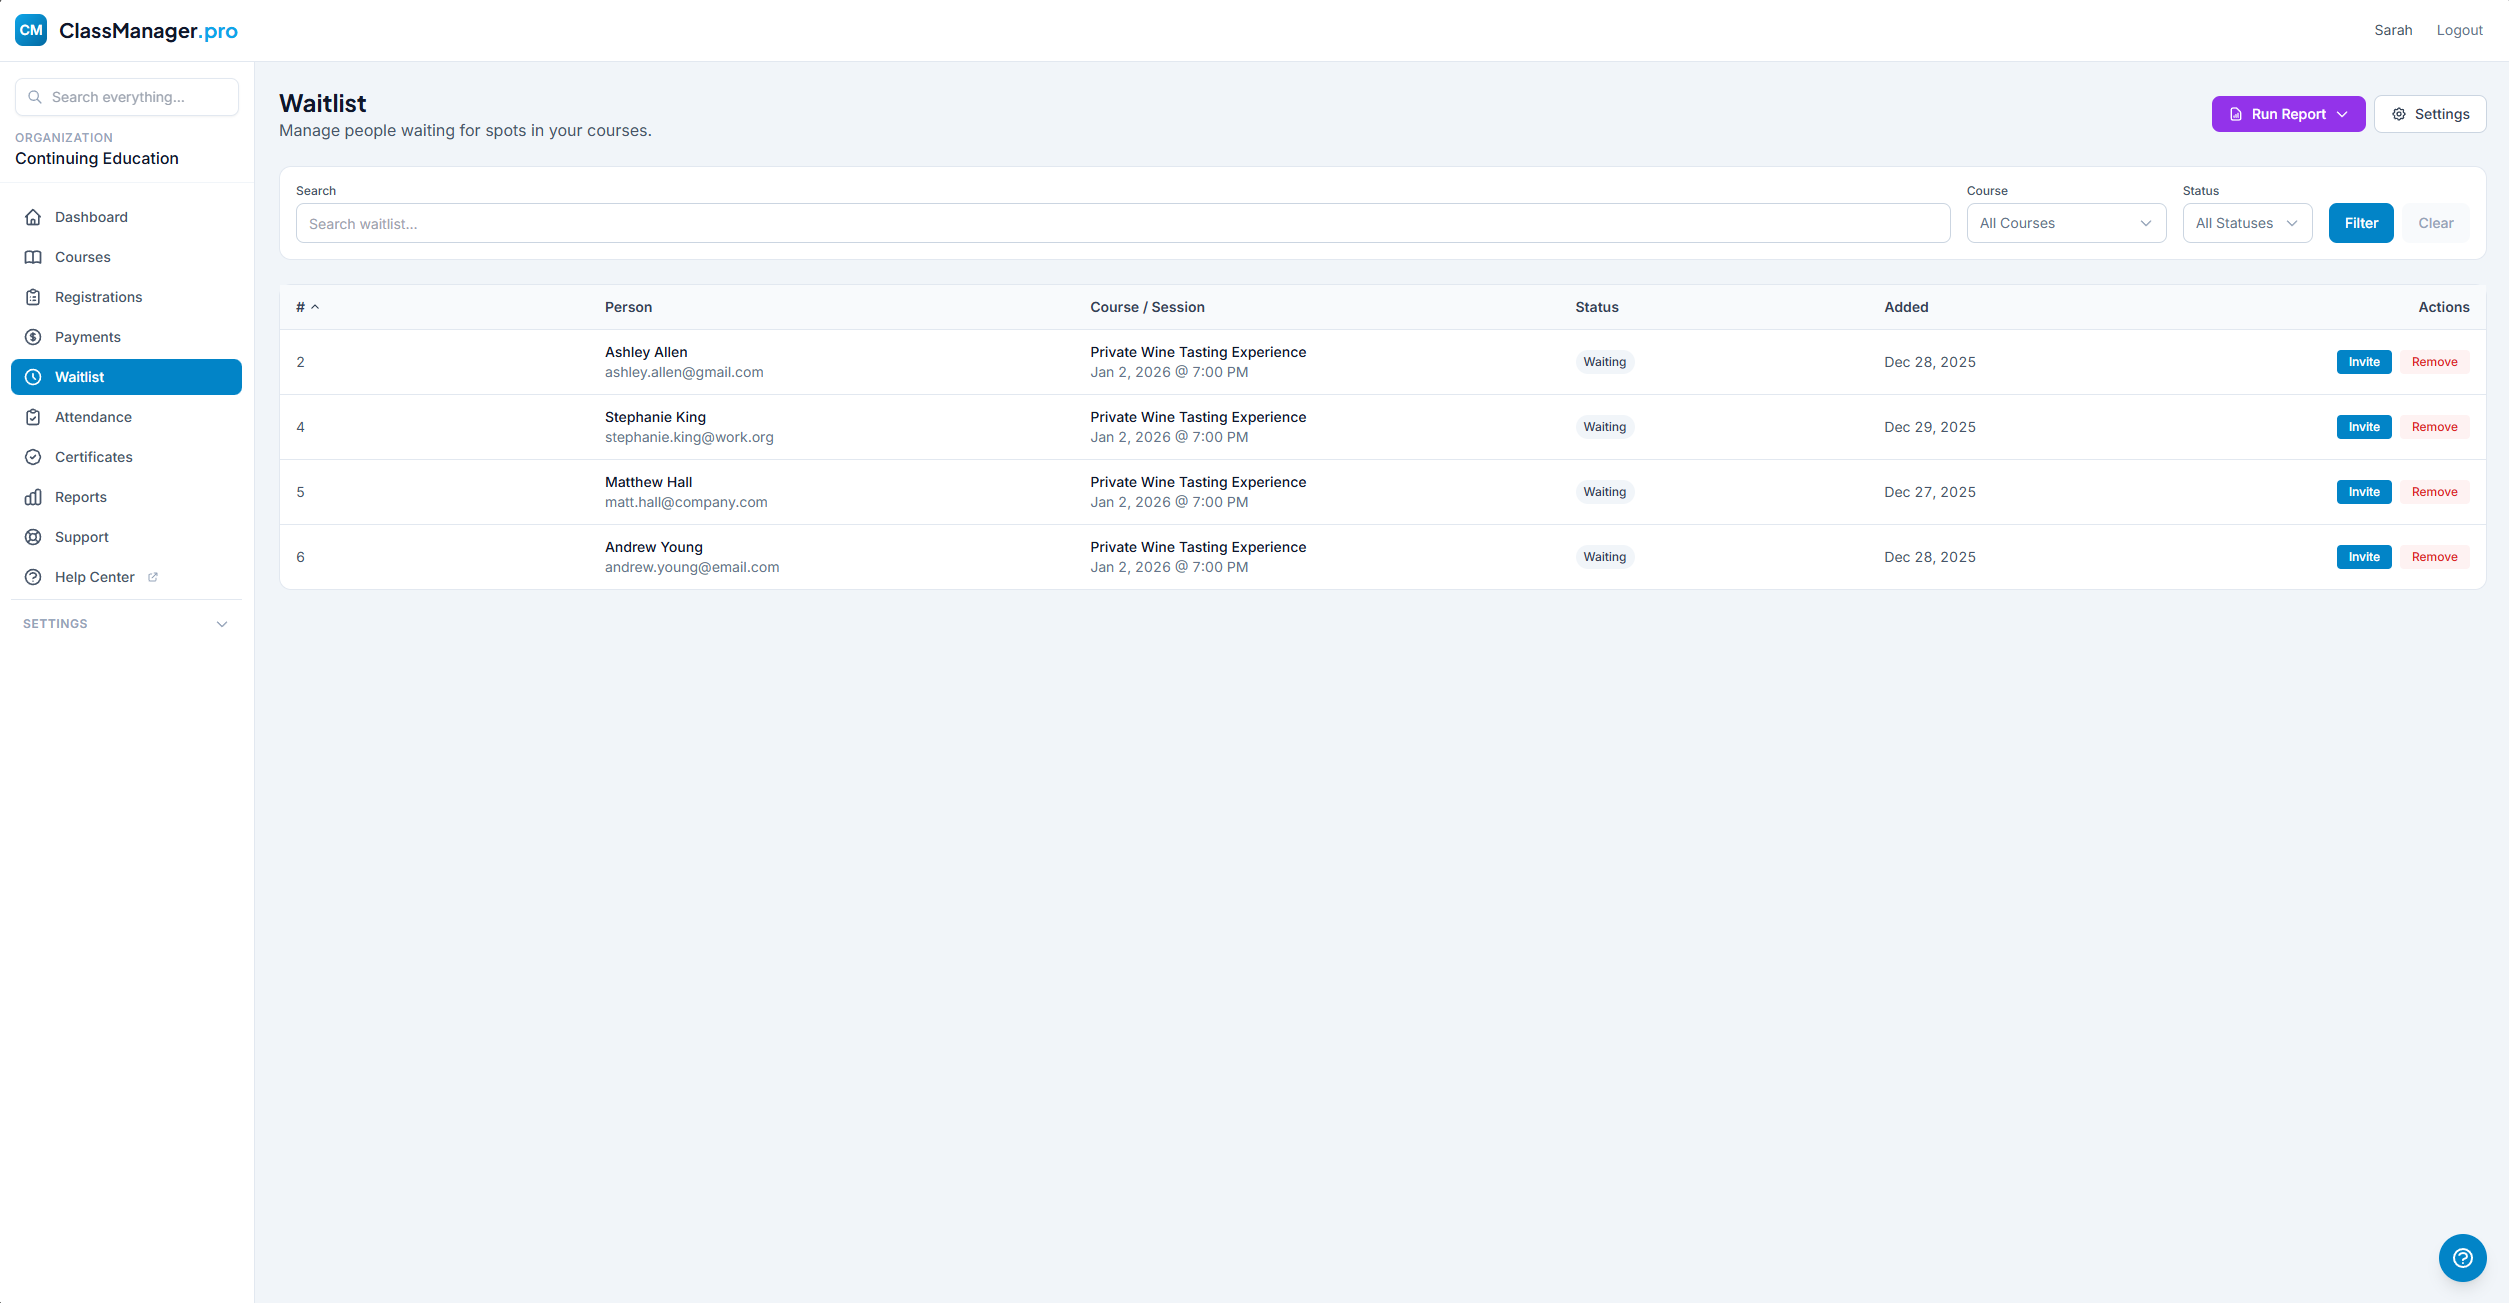
The waitlist page shows everyone waiting for a spot, organized by course and session. Each entry displays name, email, course/session, queue position (first-come, first-served), and status.
Status Badges:
Filter Options: Search by any data point, filter by course, session, or status.
Manual Invitations
How to Invite Someone:
- Click the "Invite" button next to a waitlisted entry
- Confirm the invitation
- They receive an email with a special link to complete registration
- The link expires after the time period set in your waitlist settings
Invitation Expiry
If someone doesn't respond within the expiry window, their status changes to "Expired" and the next person can be invited. The user moves to the bottom of the list. You can configure the expiry time in Settings → Registration Settings.
Auto-Invite Settings
When enabled, the system automatically invites the next person on the waitlist when a spot opens (due to cancellation or capacity increase).
- Enable Auto-Invite — Go to Settings → Registration Settings and toggle "Auto-invite"
- Set Expiry Time — Configure how long invitations remain valid (e.g., 24 hours, 48 hours)
Per-Course Waitlist
Remember that waitlists must be enabled on each course individually. Edit a course and toggle "Enable Waitlist" to allow waitlist signups for that course.
Attendance
Track who shows up to your sessions. Attendance tracking must be enabled per-course in course settings.
Attendance Dashboard
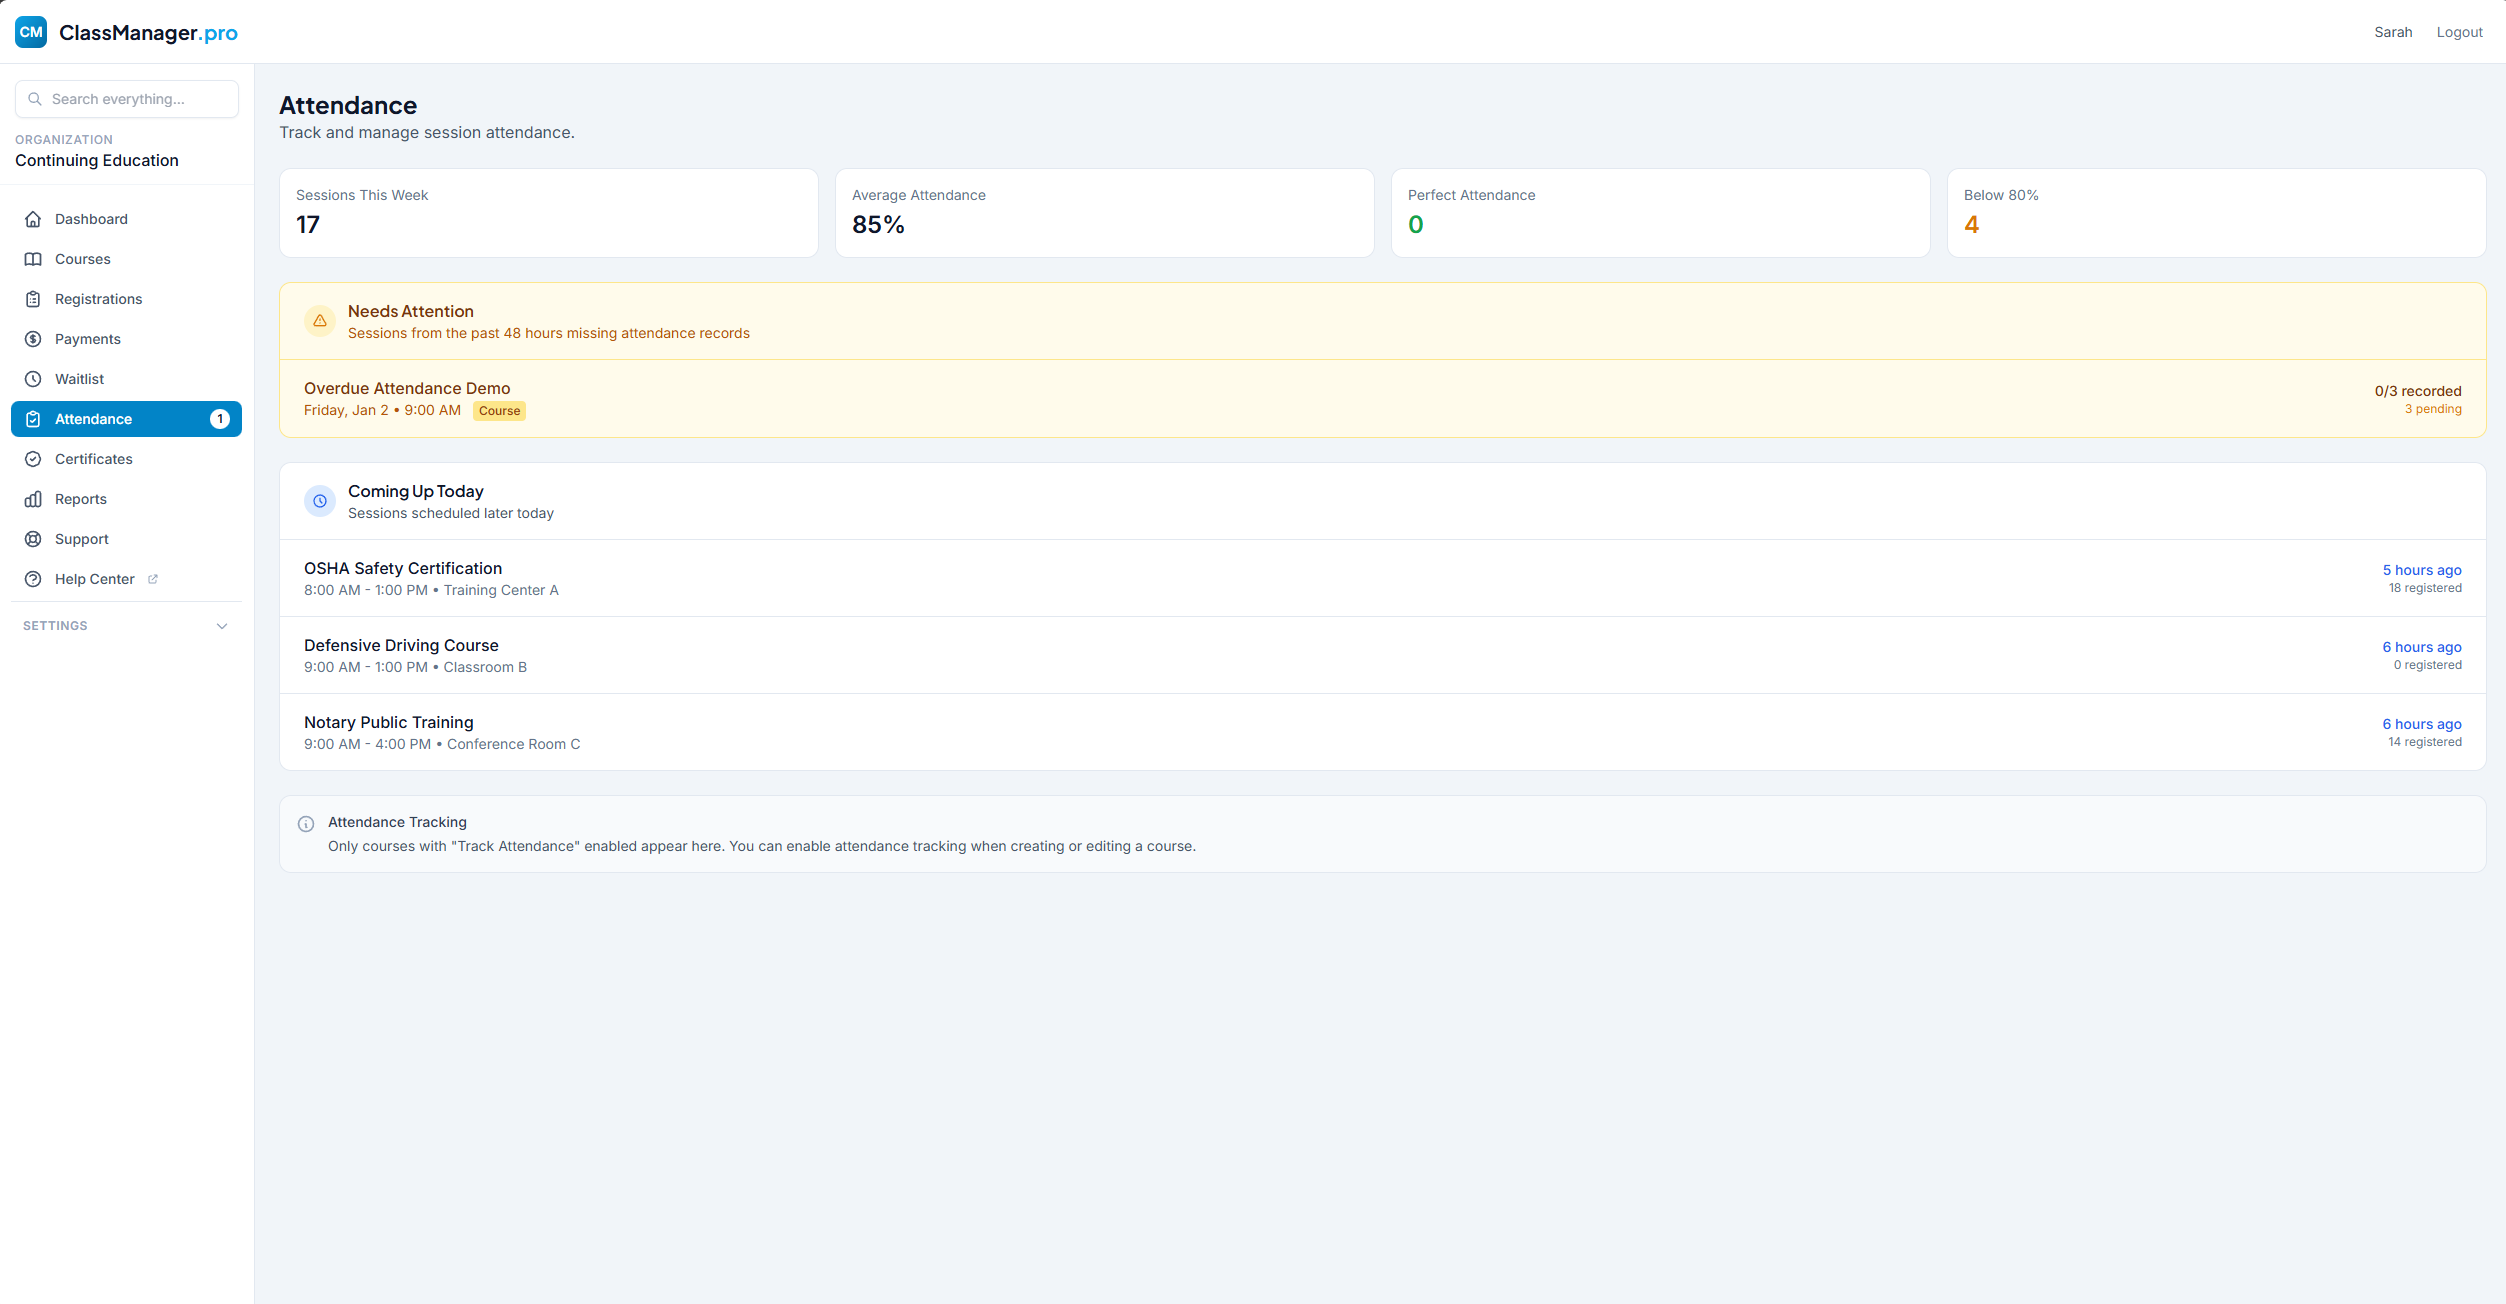
The attendance dashboard shows all sessions that need attendance taken:
- Needs Attention — Past sessions where attendance hasn't been recorded yet (amber indicator)
- Upcoming — Future sessions (attendance can't be taken until the session date)
Taking Attendance (Roster)
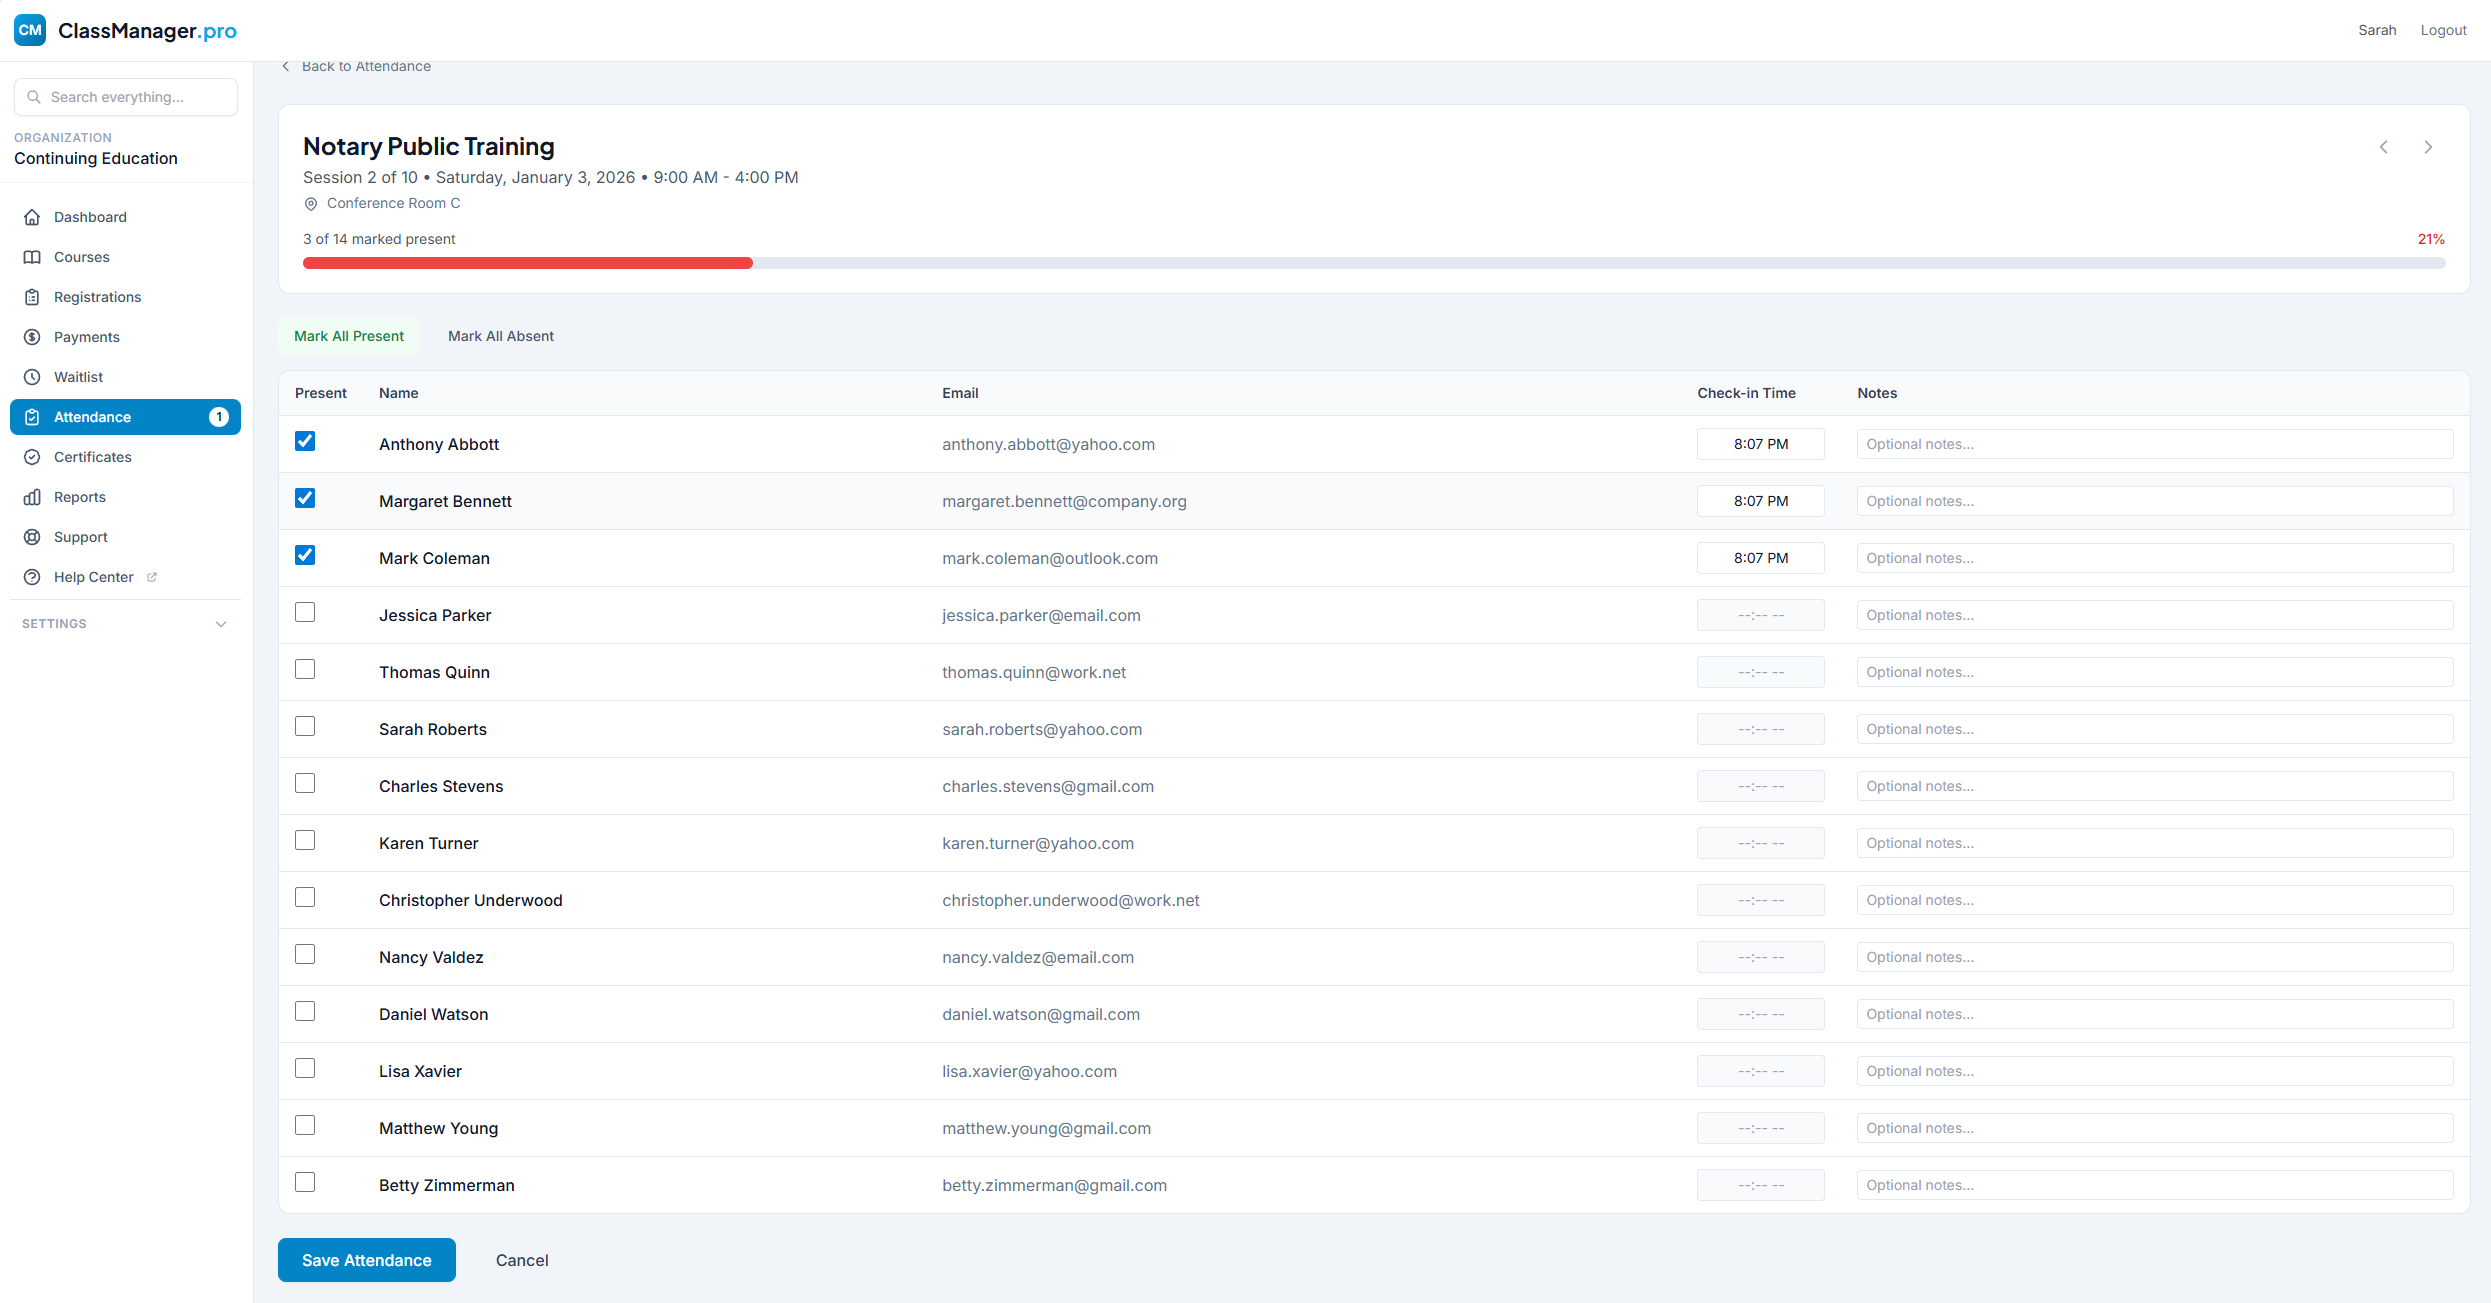
How to Take Attendance:
- Click "Take Attendance" on any session from the dashboard or course detail page
- You'll see a roster of all registered students for that session
- Check the box next to each student as they arrive, or fill this out later if you have a sign-in sheet
- Click "Save Attendance" to record your changes
Course Attendance Report
The attendance report shows each registrant's name/email, sessions attended (e.g., 9/10), and attendance rate percentage.
Quick Access
You can also take attendance directly from the course detail page by clicking the clipboard icon next to any session.
Certificates
Issue professional completion certificates to students. Each certificate includes a unique ID and QR code for verification.
Certificate List
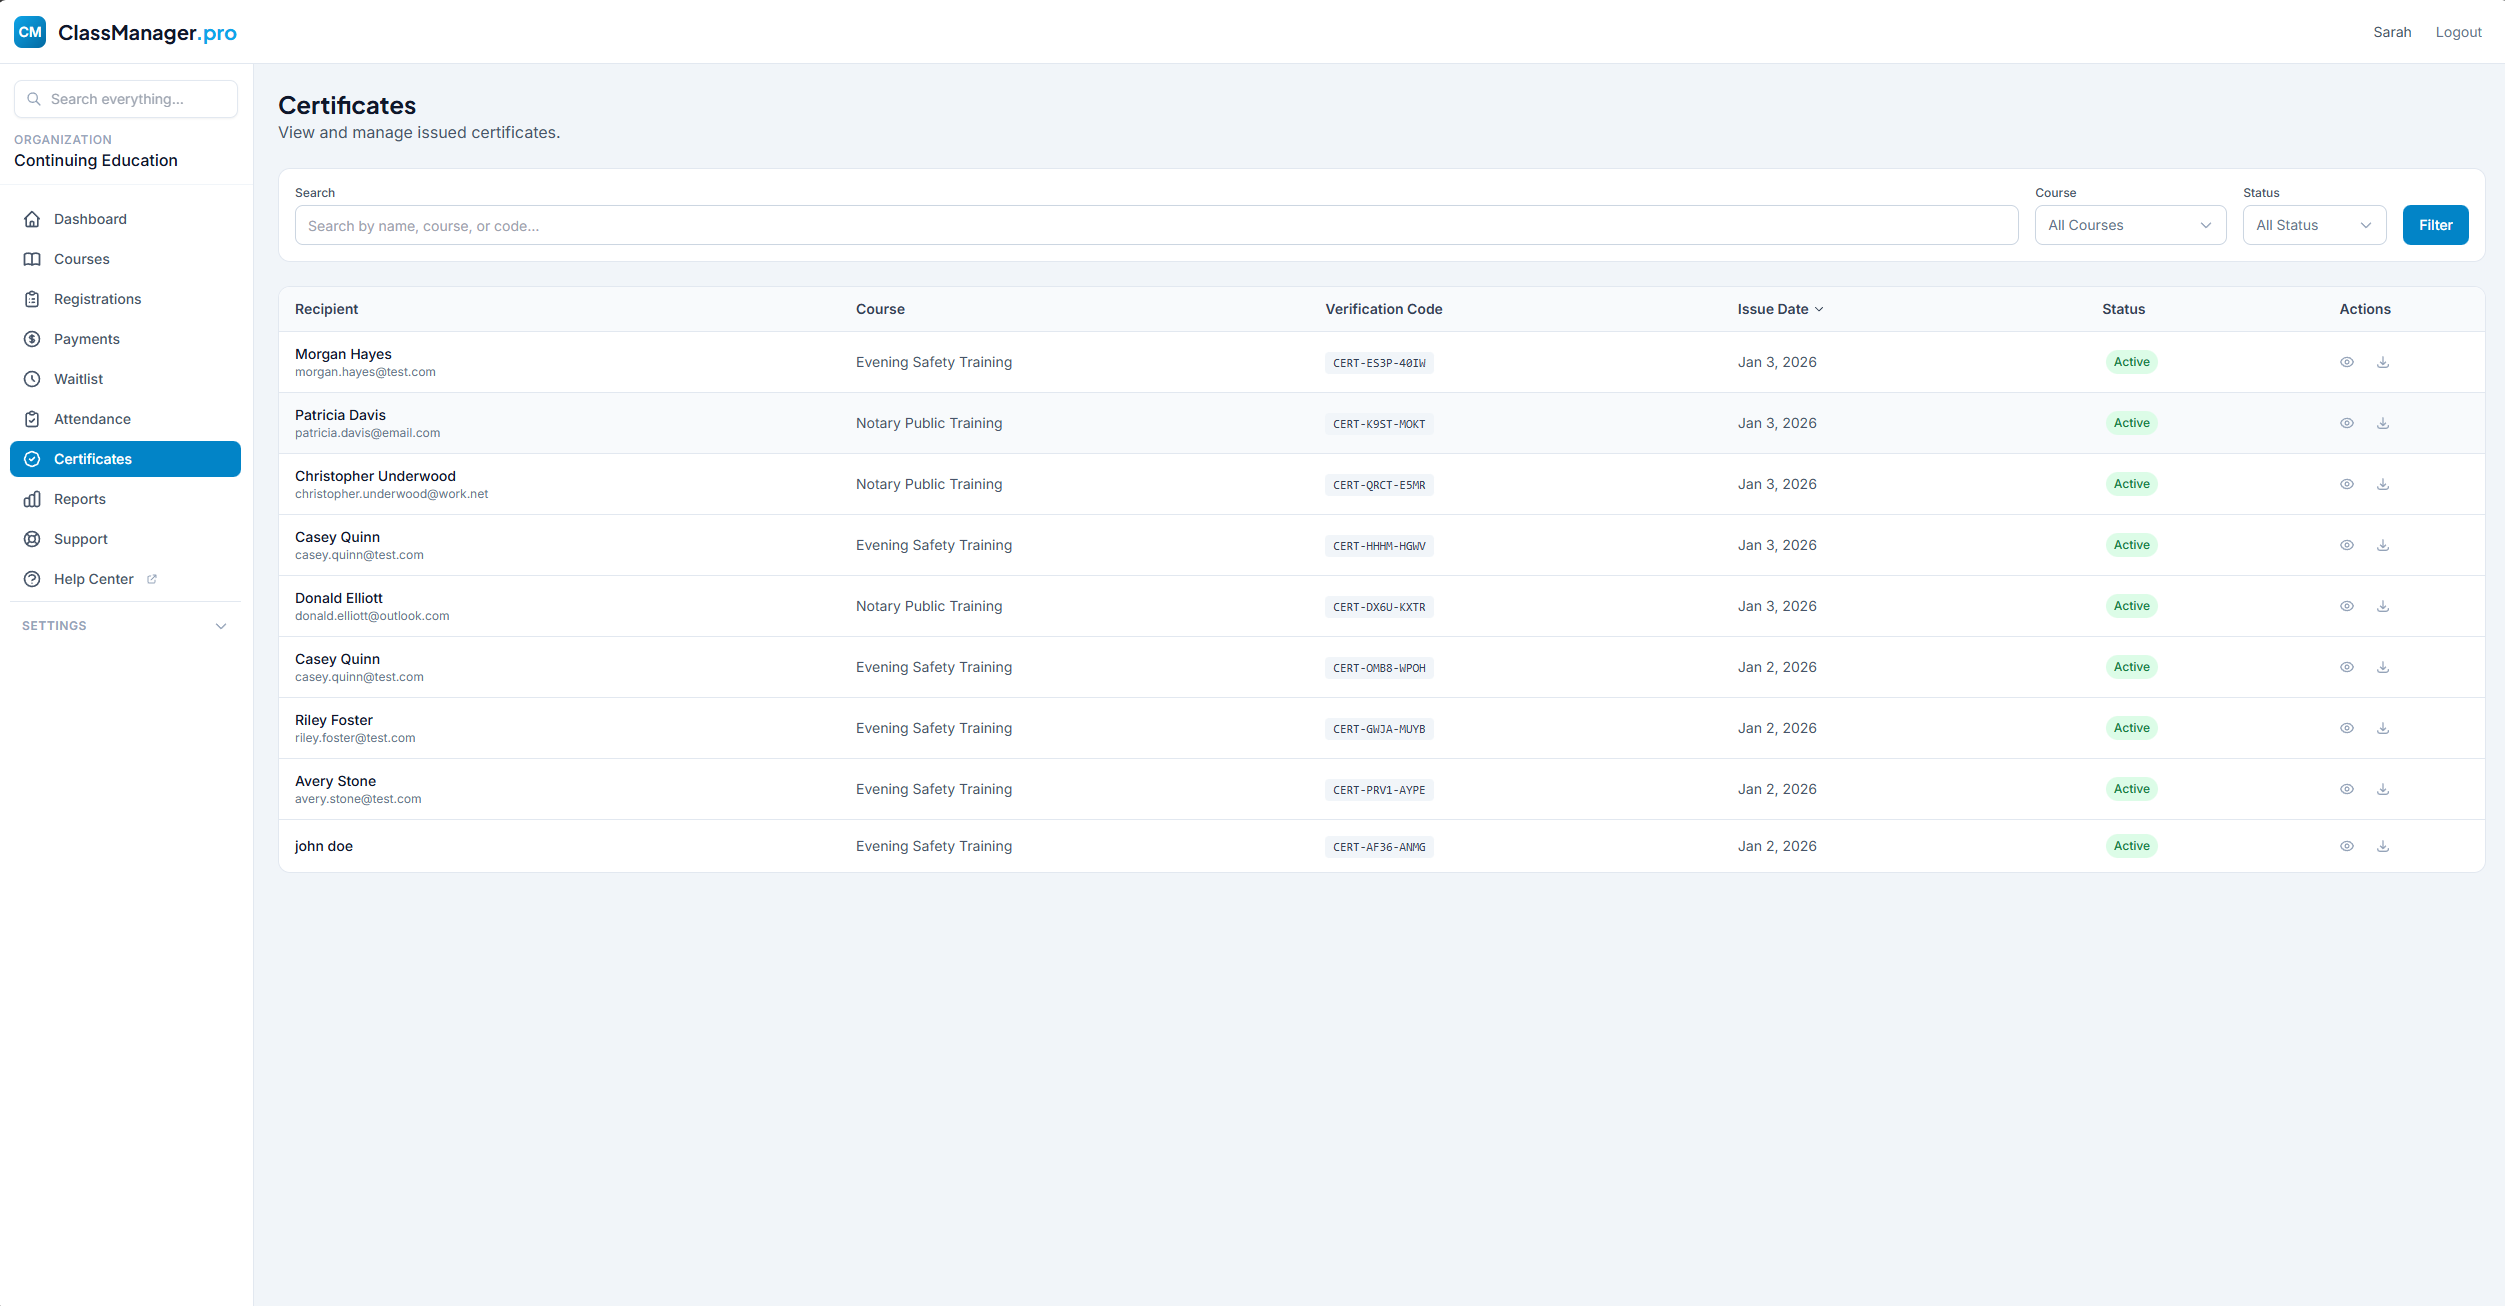
The certificates page shows all issued certificates. Each entry displays recipient name/email, course, certificate ID, issue date, and status (Active or Revoked).
Filter Options: Search by recipient name, email, course, or certificate ID. Filter by course, date range, or status.
Viewing Certificate Details
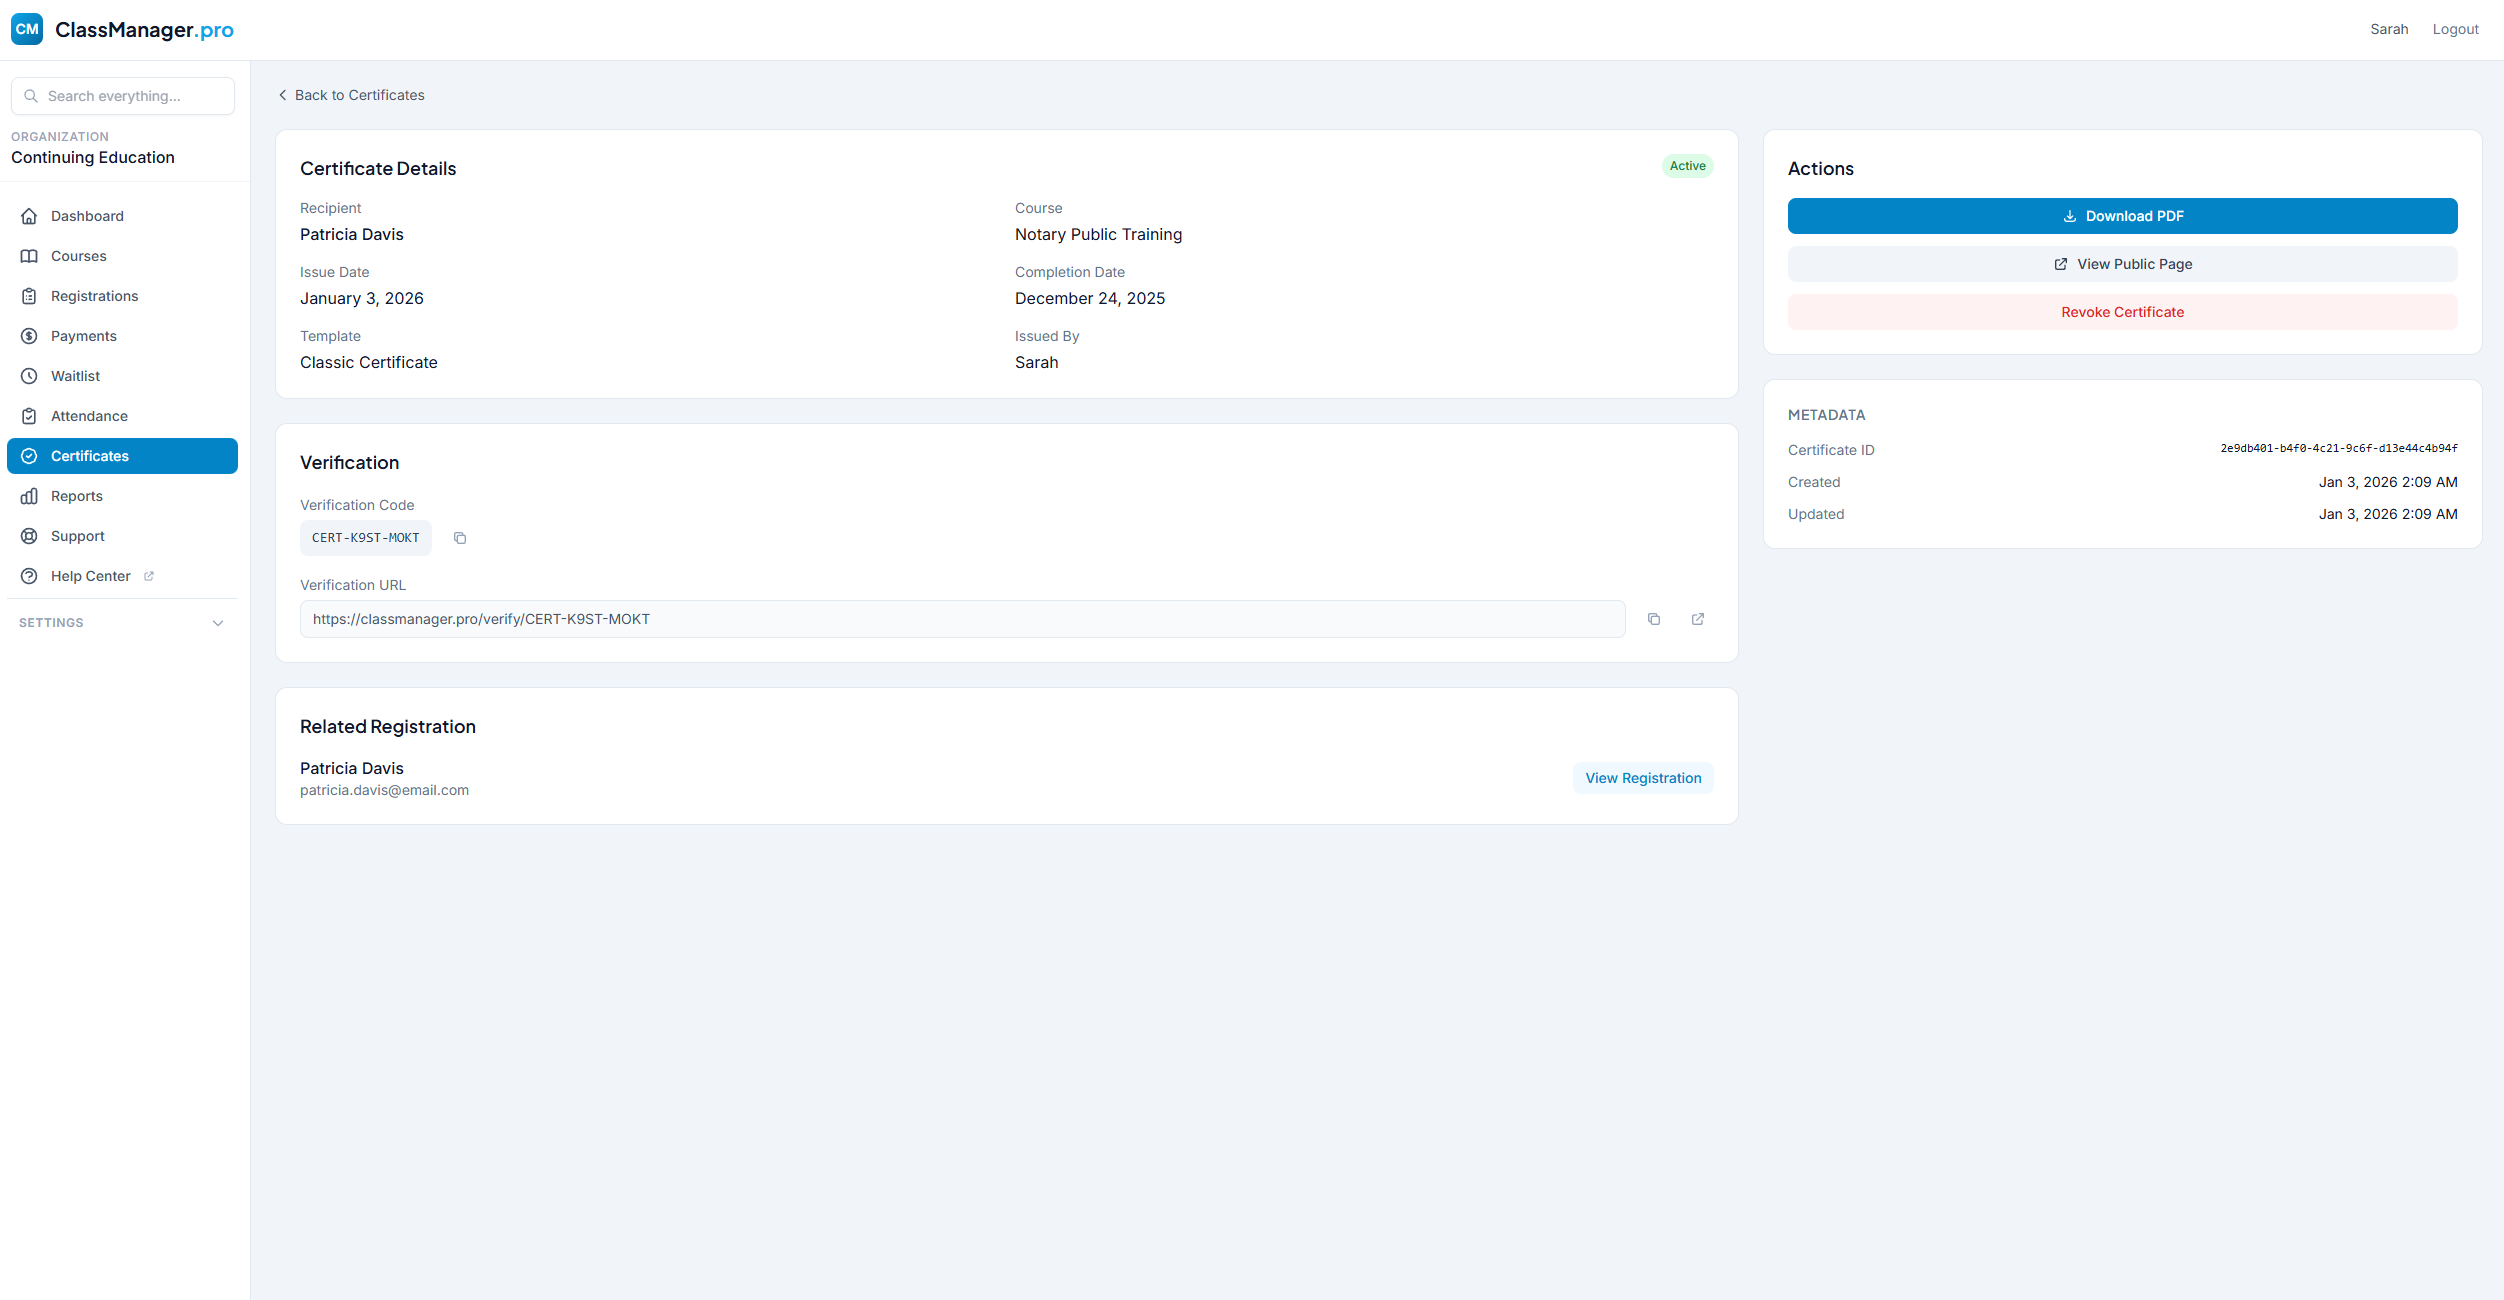
Click any certificate to see full details:
- Certificate Preview — Visual preview as it appears to the recipient
- QR Code — Unique QR code linking to the public verification page
- Actions — Download PDF, resend to recipient, or revoke
Issuing Certificates
How to Issue a Certificate:
- Go to the registration details page for a completed student
- Click "Issue Certificate" button
- Select a certificate template (if you have multiple)
- Optionally customize the completion date
- Click "Issue" to generate the certificate
The student receives an email with their certificate attached as a PDF and a link to the online verification page.
Revoking Certificates
If you need to invalidate a certificate (e.g., completed in error):
- Go to the certificate detail page
- Click "Revoke Certificate"
- Enter a reason for revocation
- Confirm the revocation
What Happens When Revoked
Revoked certificates show a "Revoked" status on the public verification page. The QR code still works, but displays that the certificate is no longer valid. The recipient is not automatically notified.
Certificate Templates
Customize how your certificates look in Settings → Certificate Templates. You can create multiple templates for different courses or purposes.
Reports
Generate custom reports to analyze registrations, revenue, attendance, and more. Save report templates for quick access to frequently-used reports.
Reports Dashboard
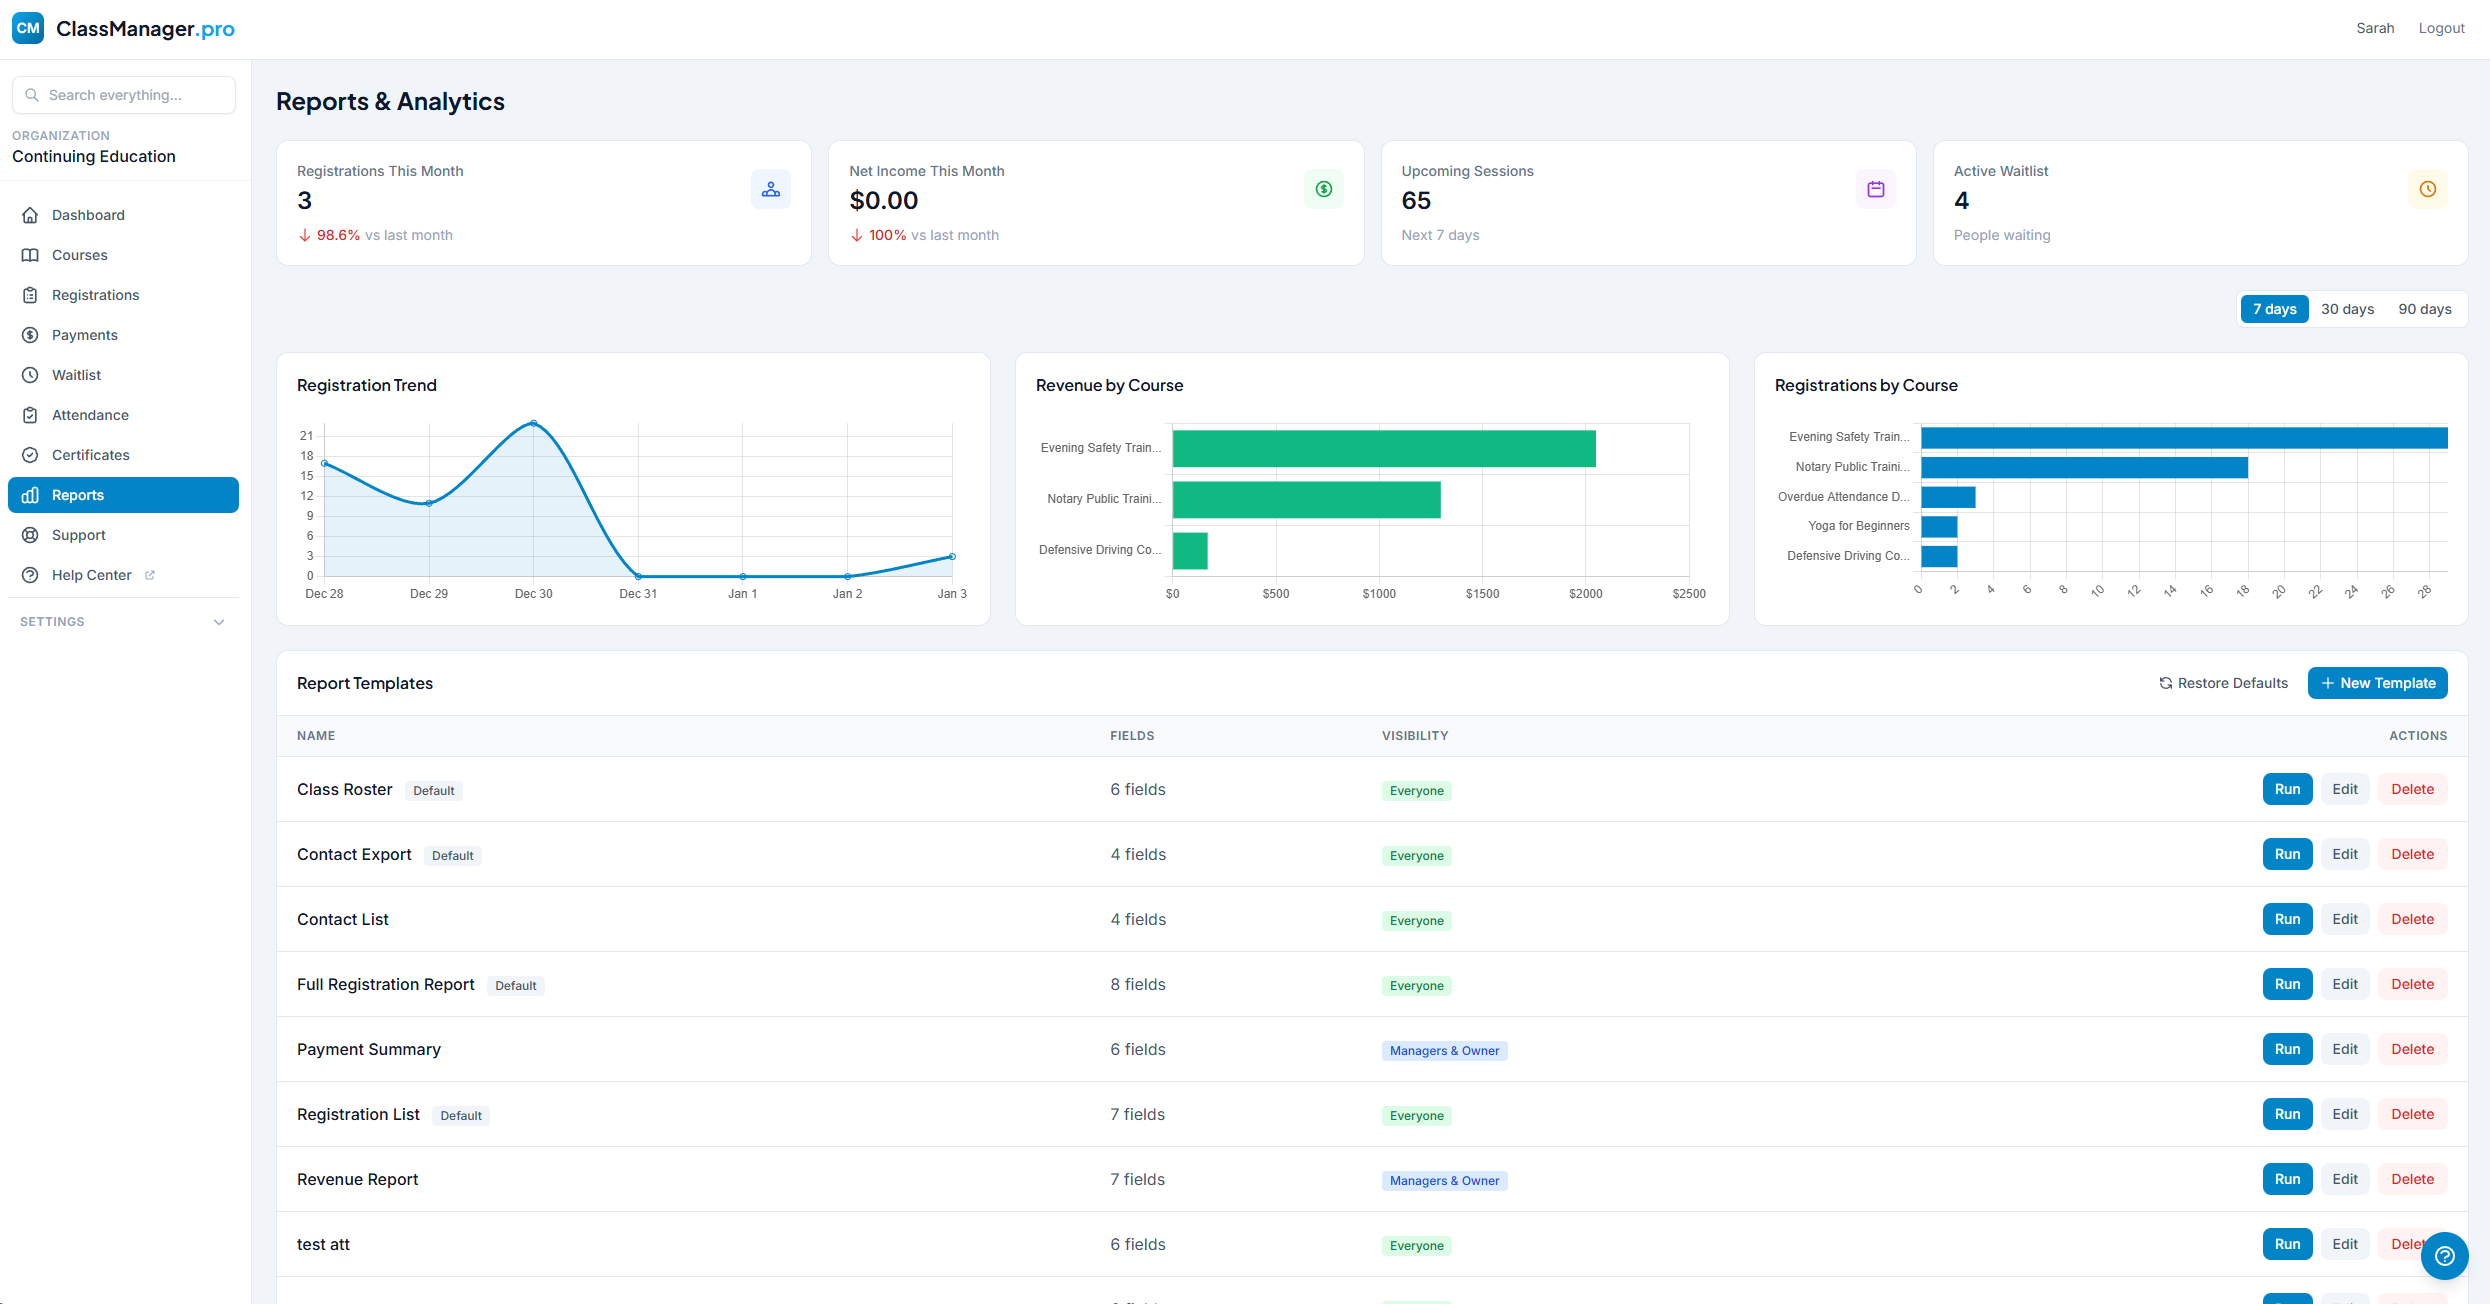
Available Report Types:
- Registration Report — Export registration data with filters for course, date range, status, and payment status. Great for rosters and mailing lists.
- Payment Report — Financial data including gross revenue, fees, refunds, and net income. Perfect for accounting and tax purposes.
- Attendance Report — Attendance records by course or date range. Shows present/absent/excused for each student.
- Certificate Report — List of issued certificates with recipient info, course, and status.
- Custom Reports — Any combination of data points in your database. If you need something specific, you can build it.
Creating Report Templates
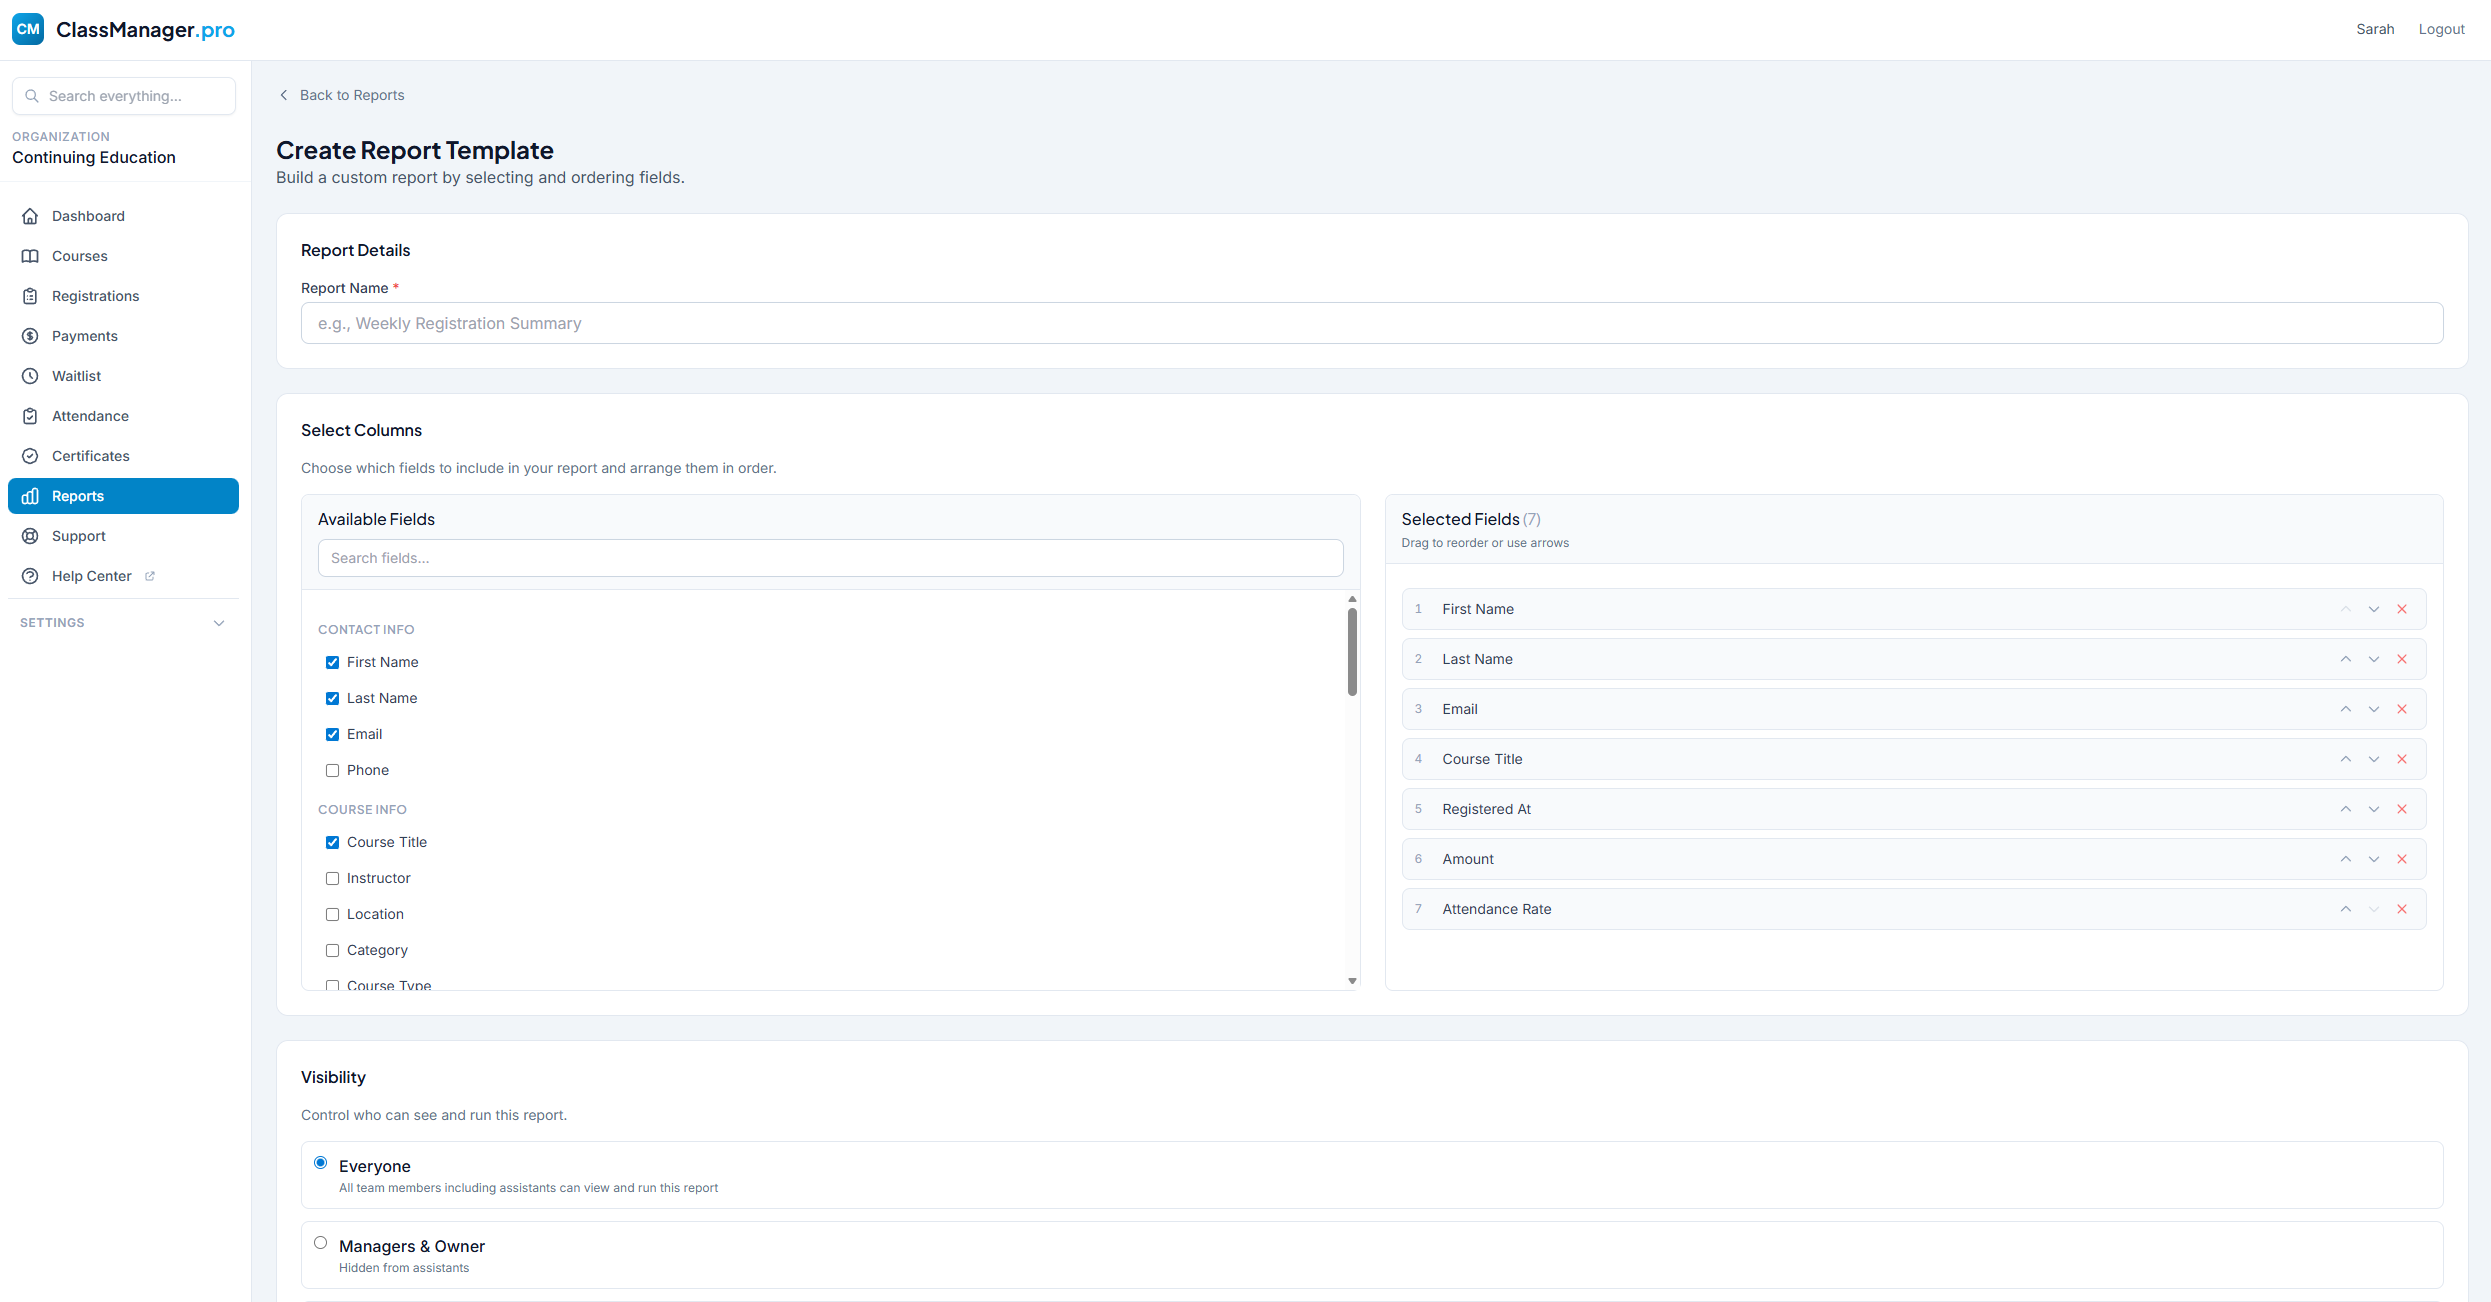
How to Create a Template:
- Click "+ New Template" on the reports dashboard
- Give your template a name (e.g., "Revenue Summary")
- Search or select which columns to include in the export
- Save the template for future use
Available Column Categories
- Contact Info
- First Name, Last Name, Email, Phone
- Course Info
- Title, Instructor, Location, Category, Type, Description
- Session Info
- Session Date, Start Time, End Time, Session #, Capacity
- Registration Info
- Status, Registered At, Cancelled At, Cancellation Reason, Admin Notes
- Payment Info
- Amount, Platform Fee, Stripe Fee, Net Amount, Payment Date, Payment Status, Refunded Amount
- Waitlist Info
- Position, Waitlist Status, Invited At, Expires At
- Attendance Info
- Attendance Status, Attendance Rate, Sessions Attended, Total Sessions, Attendance Notes
- Certificate Info
- Completion Date, Issued Date, Issuing Admin, Verification Code, Certificate ID, Verification URL, Status
Running Reports
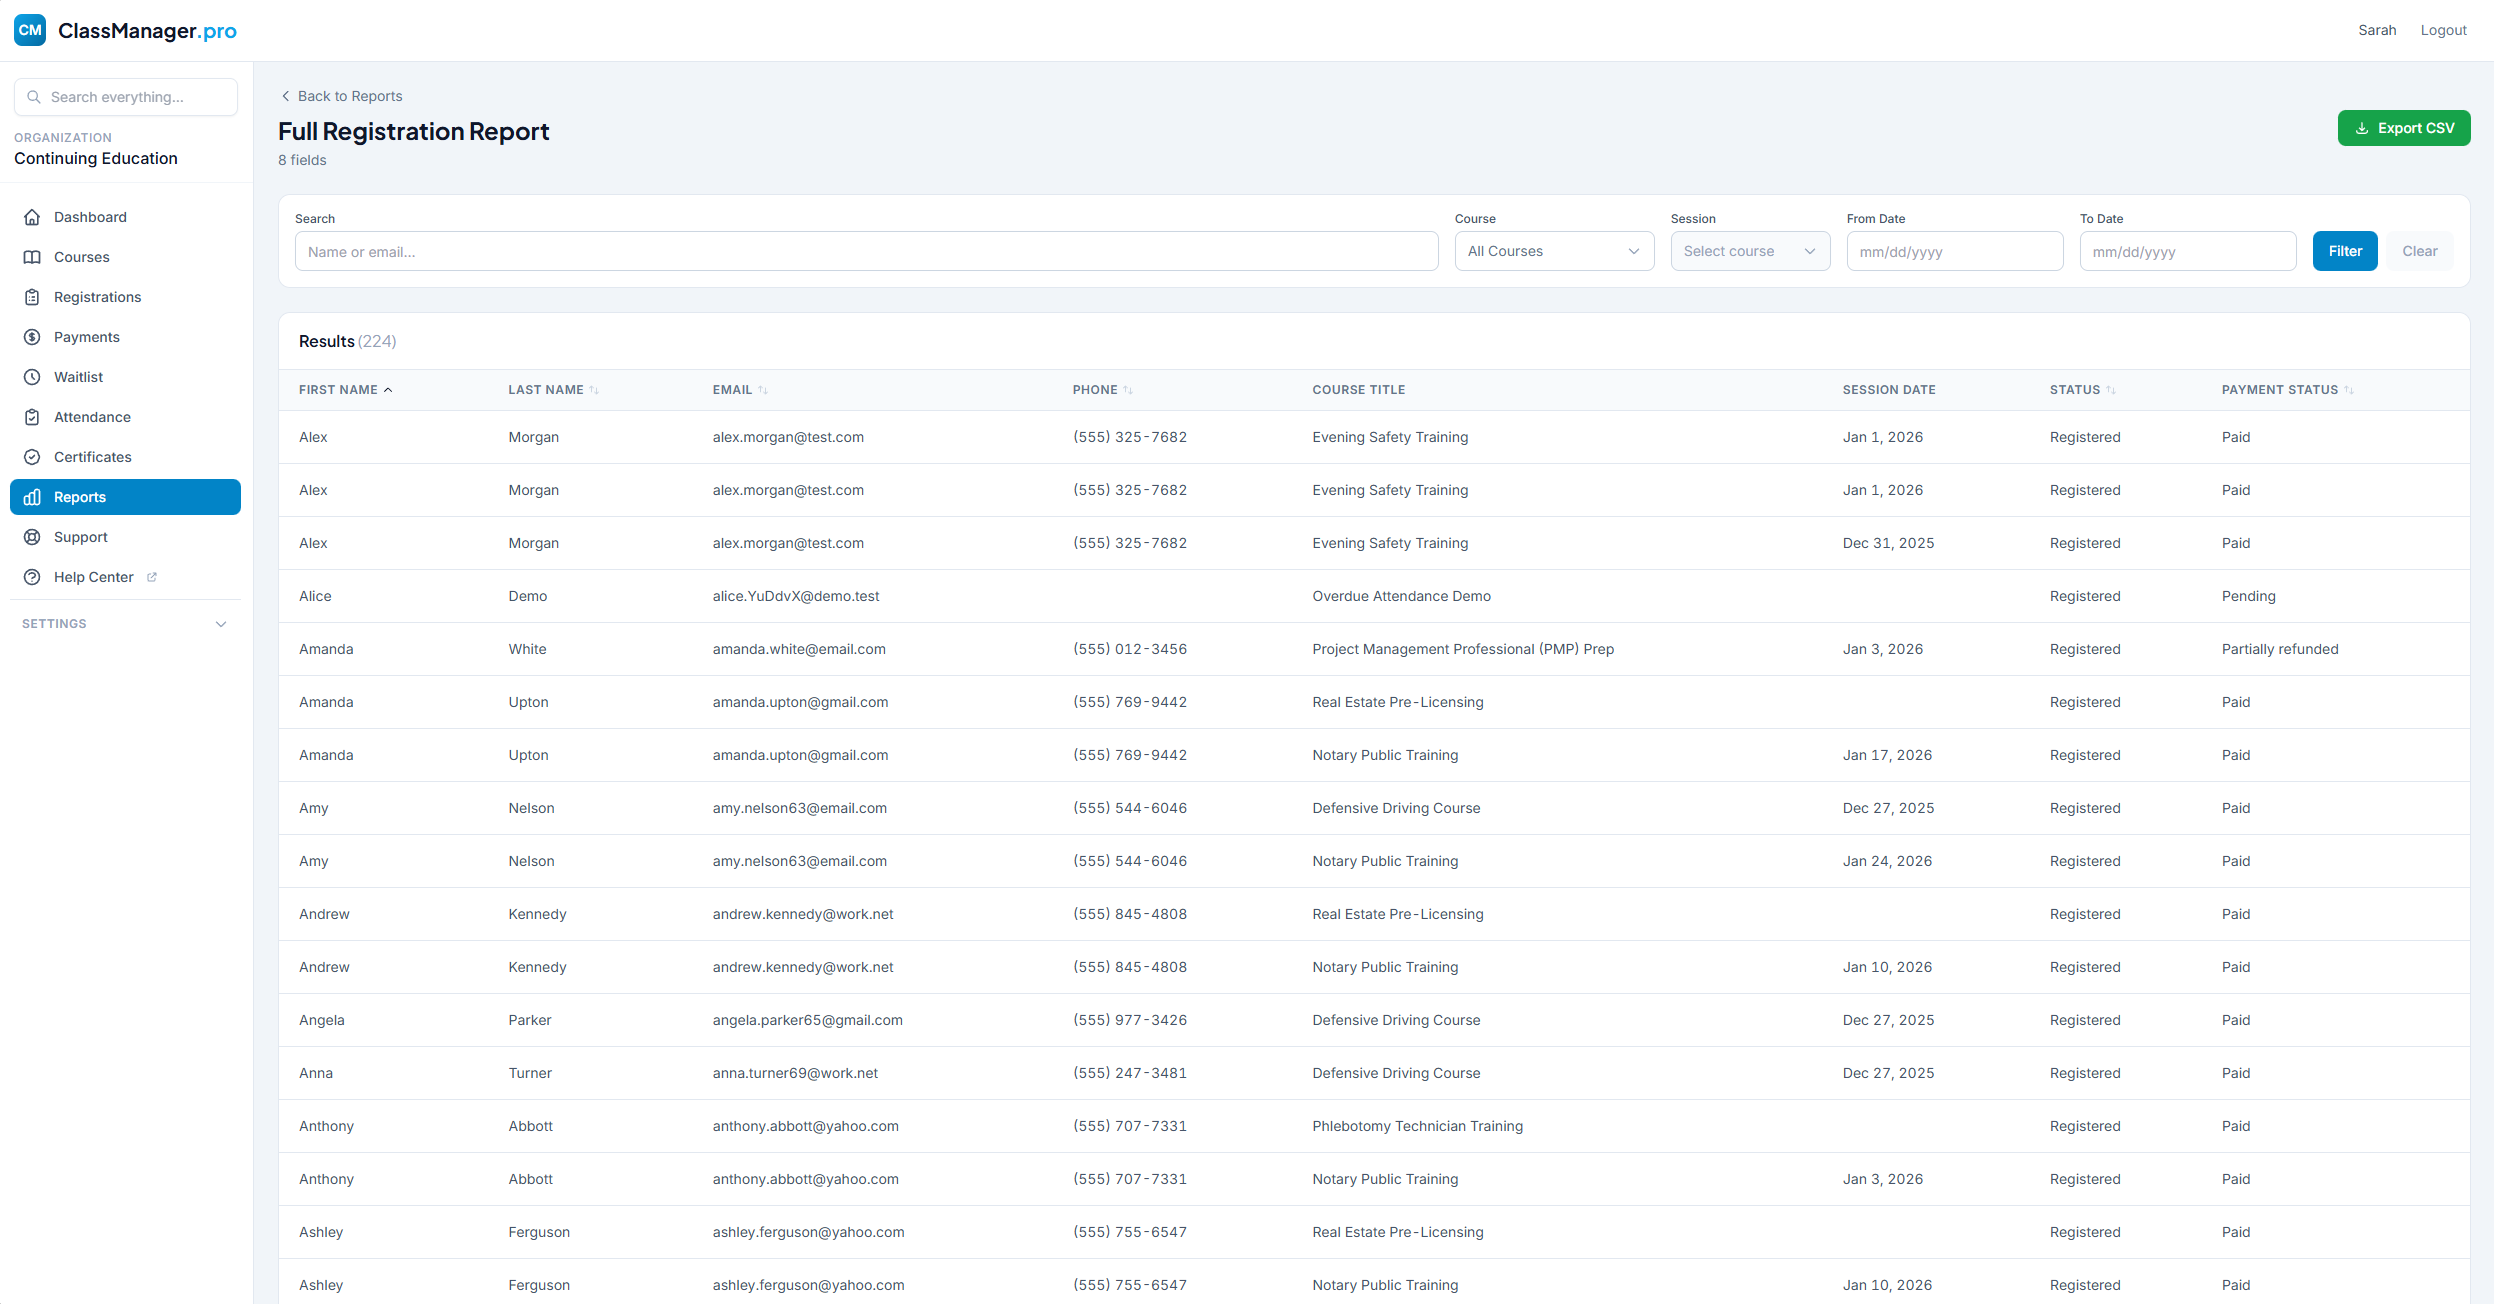
How to Run a Report:
- Click "Run" on any saved template, or use "Quick Report" for one-time viewing or export
- Apply any filters (date range, course, status, etc.)
- Click "View Report" to see results on screen or "Export" to download
Quick Reports
You can also run quick reports directly from other pages using the purple "Run Report" dropdown button on the Registrations, Payments, and Attendance pages. These use your current filters.
Exporting Data
All reports export as .csv files with formatted headers (bold and frozen), proper date formatting, and currency formatting for easy totaling in Excel.
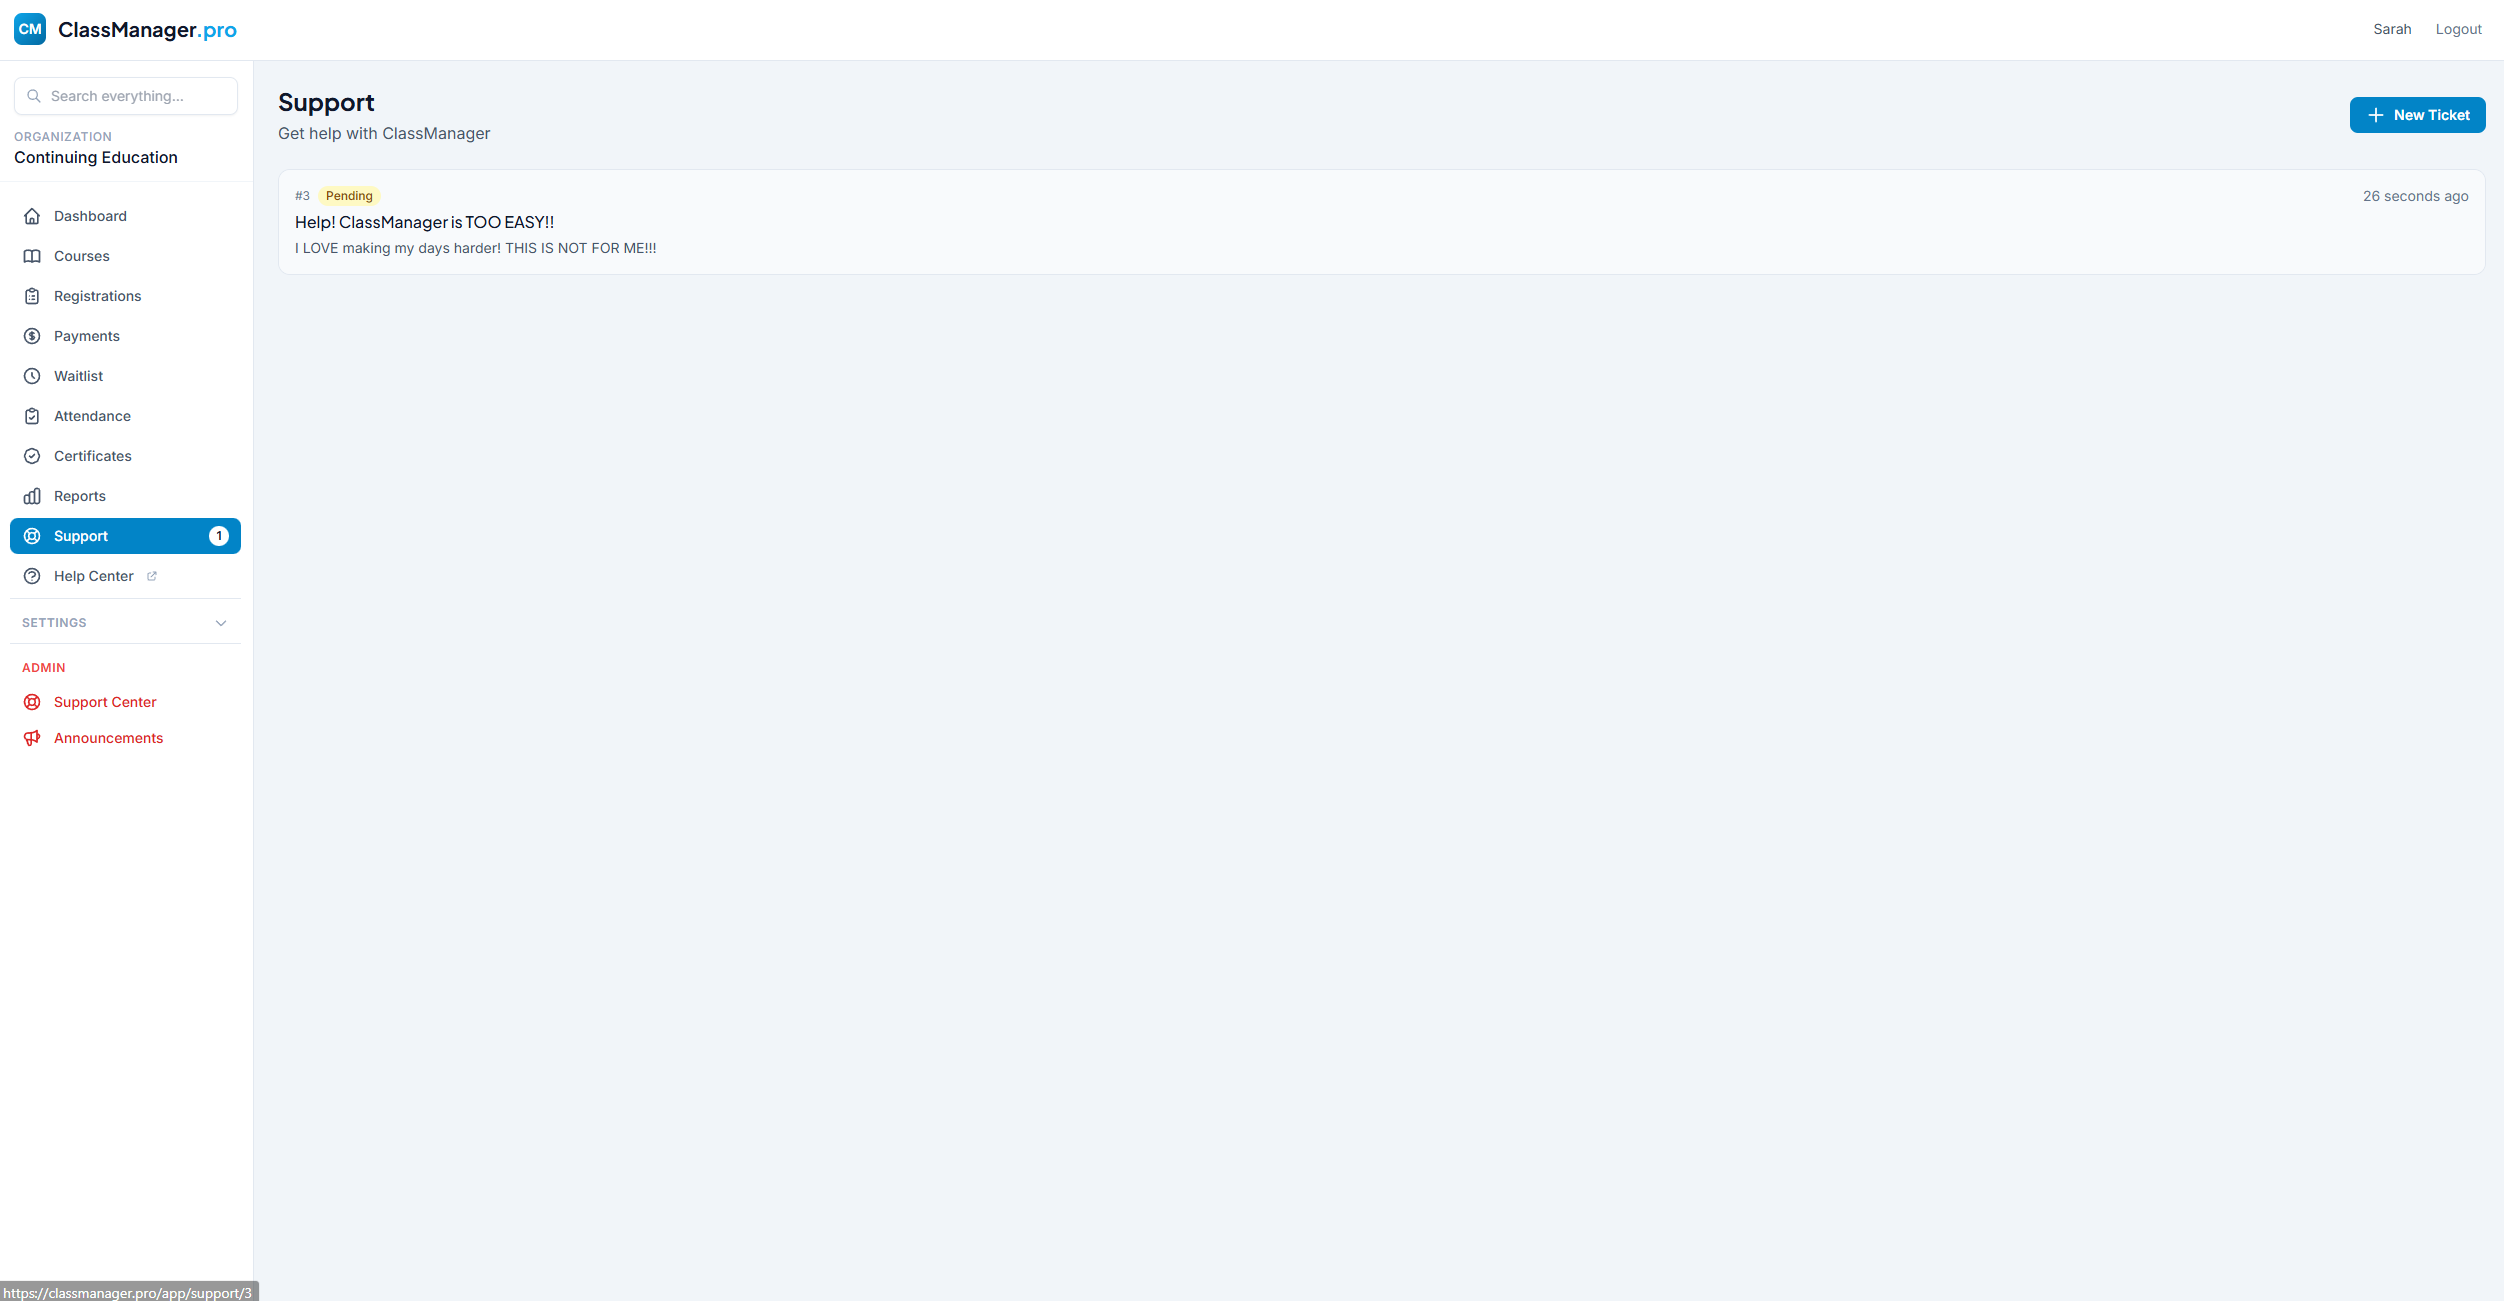
Support
Need help? Submit a support ticket and our team will get back to you. Track your tickets and view responses all in one place.
Creating a Ticket
How to Submit a Ticket:
- Navigate to Support from the sidebar menu
- Click "+ New Ticket" button
- Enter a descriptive subject line
- Describe your issue or question in detail
- Optionally attach screenshots or files
- Click "Submit Ticket"
Viewing & Replying
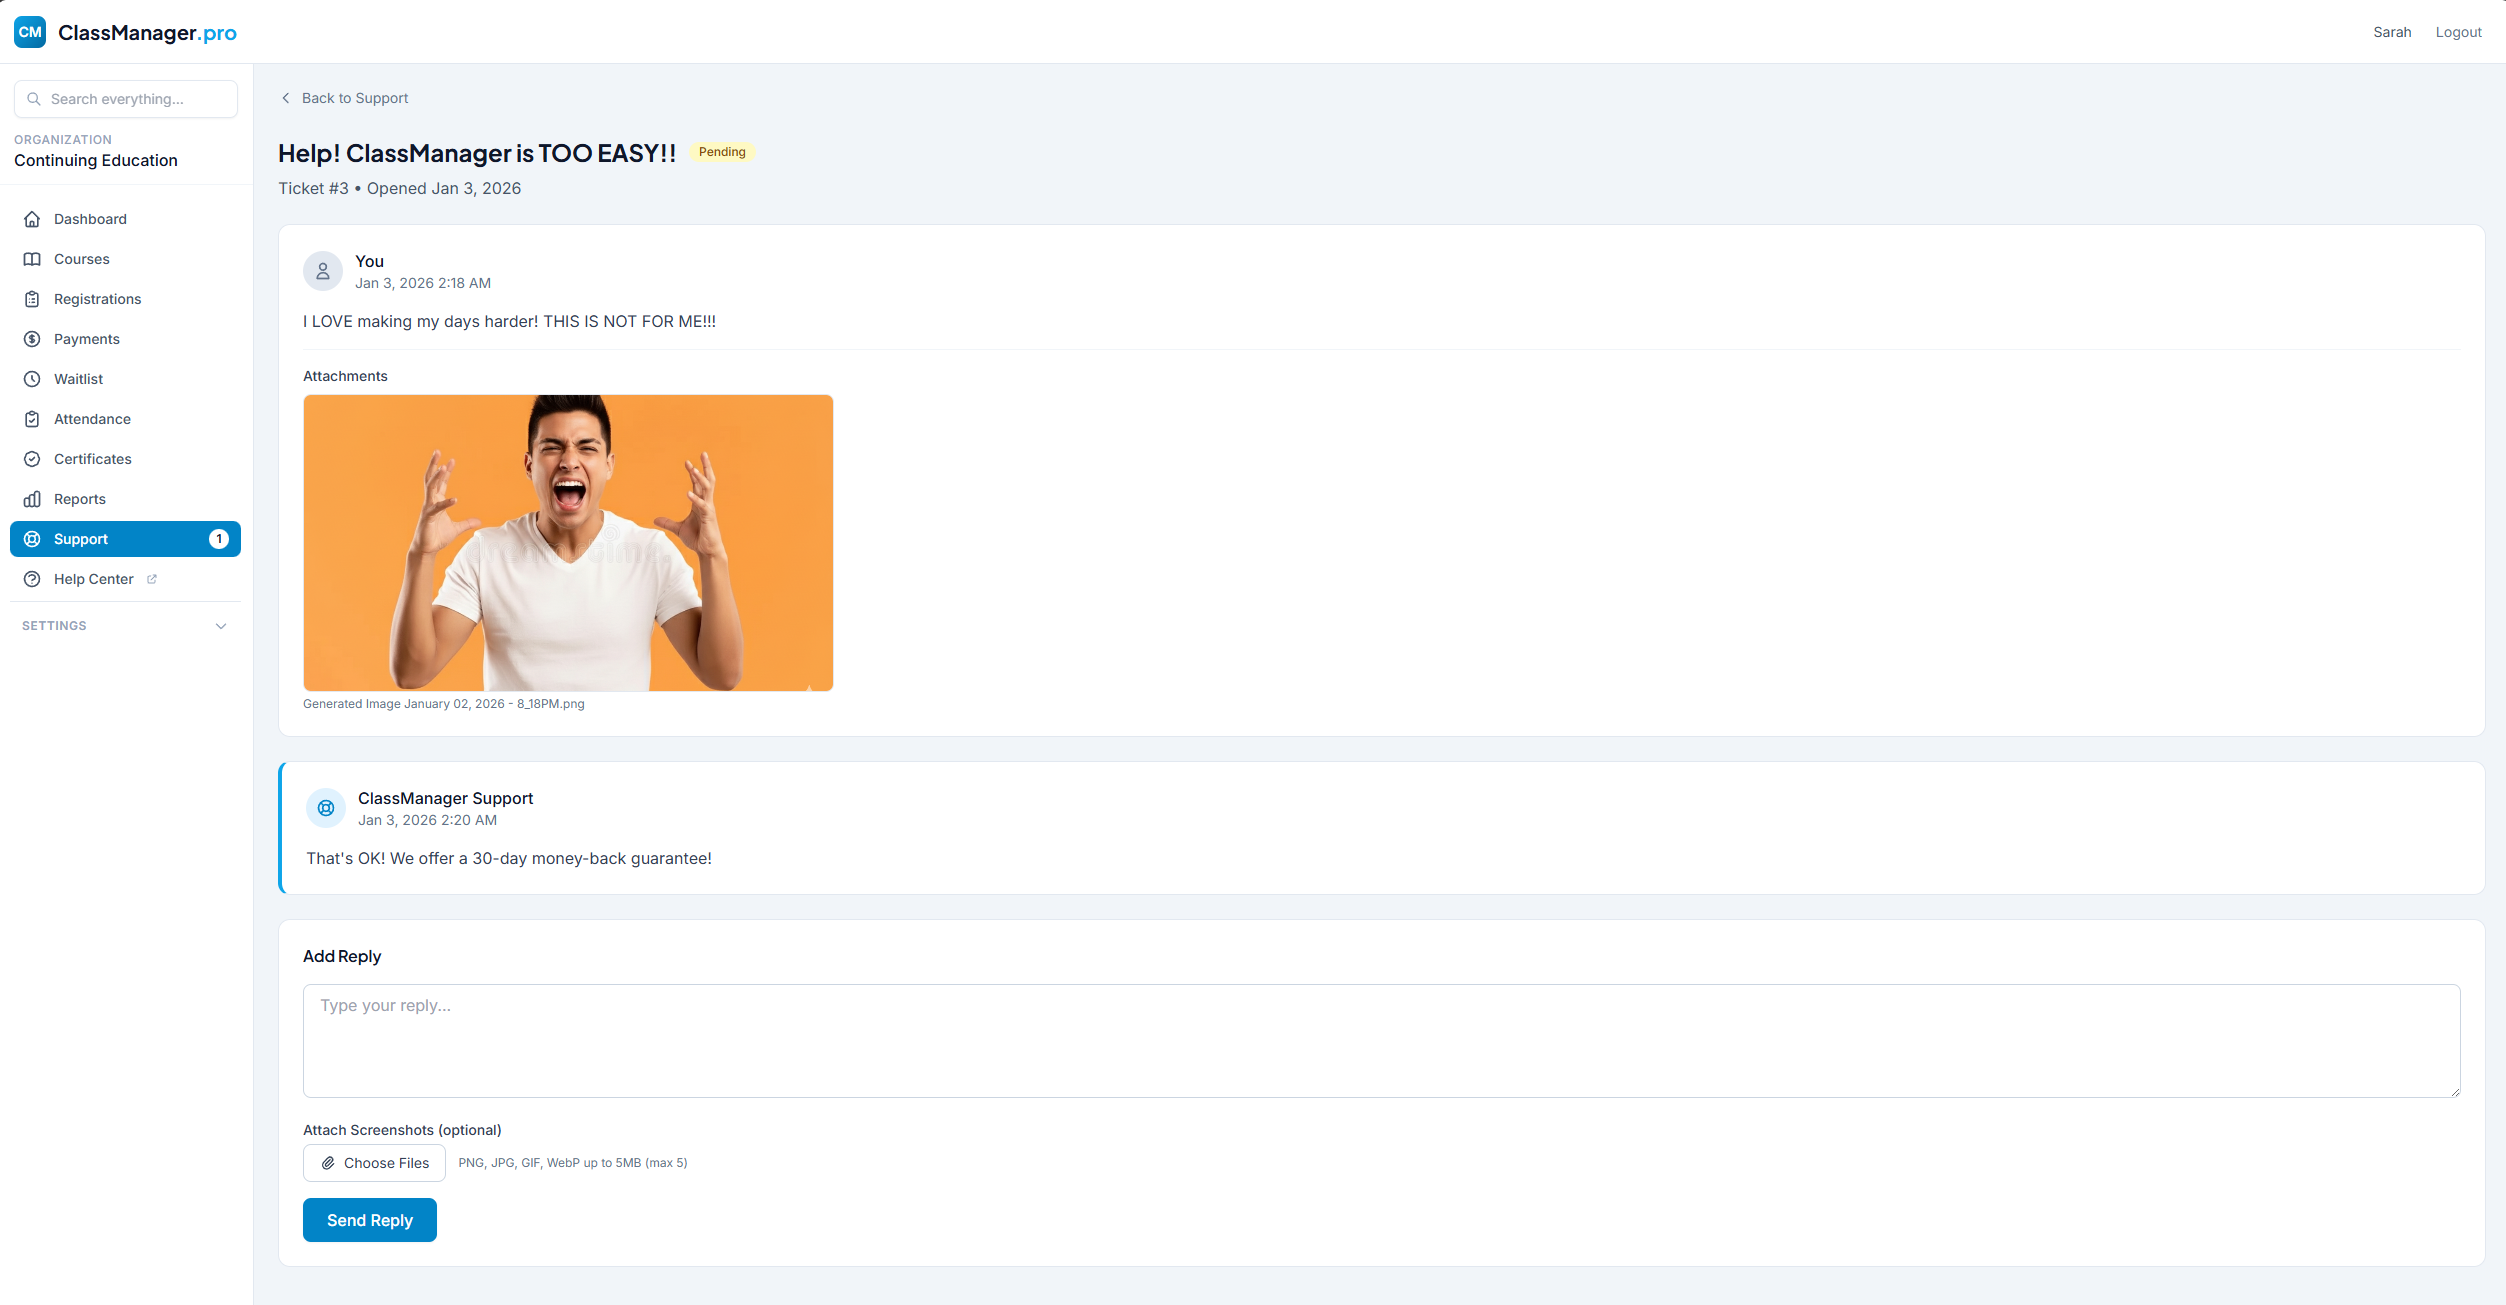
Click any ticket to view the full conversation thread, add replies, and view/download attachments.
Email Notifications
You'll receive email notifications when support responds. You can reply directly from the email or log in to view the full thread.
Ticket Status
Awaiting response from our support team
Support is actively working on your issue
We're waiting for your response
Issue has been resolved
Ticket is closed (can be reopened by replying)
Email Settings
Configure email templates and automated reminder settings for your organization.

Email Configuration
Reply-To Email: When registrants reply to automated emails, responses will go to this address. Leave blank to use your organization's account email.
Automated Reminders
You can configure up to two automated reminders that are sent to registrants before their sessions:
- Reminder 1 — First reminder before session. Toggle on/off and set how many hours before (1-168 hours).
- Reminder 2 — Second reminder closer to session. Toggle on/off and set how many hours before (1-168 hours).
Email Templates
The templates table shows all available email types. For each template you can toggle active status (disabled templates won't be sent) or edit to customize the template name, subject line, and body content.
Editing Email Templates
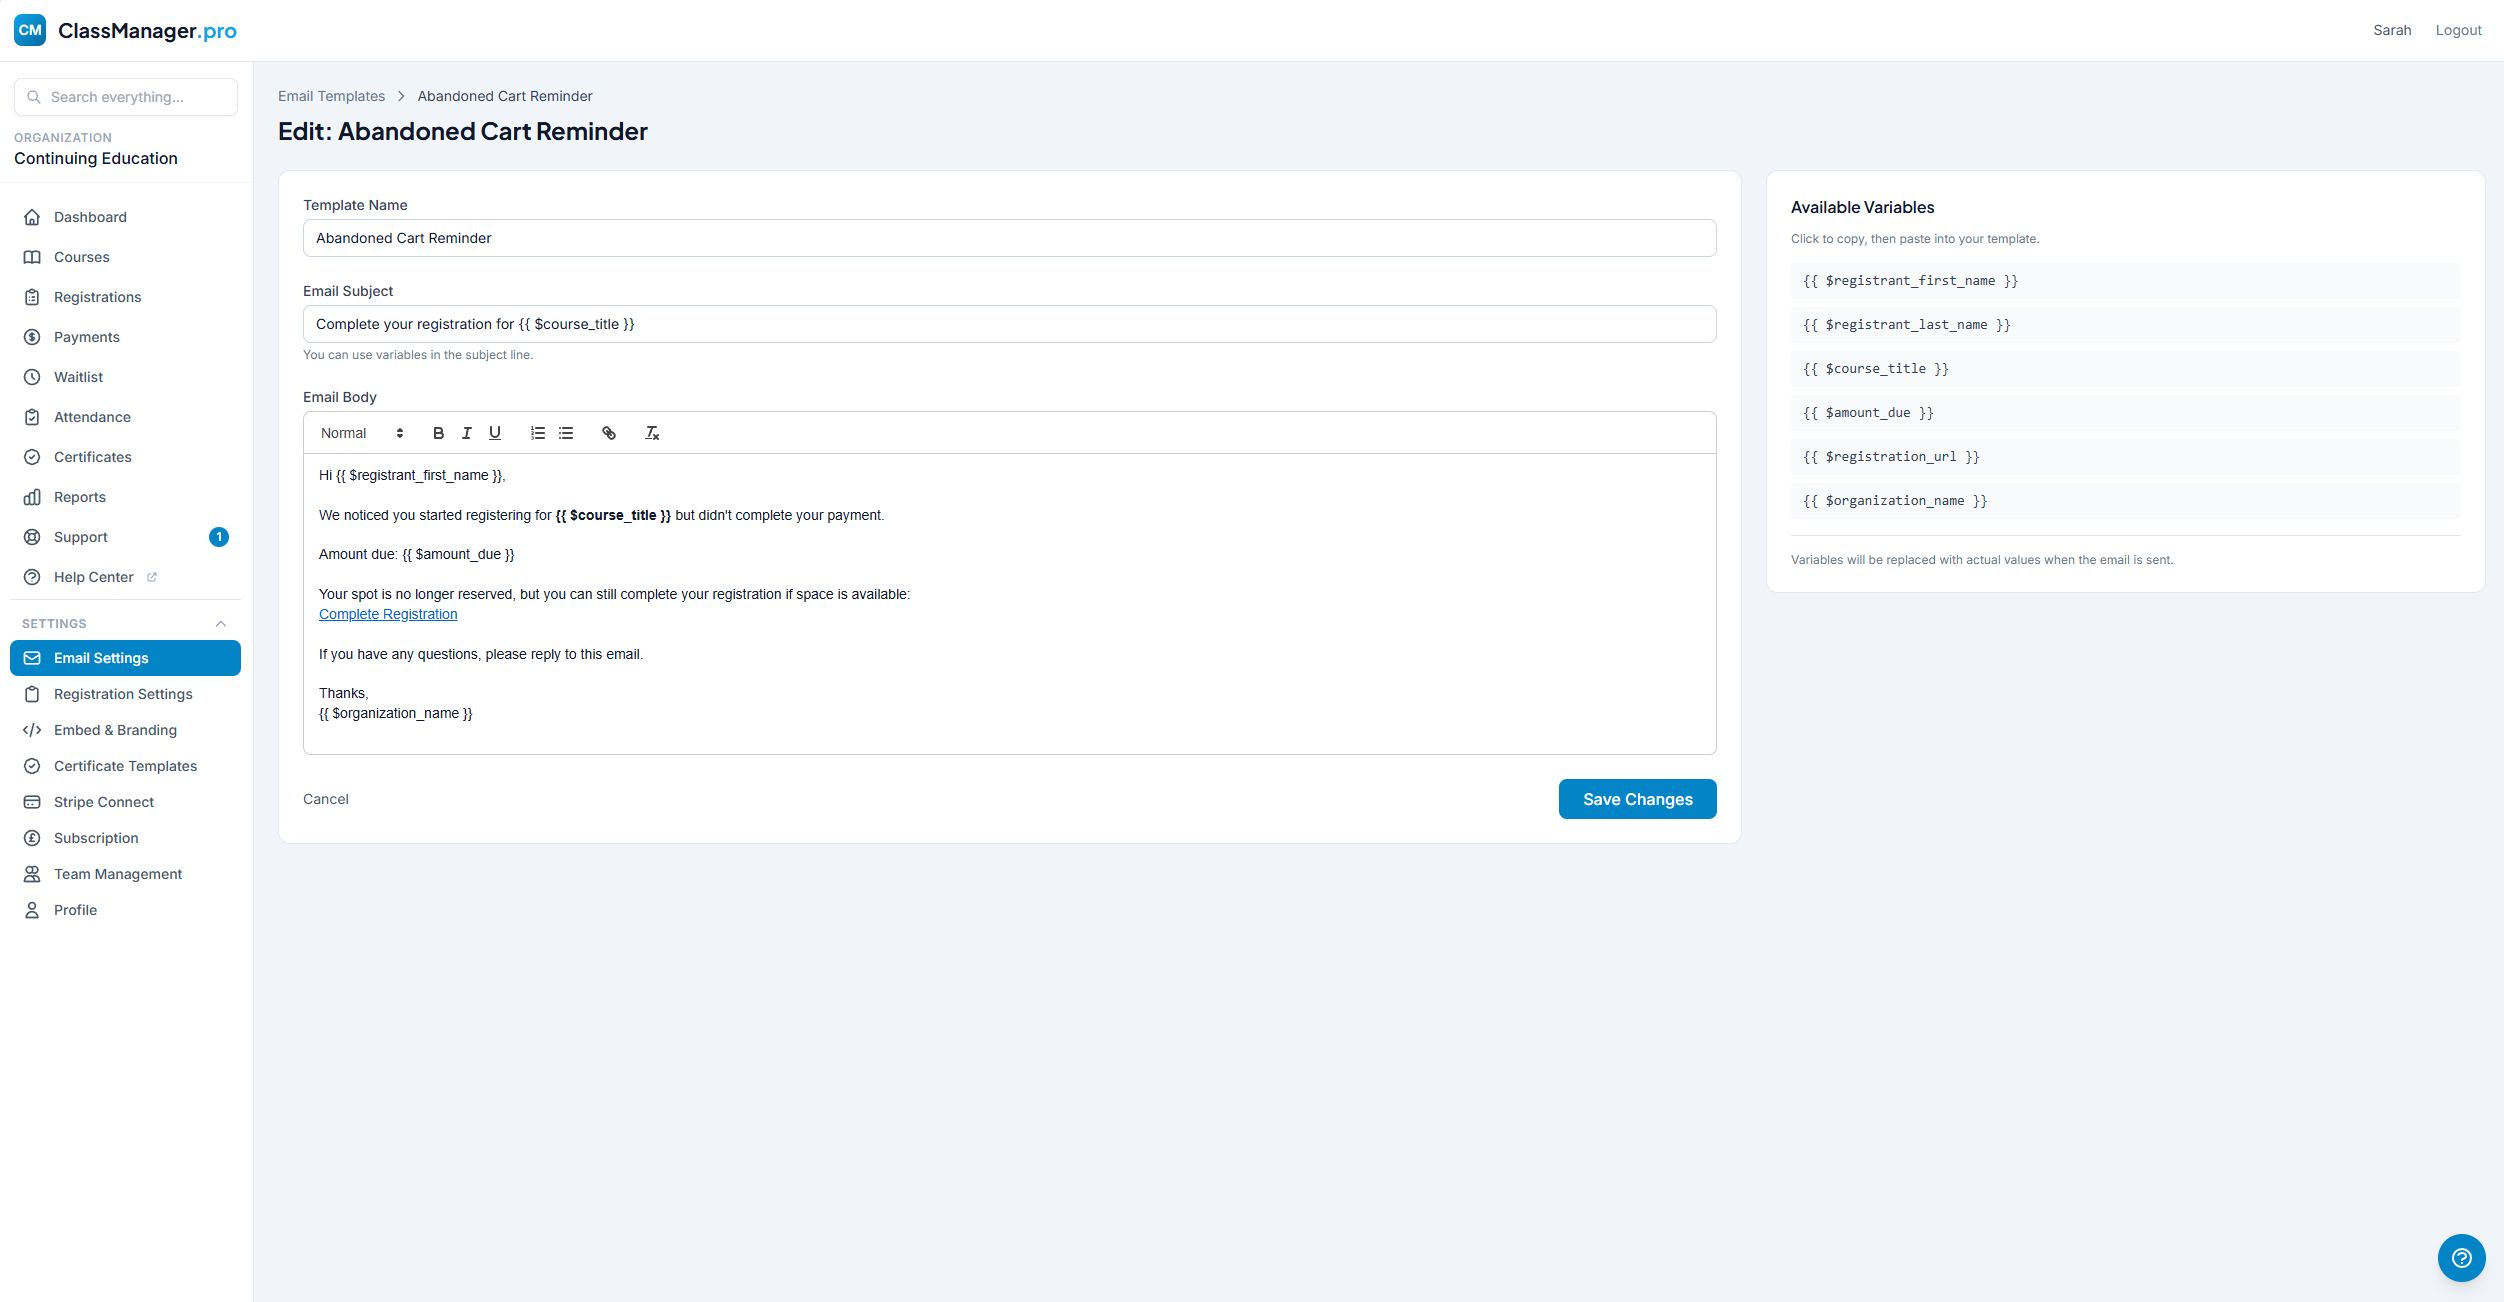
Click "Edit" on any template to open the editor where you can customize:
- Template Name — The display name shown in your templates list
- Email Subject — The subject line recipients see (supports variables)
- Email Body — Rich text editor with formatting: headers, bold, italic, underline, lists, and links
Using Variables: Each template has its own set of available variables shown in a sidebar. Click any variable to copy it, then paste into your template. Variables use the format {{ $variableName }} and are replaced with actual data when emails are sent.
About Automated Emails
Reminders/notifications are sent automatically via scheduled task. Each registrant receives at most one email per reminder slot per session, preventing duplicate notifications.
Registration Settings
Configure how registrations work across your organization: pending expiry, waitlist behavior, required fields, and more.
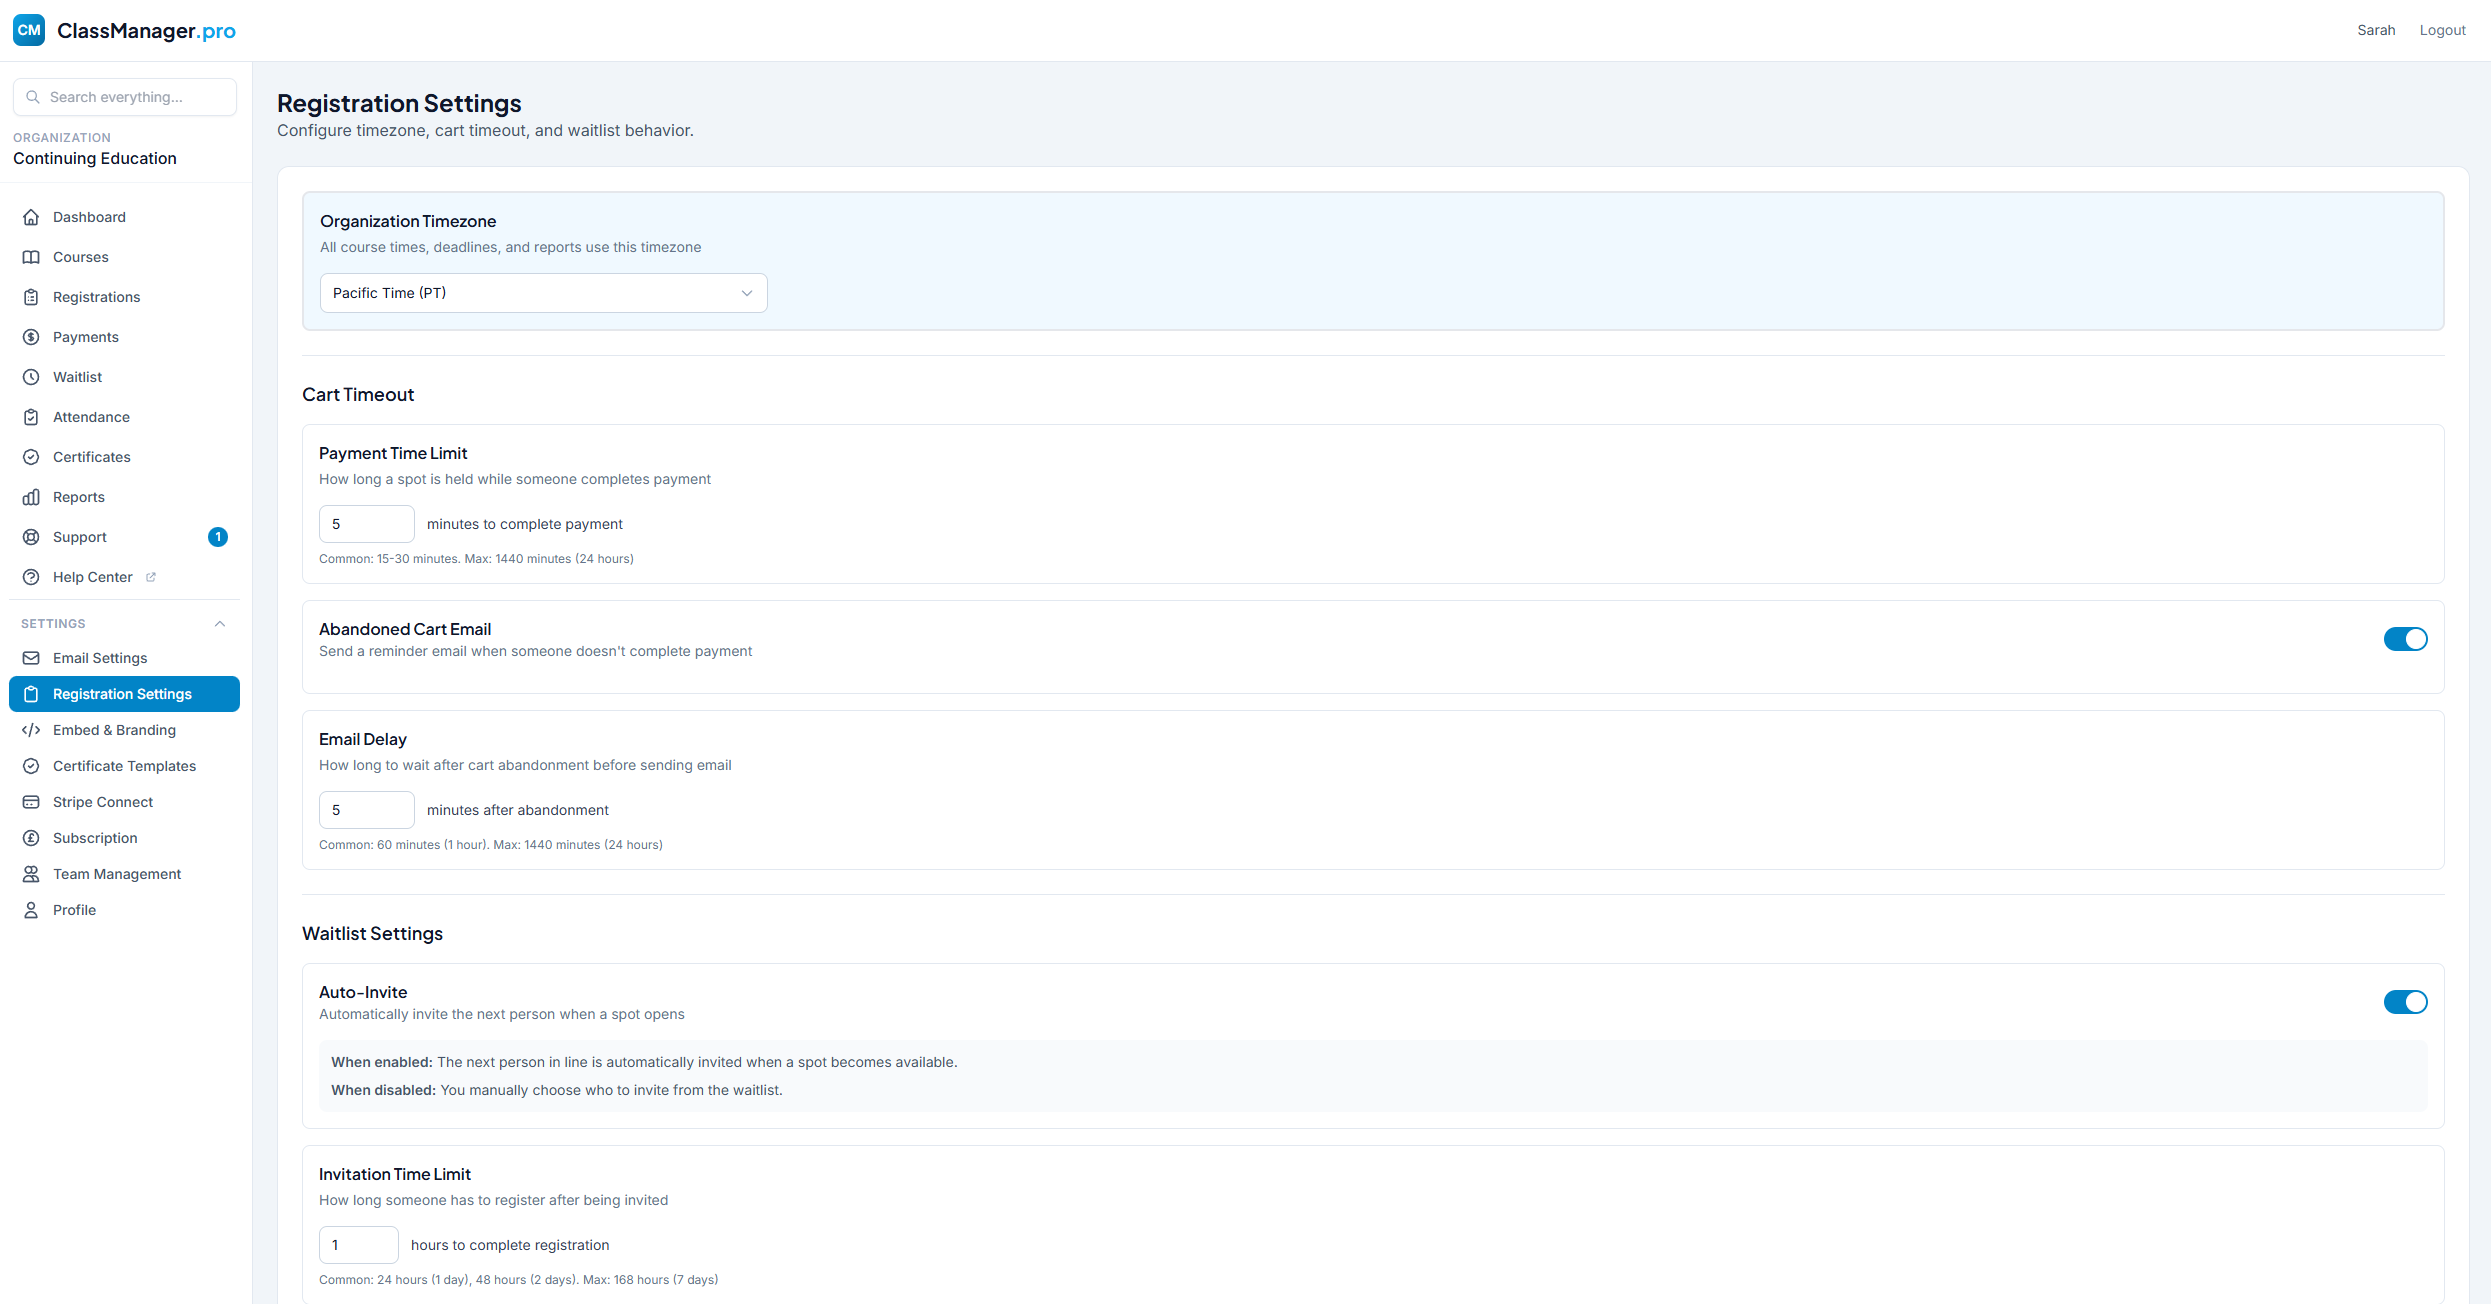
Abandoned Registration Settings
- Abandoned Expiry Time — How long a registration can remain in "pending" status before it expires and the spot is released. Default: 30 minutes.
- Send Reminder Email — Automatically email registrants when their pending registration expires.
Waitlist Settings
- Auto-Invite from Waitlist — When enabled, automatically sends invitations to the next person on the waitlist when a spot opens up.
- Waitlist Invitation Expiry — How long waitlist invitations remain valid before expiring. Default: 24 hours.
Terms & Conditions
Paste in your T&C and we will retain the current formatting. Registrants must accept these terms during checkout.
Organization-Wide Settings
These settings apply to all courses in your organization. Individual courses cannot override these settings.
Embed & Branding
Embed your course calendar on your website and customize its appearance to match your brand.
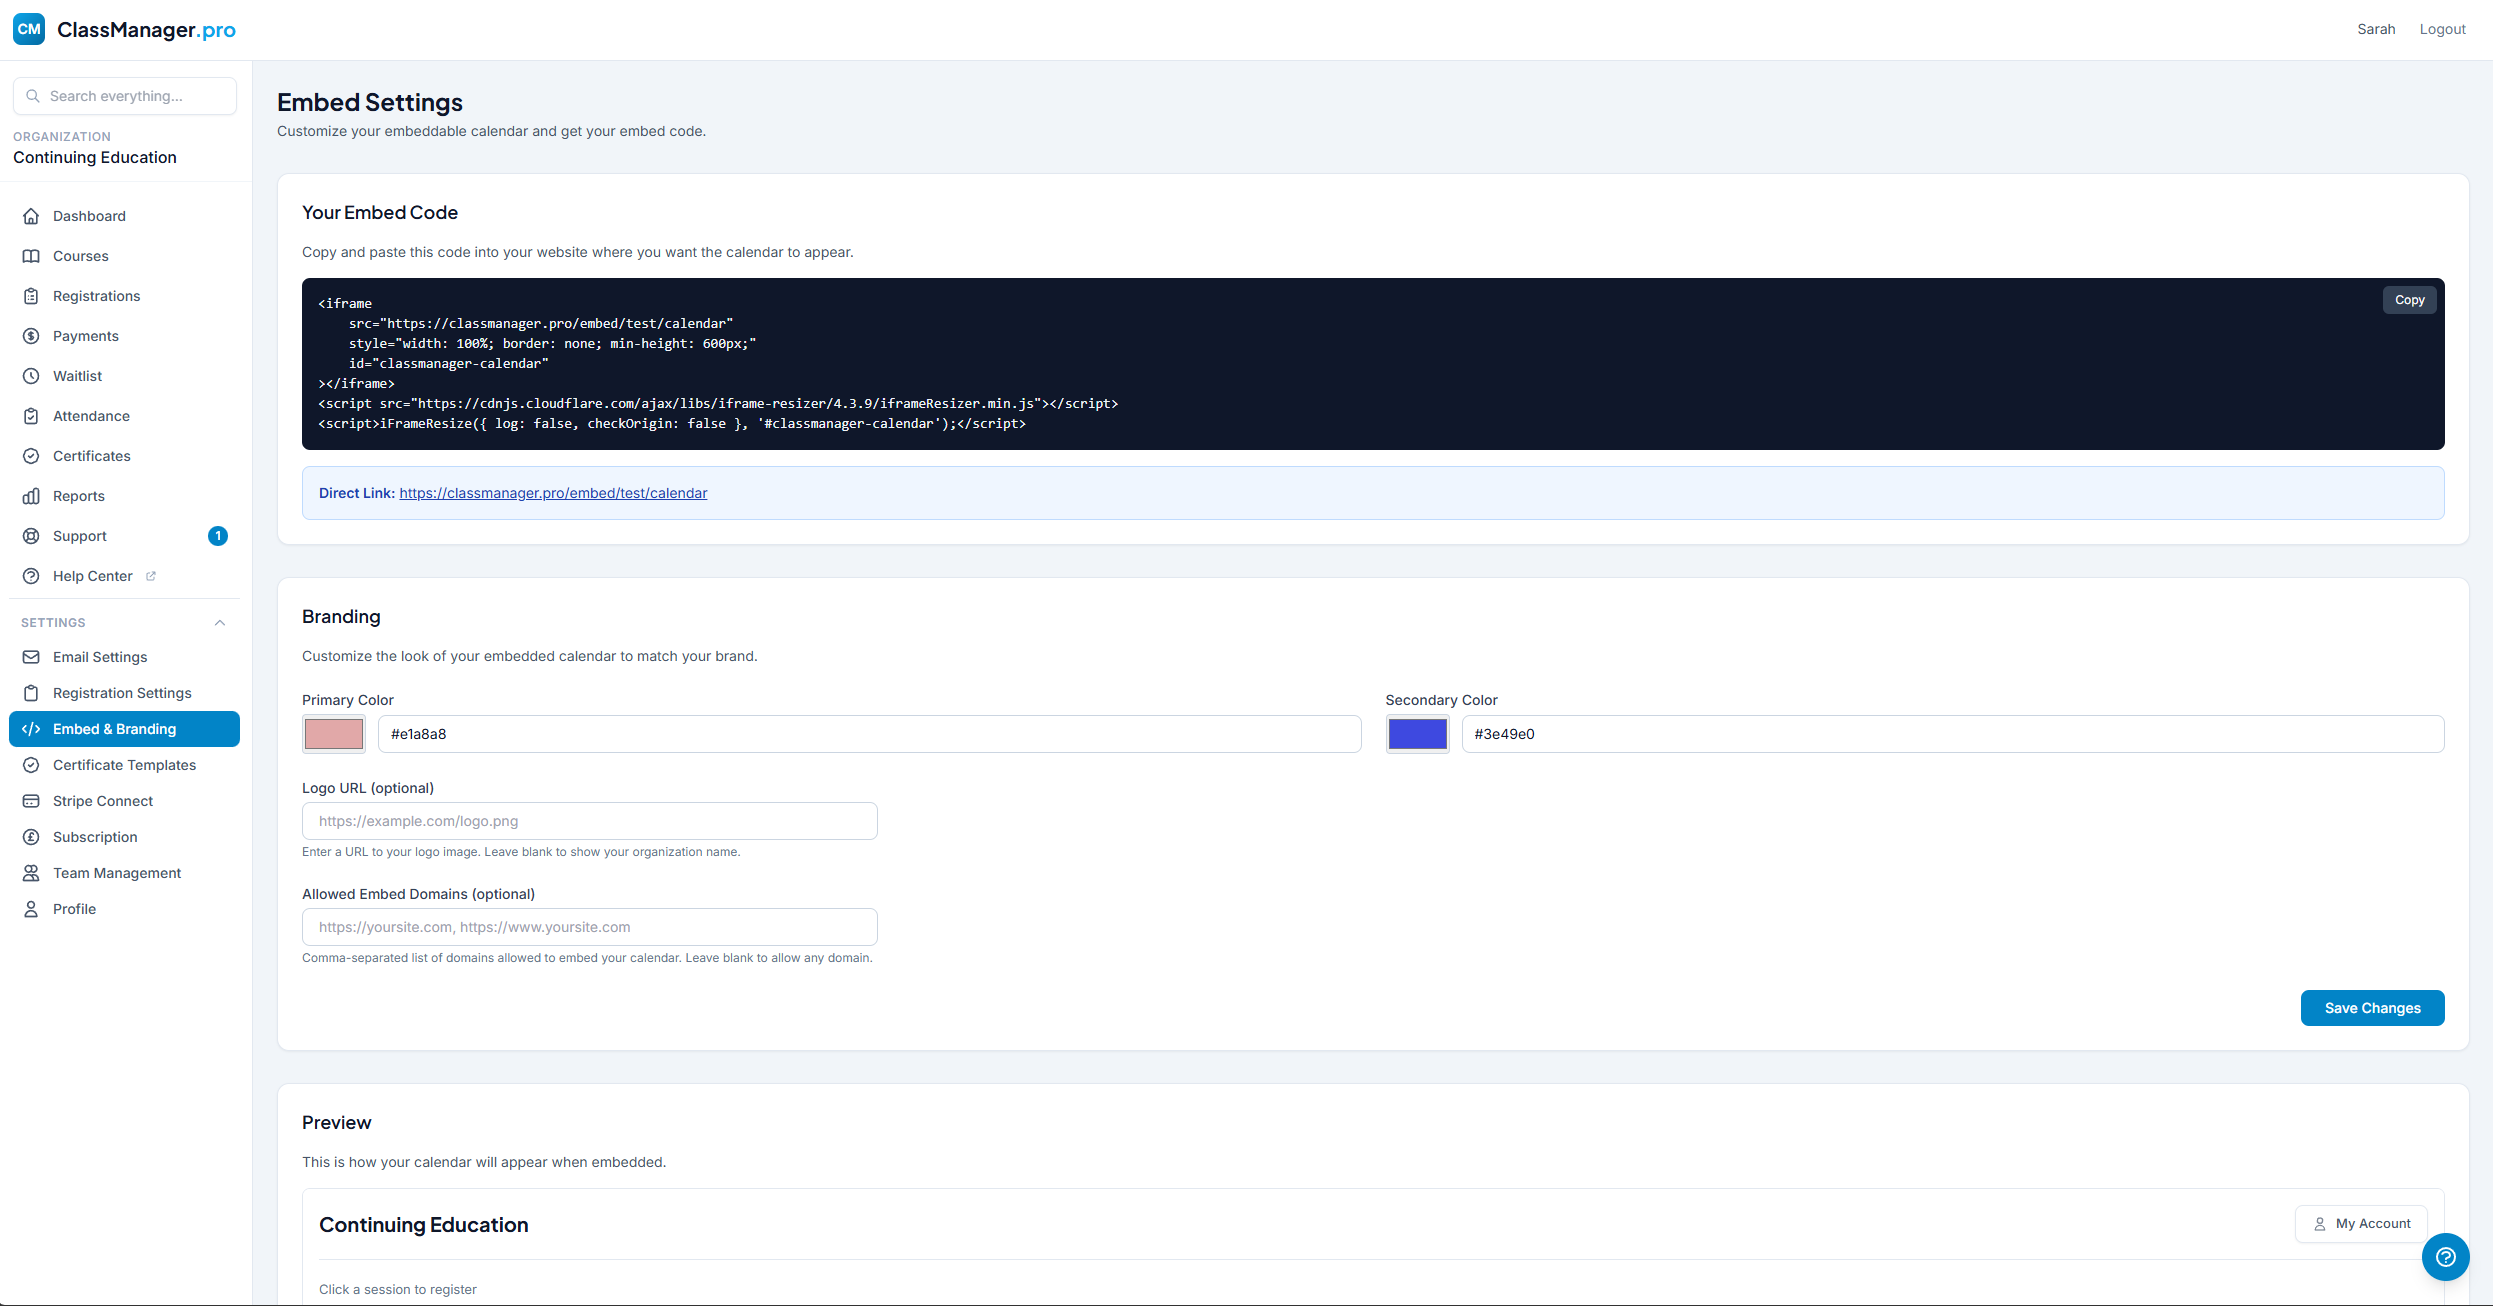
Embed Code
How to Embed Your Calendar:
- Copy the embed code from this page
- Paste it into your website's HTML where you want the calendar to appear
- The calendar will automatically display your published courses
Embed Options:
- Calendar View — Interactive calendar showing all published courses. Visitors can click sessions to register.
- Default View — Choose the default calendar view: Month, Week, or List.
Example Embed Code:
<iframe src="https://classmanager.pro/calendar/your-org-slug" width="100%" height="700" frameborder="0"></iframe>
Branding Options
- Primary Color — Main accent color for buttons, links, and highlights. Use the color picker or enter a hex code.
- Secondary Color — Supporting color for hover states and accents.
- Organization Logo — Upload your logo to display on the calendar and registration pages (PNG or JPG, max 2MB).
- Allowed Domains — Restrict which websites can embed your calendar. Enter comma-separated domains or leave blank to allow any domain.
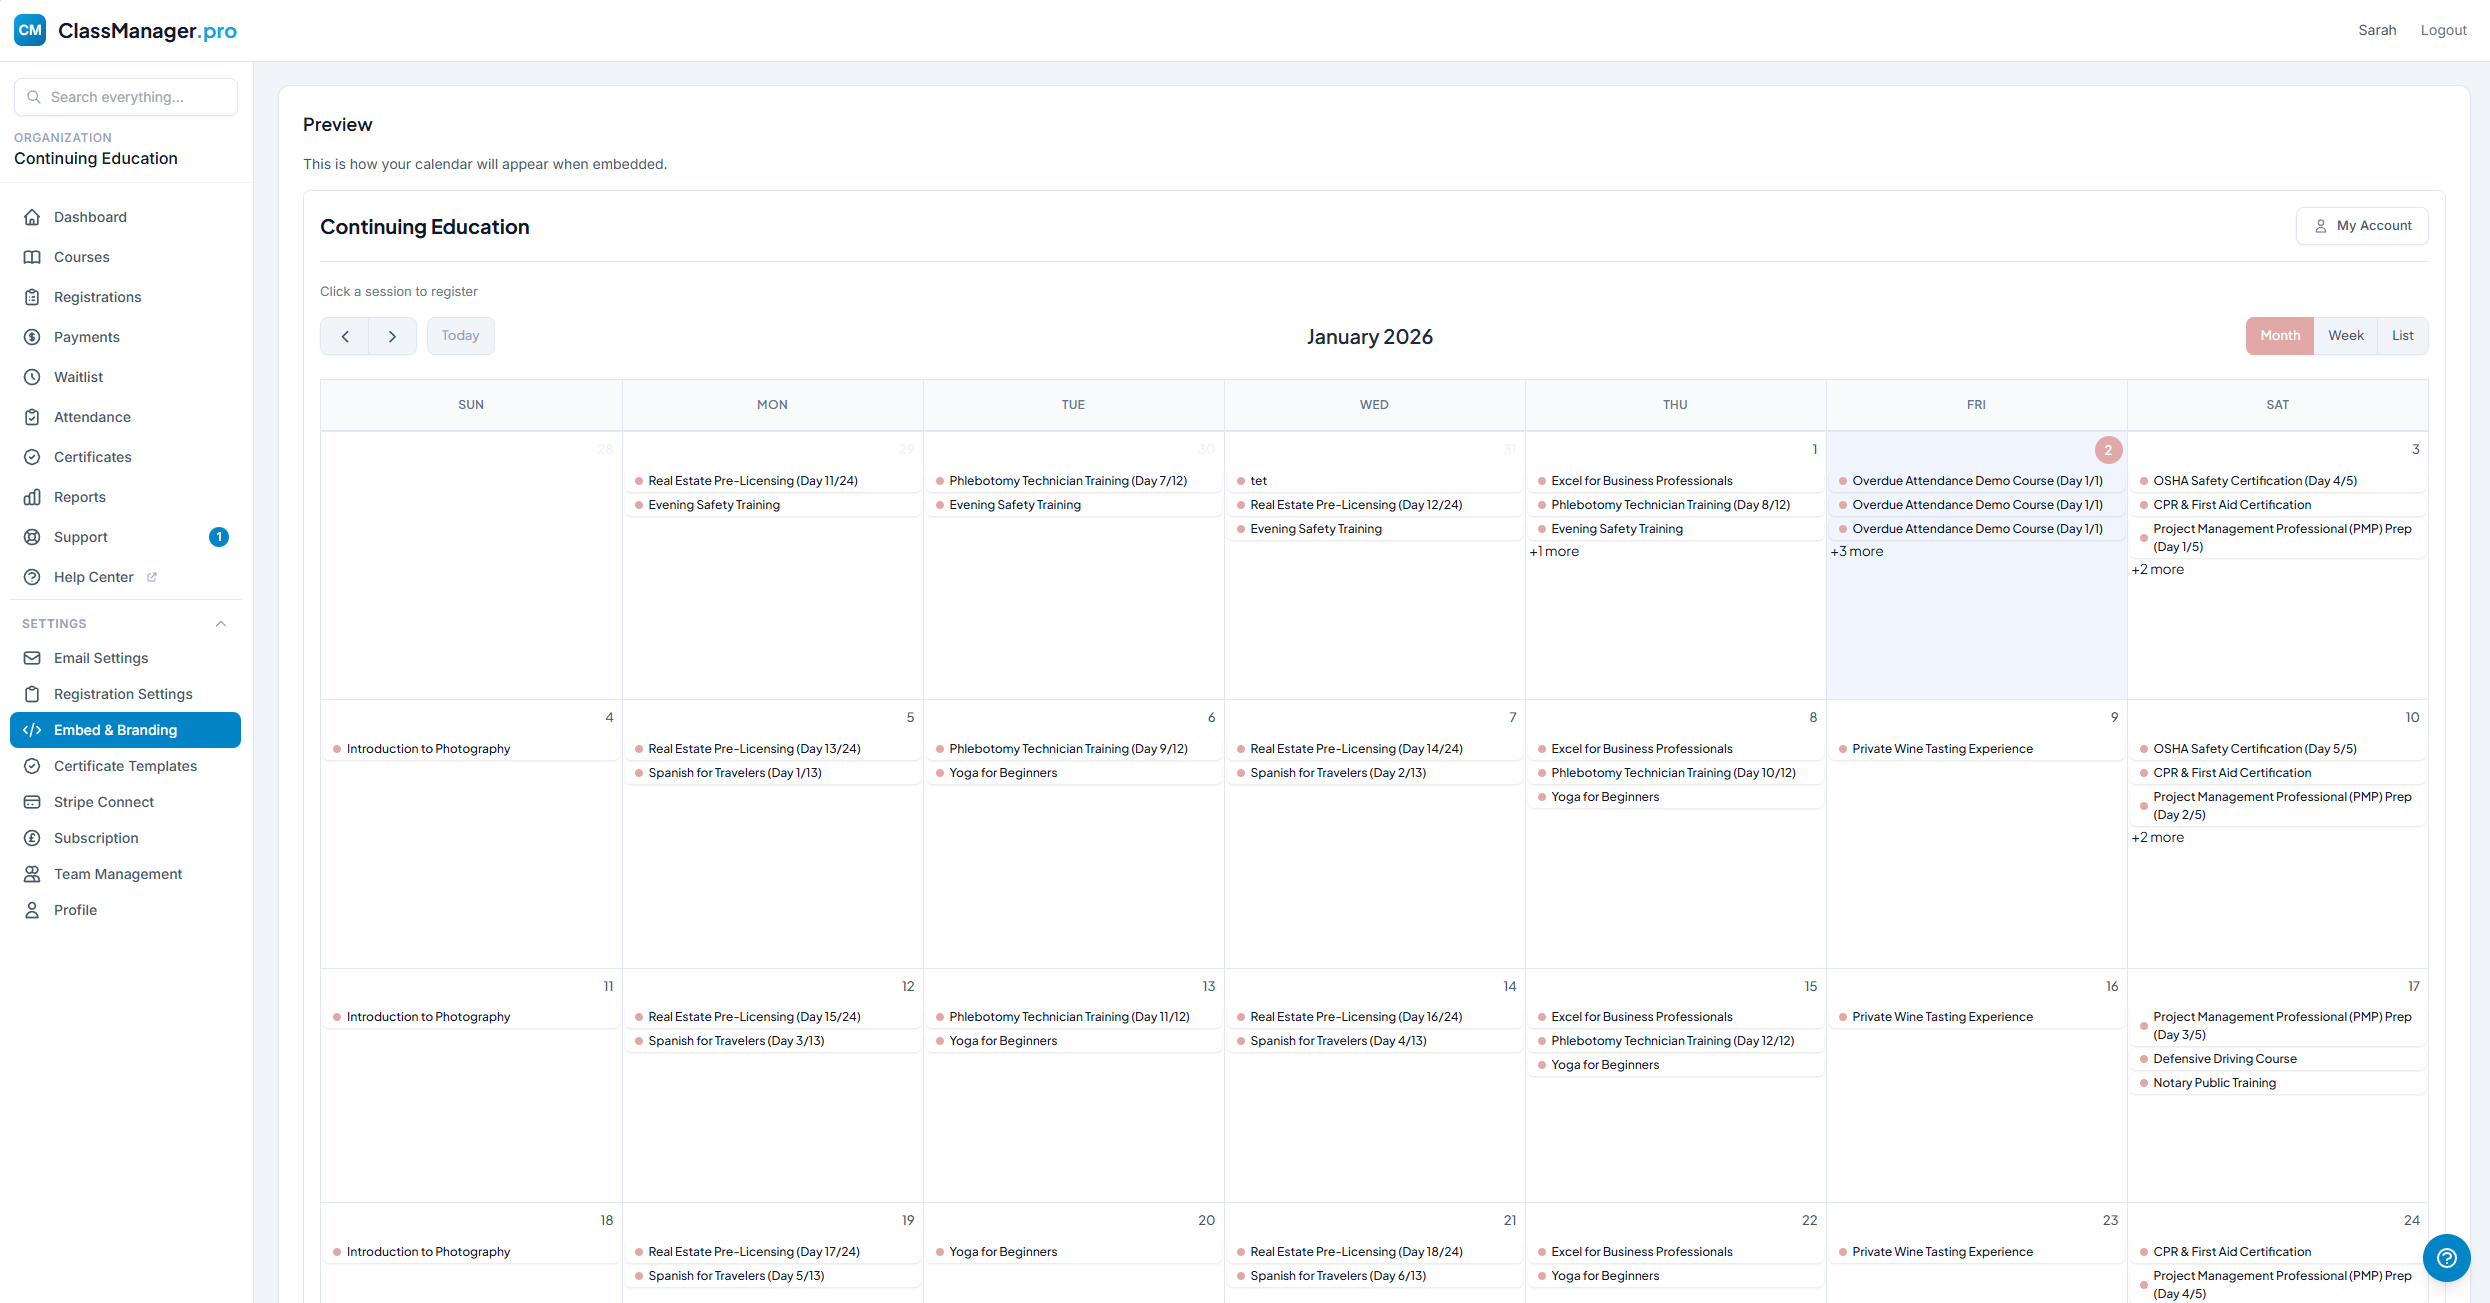
Live Preview
The preview section shows exactly how your embedded calendar will appear with your current branding settings. Save your changes to see them reflected in the preview.
Certificate Templates
Design professional completion certificates with your branding. Create multiple templates for different courses or purposes.
Template List
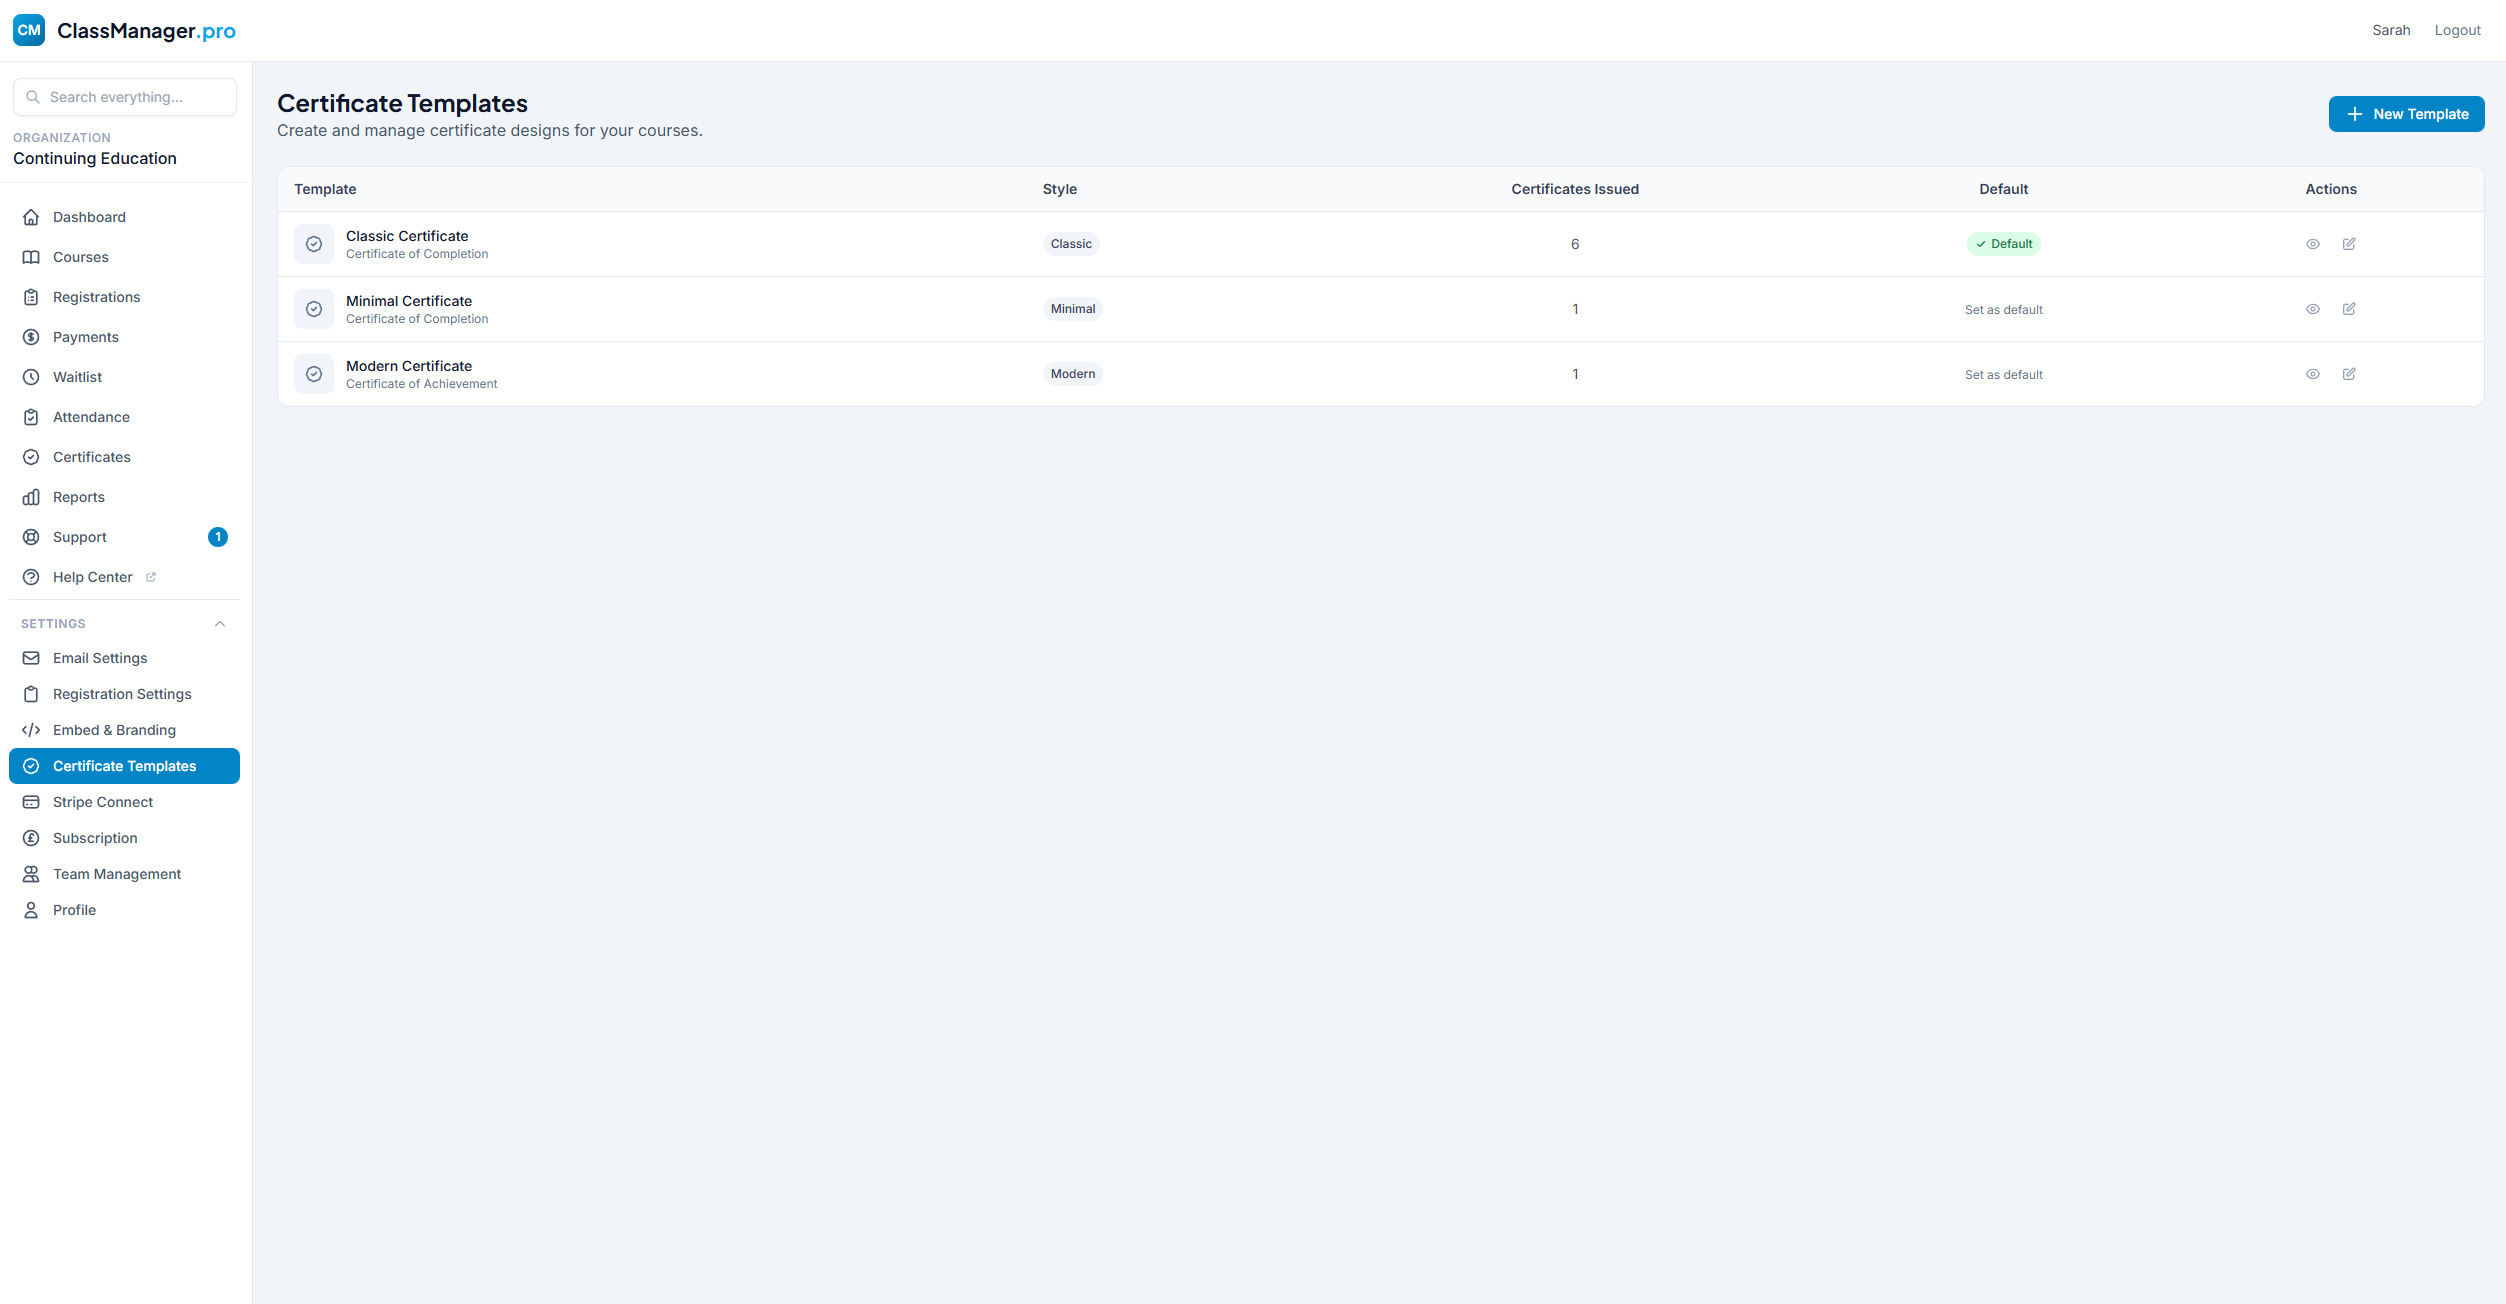
The templates list shows template name, base style (Classic/Minimal/Modern), certificates issued count, default badge, and action buttons (Preview, Edit).
Deleting Templates
Templates can only be deleted if no certificates have been issued using them. Once a certificate is issued with a template, that template is preserved for record-keeping.
Creating & Editing Templates
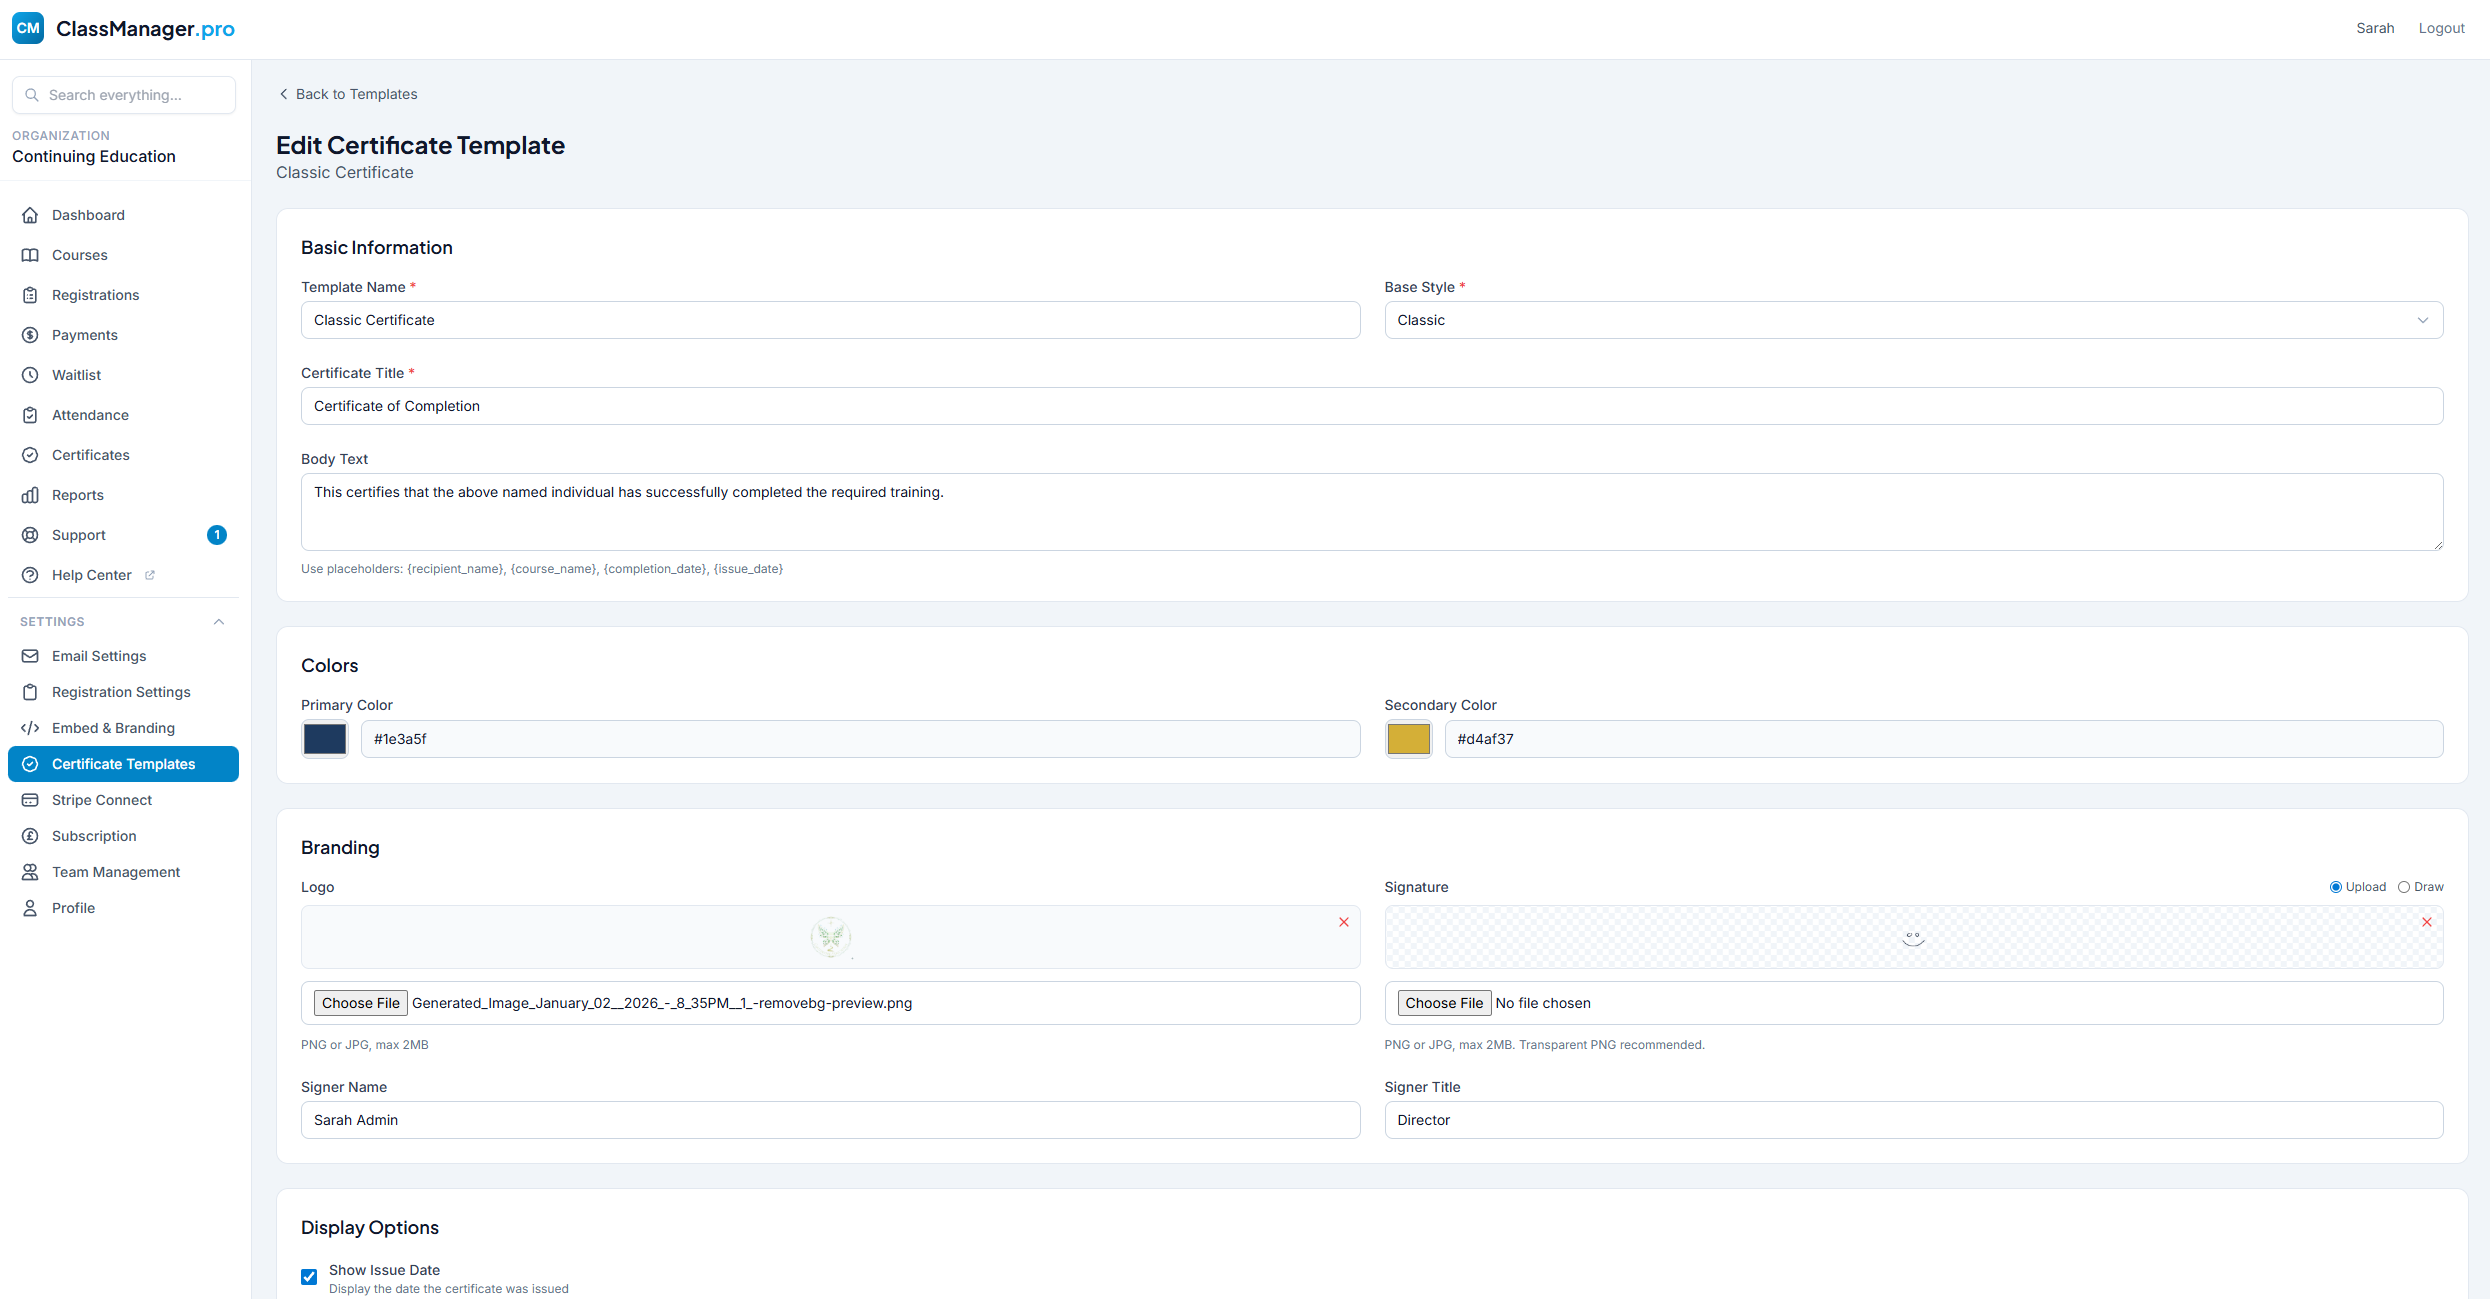
Basic Information:
- Template Name — Internal name for your reference (e.g., "Professional Development Certificate")
- Base Style — Choose a starting design: Classic (traditional), Minimal (clean), or Modern (contemporary)
- Certificate Title — The heading that appears on the certificate (e.g., "Certificate of Completion")
- Body Text — Main text with placeholders for dynamic content
Body Text Placeholders
Use these placeholders in your body text - they'll be replaced with actual data:
{recipient_name}
Student's full name
{course_name}
Name of the course
{completion_date}
Date the course was completed
{issue_date}
Date the certificate was issued
Example body text:
This is to certify that {recipient_name} has successfully completed {course_name} on {completion_date}.
Colors & Branding:
- Primary Color — Main accent color for borders and highlights
- Secondary Color — Supporting color for accents
- Organization Logo — Upload your logo (PNG or JPG)
- Signature Image — Optional signature for the certificate
- Signer Name/Title — Text displayed below the signature
Display Options:
- Show Certificate ID — Display unique certificate number
- Show QR Code — Include QR code for verification
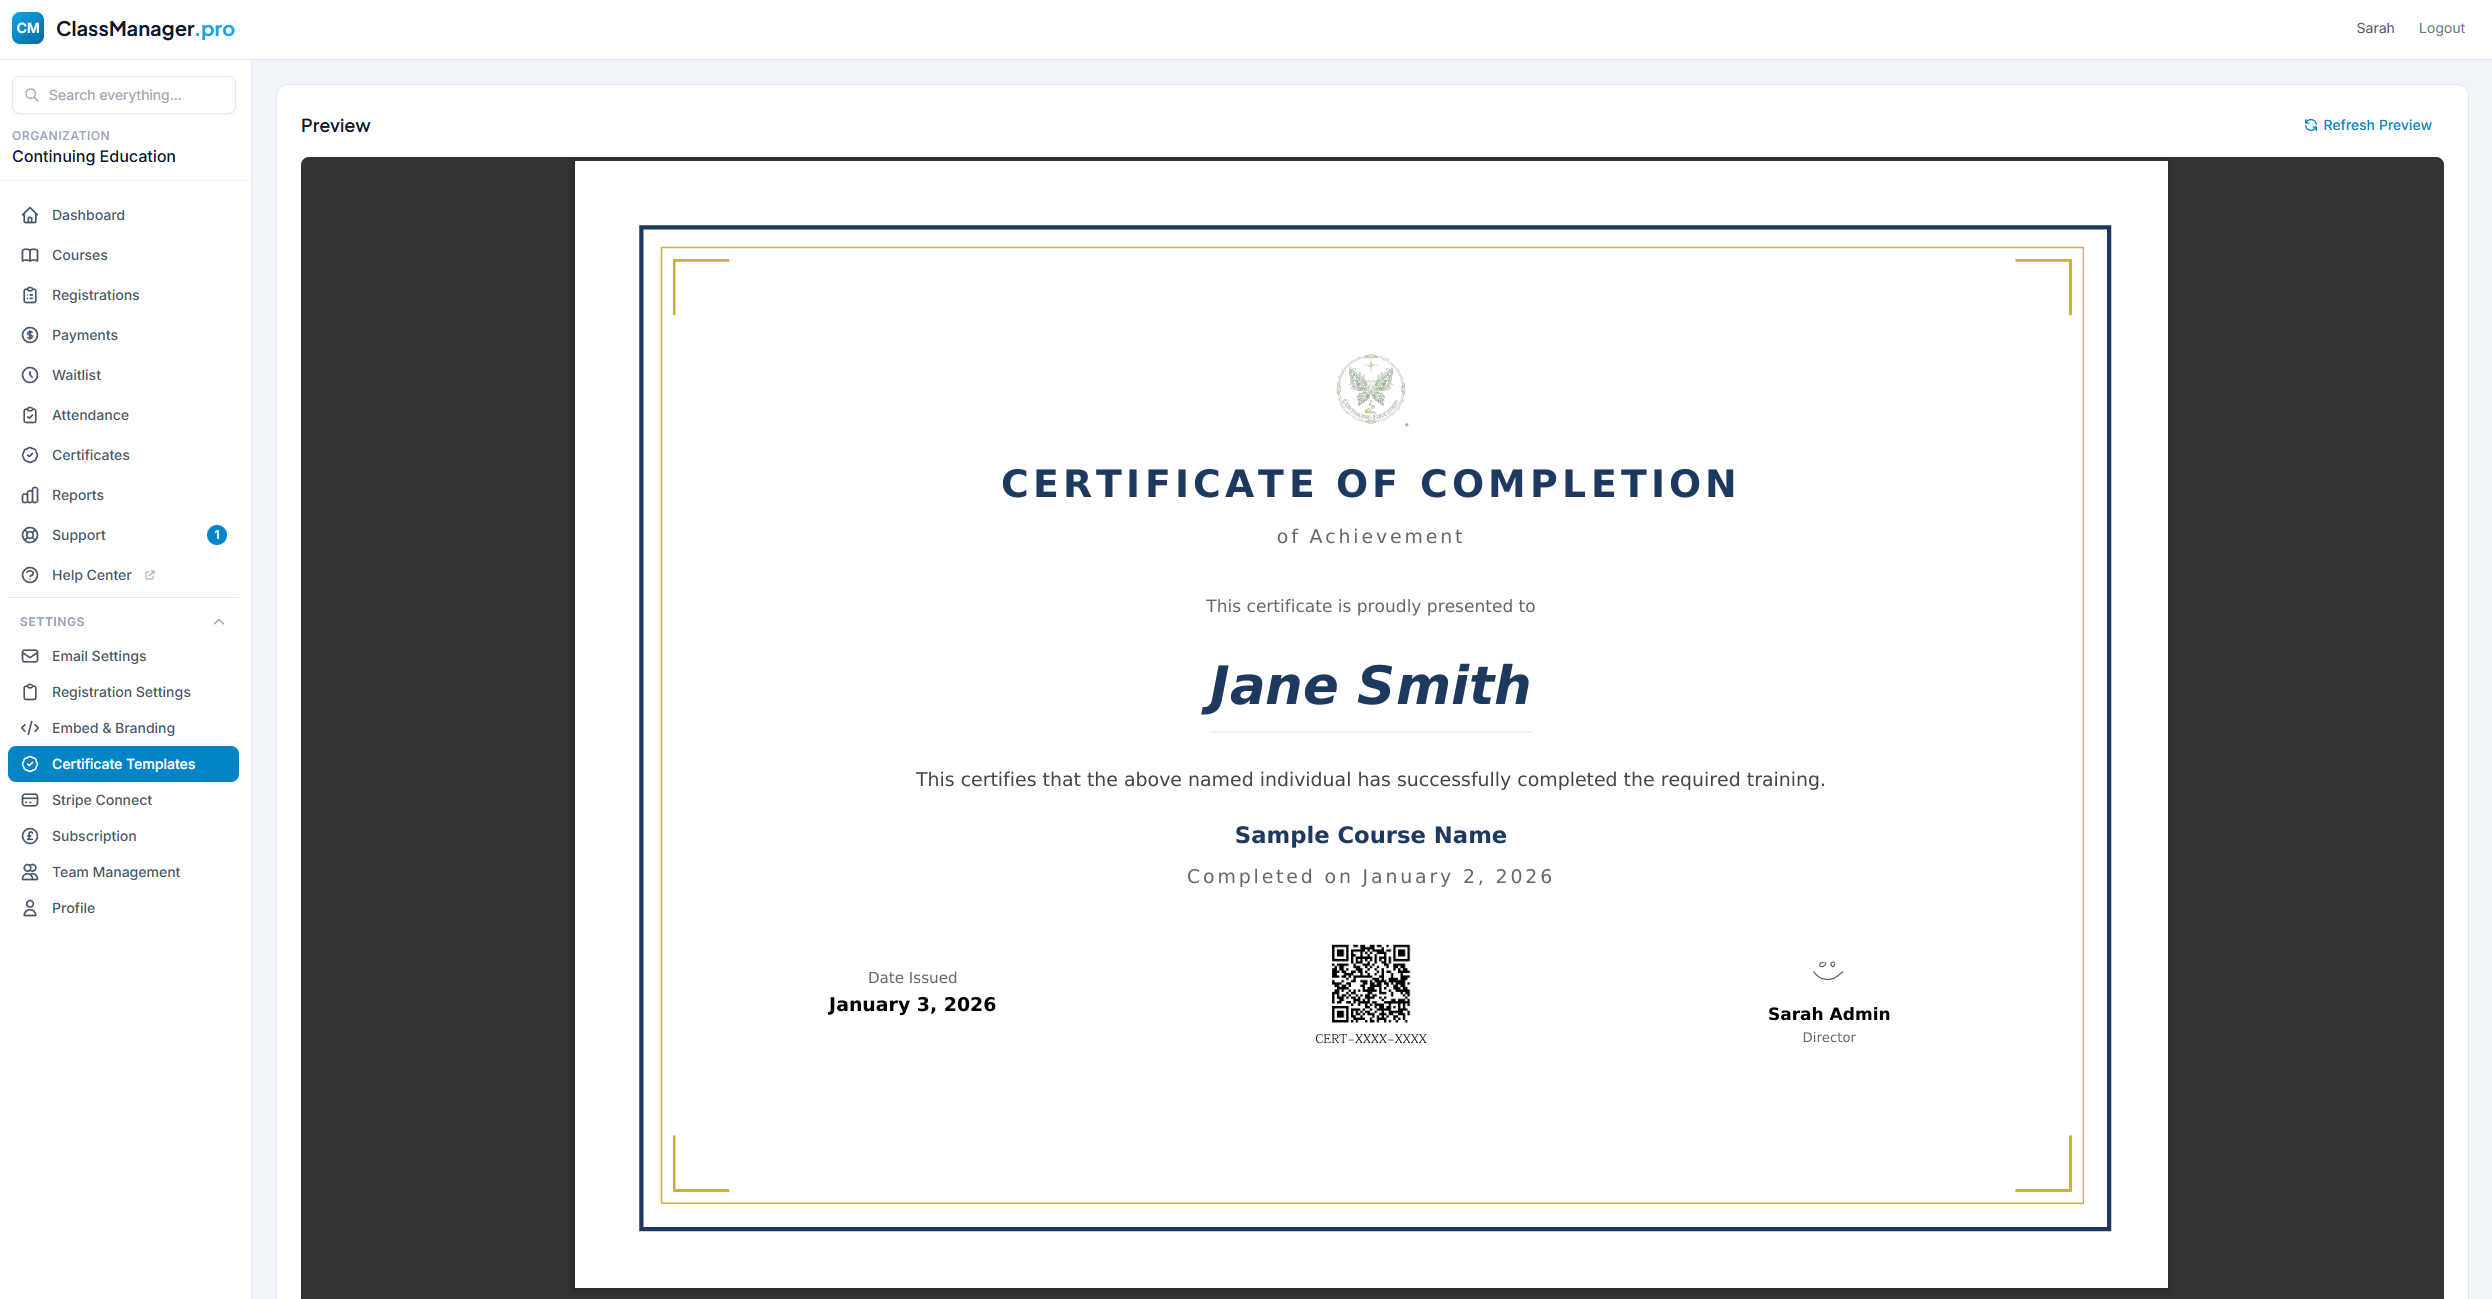
Live Preview
The editor includes a live preview that updates as you make changes. Click the "Refresh Preview" button to see your latest edits with sample data.
Stripe Connect
Connect your Stripe account or create a new one to accept payments for course registrations. Payments go directly to your account minus processing fees.
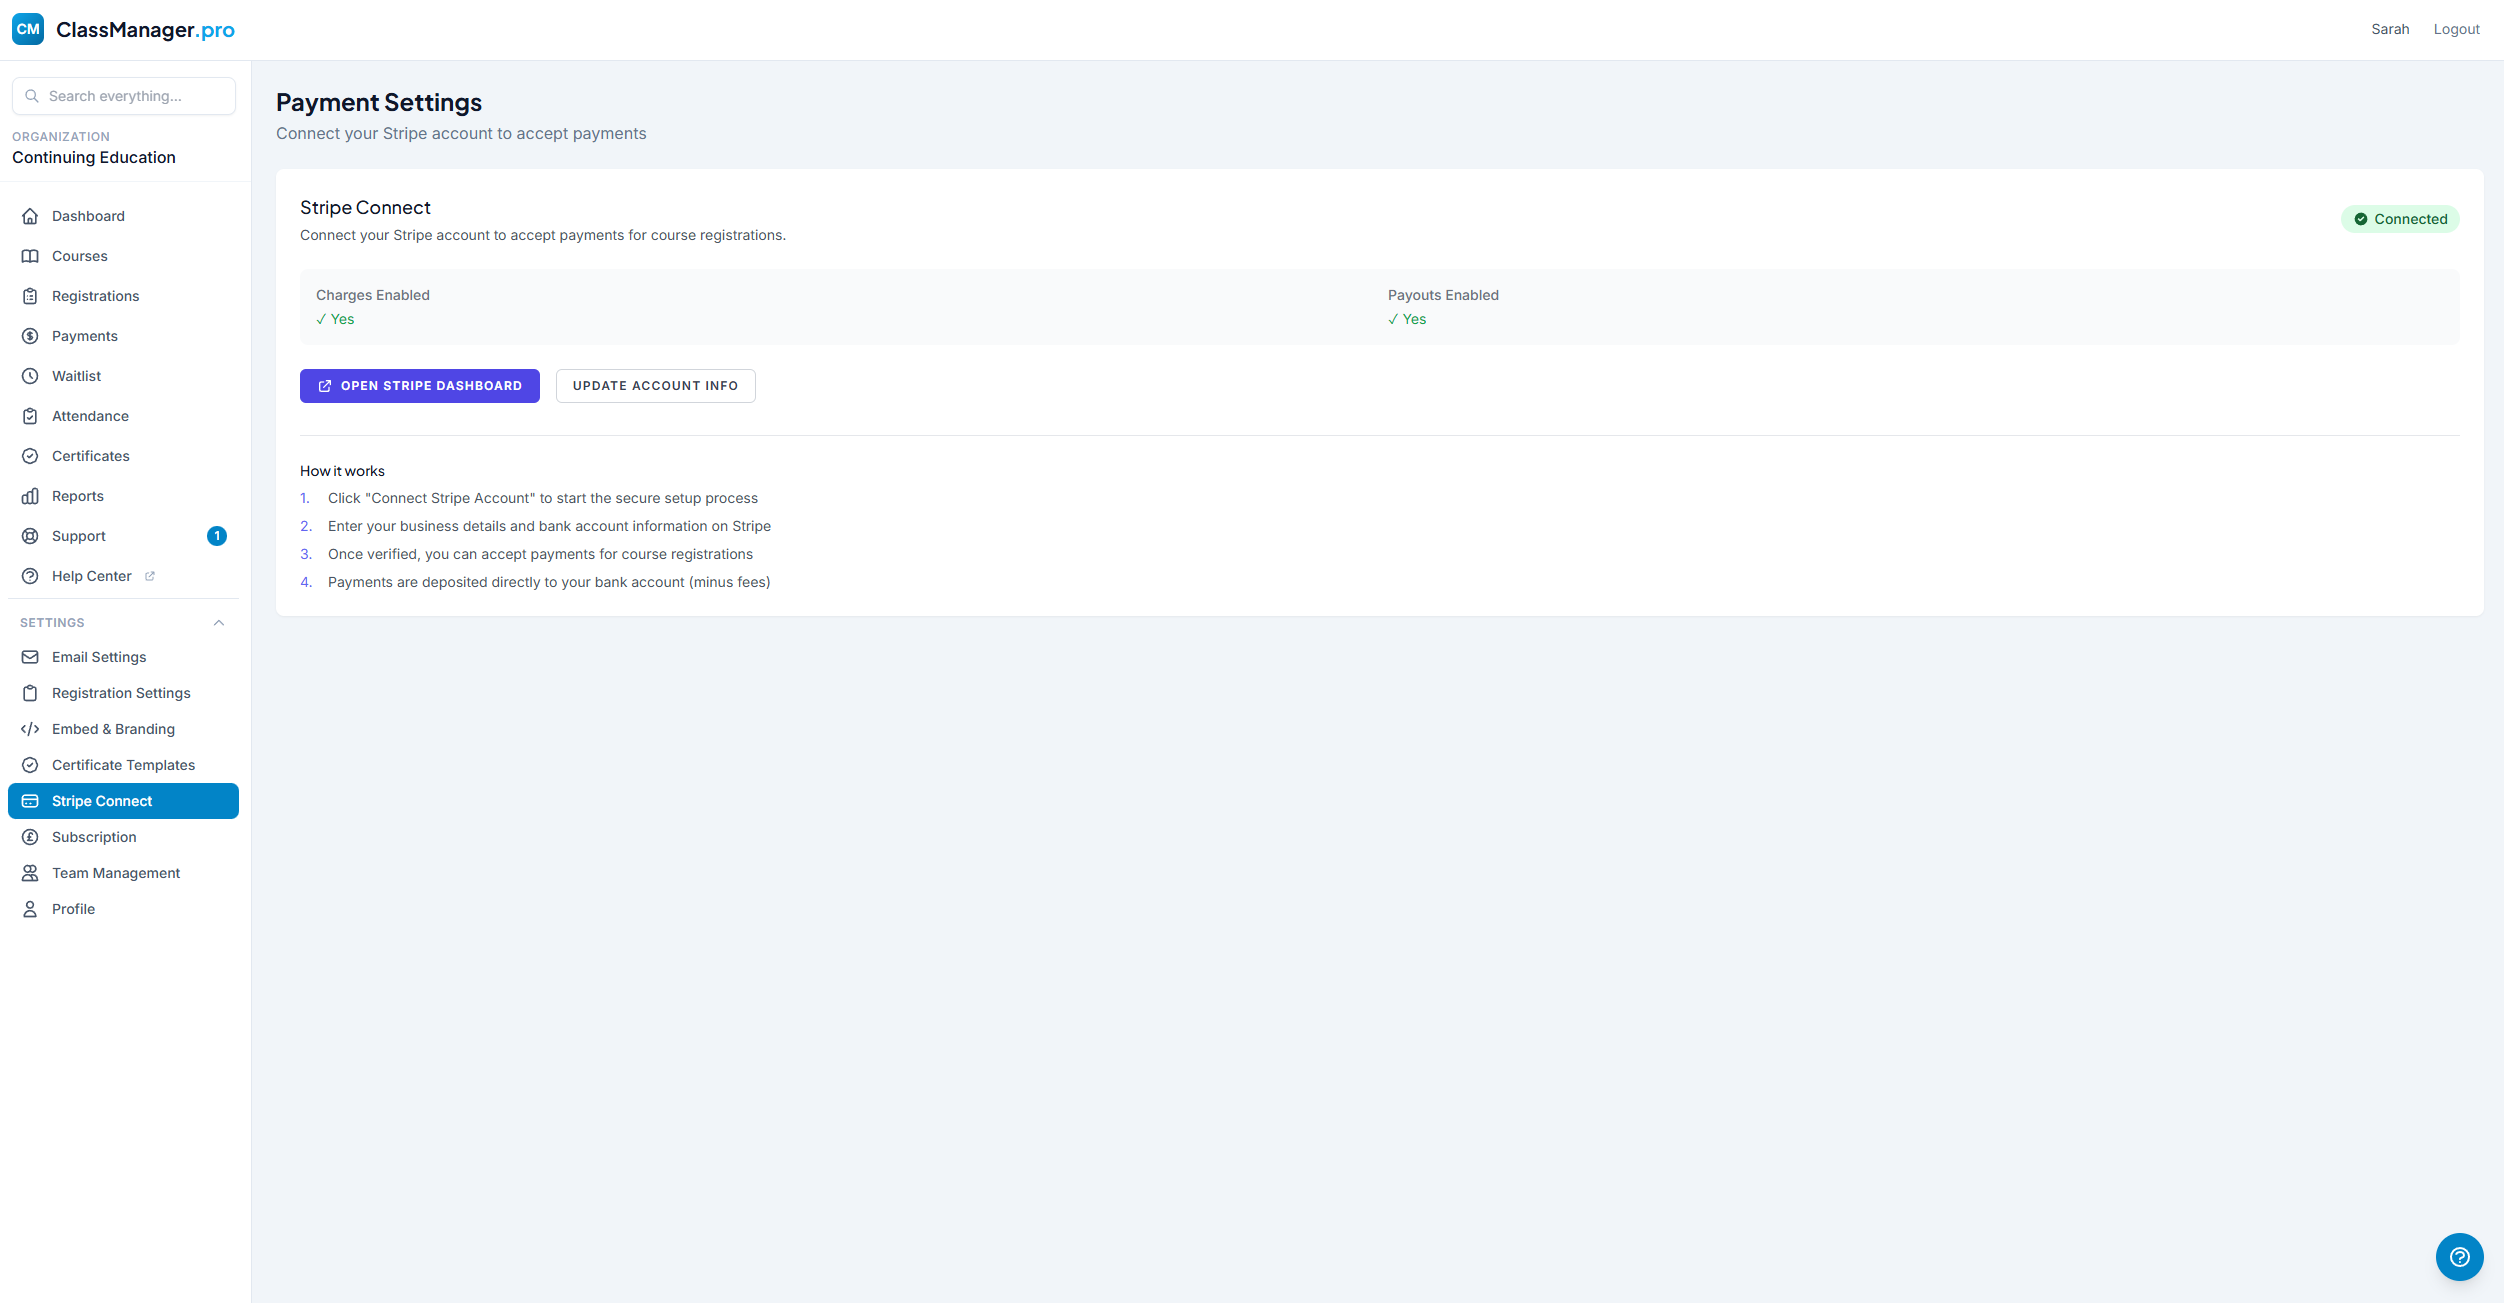
Connection Status
Connected
Your Stripe account is fully connected. Charges and payouts are enabled.
Incomplete
Stripe needs more information. Click to complete setup.
Not Connected
You haven't connected a Stripe account yet.
Connecting Your Account
How It Works:
- Click "Connect Stripe Account" to start the secure setup process
- You'll be redirected to Stripe to enter your business details
- Stripe will verify your identity and business information
- Once verified, you can accept payments immediately
- Funds are deposited to your bank account on Stripe's payout schedule (typically 2 business days)
When Connected
- Open Stripe Dashboard — View detailed payment history, manage payouts, and configure Stripe settings
- Update Account Info — If Stripe needs additional information or you need to update business details
Fee Structure
- Stripe Processing Fee — 2.9% + $0.30 per transaction (standard Stripe rate, may vary by country)
- ClassManager Platform Fee — 1.5% per transaction
Example: For a $100 registration:
- • Stripe fee: $3.20 (2.9% + $0.30)
- • Platform fee: $1.50 (1.5%)
- • You receive: $95.30
Free Courses
There are no transaction fees for free courses (price = $0). You only pay fees when you collect payment from students.
Subscription
Manage your ClassManager.pro subscription, update payment methods, and view billing history. Available to Owners only.
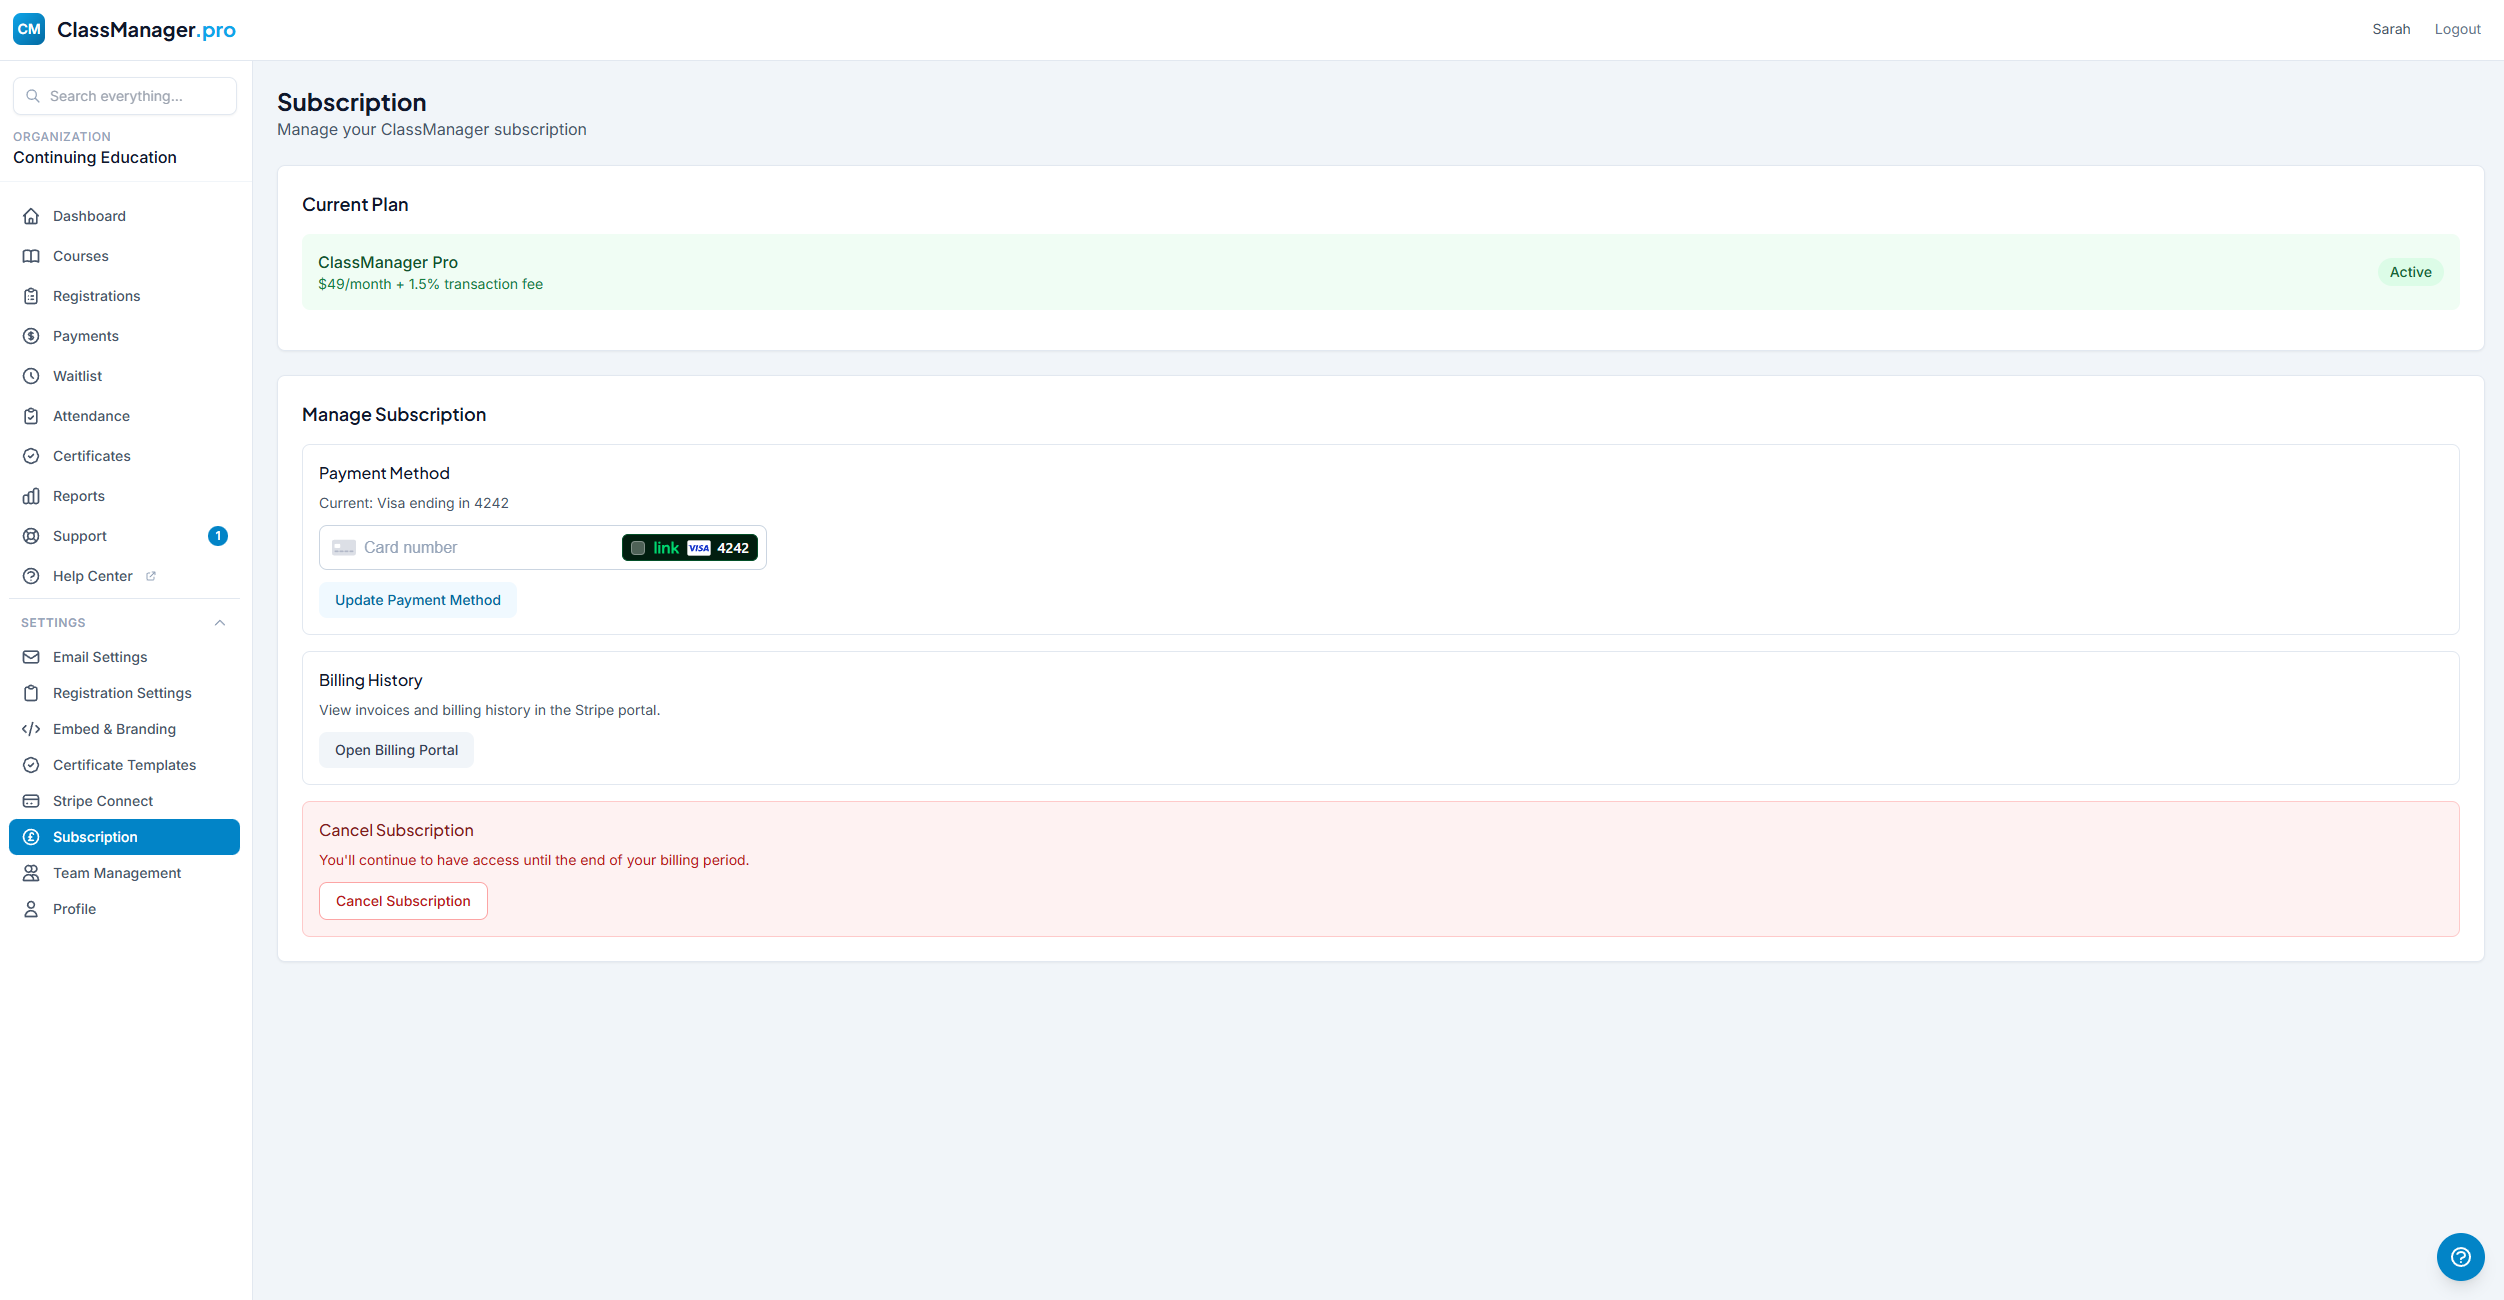
Current Plan
ClassManager Pro
Includes: Unlimited courses, unlimited registrations, embeddable calendar, custom email templates, attendance tracking & certificates, team members (up to 3 additional admins), and priority support.
Subscription Status
Active
Your subscription is active and will renew automatically.
Cancelled (Access until [date])
Your subscription has been cancelled but you have access until the end of your billing period.
Past Due
Payment failed. Please update your payment method to continue service.
Payment Method & Billing History
Click "Open Billing Portal" to open Stripe's billing portal where you can update your payment method, view all invoices, download receipts, and manage billing details.
Cancelling Your Subscription
How to Cancel:
- Scroll to the "Cancel Subscription" section at the bottom of the page
- Click "Cancel Subscription"
- Confirm the cancellation in the modal. We won't give you a hard time, and we offer a 30-day money-back guarantee.
What Happens When You Cancel
You'll retain access until the end of your current billing period. No further charges will be made. Your data is preserved if you decide to resubscribe, and you can resume your subscription at any time.
Resume Subscription
If you've cancelled but are still within your billing period, you can click "Resume Subscription" to reactivate automatic renewal.
Team Management
Invite team members to help manage your organization. Assign roles to control what each person can access. Available to Owners only.

Organization Owner
The owner has full access to everything, including billing, subscription management, and team administration. There can only be one owner per organization, and ownership cannot be transferred.
Team Roles
Role Comparison
| Permission | Owner | Manager | Assistant |
|---|---|---|---|
| View Dashboard & Courses | ✓ | ✓ | ✓ |
| Create/Edit Courses | ✓ | ✓ | — |
| Registrations, Waitlist, Attendance, Certificates, Reports | ✓ | ✓ | ✓ |
| View Payments & Process Refunds | ✓ | ✓ | — |
| Access Settings | ✓ | ✓ | — |
| Manage Team & Billing | ✓ | — | — |
Inviting Team Members
How to Invite:
- Enter the team member's email address
- Select a role: Manager or Assistant
- Click "Send Invite"
- They'll receive an email with instructions to accept the invitation
Managing Your Team
Member Statuses:
Member has accepted the invitation and can access the organization
Invitation sent but not yet accepted (shows expiry countdown)
Member has been deactivated but not removed
Team Actions: Resend Invitation (if expired), Cancel Invitation (revoke pending), Remove Member (immediate access loss), or Reactivate Member (restore access).
Subscription Limits
For transparency and ease-of-use, everyone has the same subscription limits and pricing. ClassManager restricts add-on admins to 3.
Need More Help?
If you have questions that weren't answered here, our support team is ready to help you succeed.